Ship It!
Is it not amazing? In almost no time we have programmed a microcontroller to send data to Azure where that data is picked up and sent to a Redis server. We then wrote a realtime service that is able to update clients in well, real time! But we ran the service and client on our local machine. Let's now run this service in the public cloud. There are many ways to do this but we will do the following:
- Package the service as a Docker container
- Run the container on Azure
Seems difficult? I assure you it is not.
Creating the container
Before we create a container, make a small change to package.json:
{
  "name": "socket",
  "version": "1.0.0",
  "description": "",
  "main": "index.js",
  "scripts": {
    "test": "echo \"Error: no test specified\" && exit 1",
    "start": "node index.js"
  },
  "author": "",
  "license": "ISC",
  "dependencies": {
    "express": "^4.15.2",
    "path": "^0.12.7",
    "redis": "^2.7.1",
    "socket.io": "^1.7.3"
  }
}
A line was added to the scripts section that runs our program by issuing the npm start command. That is not required but often used as a best practice. Try it and use npm start on the command prompt. It will execute node index.js and run the realtime service as usual.
It will be a tad difficult to work with Docker containers without Docker on your machine. So head off to their website and install it.
Now let's turn to building the container and keep it as concise as possible. Although there are several ways to build a container, you should use a Dockerfile in most cases. A Dockerfile controls how a container is built with the docker build command. Add the following Dockerfile to the folder that contains the code:
FROM node:alpine
MAINTAINER <your_name_here>


# create app directory
RUN mkdir -p /usr/src/app
WORKDIR /usr/src/app

# install dependencies
COPY package.json /usr/src/app
RUN npm install

# copy app sources
COPY index.js /usr/src/app
COPY index.html /usr/src/app

# expose not really needed here
EXPOSE 8888
CMD ["npm", "start"]
We start from an existing image that can run Node.js applications and that is based on Alpine Linux. Using this image will result in a relatively small image of around 60MB. We then run several commands in the container to create a new folder, copy package.json, run npm install to install the packages referenced in package.json and finally we copy our index.js and index.html files.
The last two commands expose the port our server runs on and we set the command to run when the container starts to npm start. Note that it is not a best practice to statically set the port. You should use an environment variable instead.
Now the container can be built with the following command run from the folder that contains your Dockerfile:
docker build -t rt .
Note that the . is important for the docker build command to pick up the Dockerfile from the current folder. All sorts of messages will appear on screen. If you have never used the image node/alpine it will be downloaded. Next, the Dockerfile is processed and you will see the output of the commands. If everything went well, there will be an image with tag rt (-t used to set a tag). The tag is chosen by you and is a name you use to reference the image later.
To check for the image, use the following command:
docker images rt
The above command should show the image in a list with additional information such as the image ID and its size. Now an actual container can be started from this image with the following command:
docker run -d -p 8888:8888 --name=realtime rt
The above command runs the process in the background with -d and maps the container port 8888 to your host's port 8888. To easily reference this container, the name realtime is given. Note that realtime is the container name, where rt is the name of the image this container is using. The last parameter tells Docker to use the rt image to start this container from. Now run the following command:
docker ps
The running container will be shown. But how can we see its output? The Node.js application logs output to standard out. To see that output, use the following command:
docker attach realtime
Since the realtime service is now running in a container and available to your host on port 8888, navigate to http://localhost:8888 to run the socket.io client just as before (make sure that the service is not running on your host outside the container). Now that your application is packaged in a container, you can think of running the realtime service anywhere you can run Docker containers. In the next sections, we will actually do that and run the realtime service on Azure. But first a small detour to upload our image to a registry.
Azure Container Registry
We created and tested our container locally. When planning to use containers with Azure Container Service or other solutions, images should be placed in a container registry. A container registry can be deployed by yourself or you can select one of the container registry services in the cloud. In fact, Docker provides a registry with Docker Hub (https://hub.docker.com) that is free to use for public repositories. A repository is where you store an image. If you want private repositories, only accessible by yourself or team members, there is a paying option. To upload an image to a repository, tag the image with your Docker Hub account name and the name of the image like so: accountname/imagename (e.g. gbaeke/rt). To tag and upload the image you would then use:
docker tag <image_id> gbaeke/rt

docker push gbaeke/rt
Automatically, when you use the above command, the docker tool knows you want to push the image to the Docker registry because there are no dots (.) in the name preceding the slash (/). The name of the repository will be rt.
To mix things up a bit and because this book focuses on Azure, you will use Azure Container Registry (ACR) instead of Docker Hub. ACR itself is free but you do need to pay for storage and bandwidth as discussed here: https://azure.microsoft.com/en-us/pricing/details/container-registry/.
The following commands create a registry in West Europe (make sure you use the latest version of Azure CLI 2.0 that has support for ACR).Replace <acr-name> and <acr-rg> with names of your choosing. You can of course use an existing resource group instead of creating a new one:
az group create -n <acr-rg> -l westeurope

az acr create -n <acr-name> -g <acr-rg> -l westeurope --sku Basic

az acr update -n <acr-name> --admin-enabled true
The last command enables admin mode. In that mode, you can logon to your registry with the name of the registry as the username and a password. But what's the password? Run this command:
az acr credential show -n <acr-name>
You will see two complex passwords in the output of the above command. I just use the first one. To actually configure your docker command line tool to authenticate with these credentials, use the command below:
docker login <acr-name>.azurecr.io
You will be asked for the username and password. As you can see, the address of the Azure Container Registry you created is the registry name followed by azurecr.io.
Next, we want to upload our rt image to the registry. To do so, first tag the image appropriately:
docker tag imageid <acr-name>.azurecr.io/rt
When you put the fully qualified domain name of the registry in front of the /, the docker tool will know where to upload the image when you use the docker push command. Now let's push the image to ACR:
docker push <acr-name>.azurecr.io/rt
If all went well, you will have a repository called rt, in your registry. Check it with:
az acr repository list -n <acr-name>
Depending on how you have configured the default output format of the Azure CLI 2.0, you should see rt listed. If the output is JSON, you will see an array:
[
  "rt"
]
You now have an image with the realtime server up in an Azure Container Registry. Now when we deploy an orchestrator like Kubernetes, DC/OS or Swarm or use any other tool, we can refer to this registry to run containers based on images within it.
Run the container in the cloud
Now that we have a working container that we tested on our local machine and we have the image of the container in an Azure Container Registry, it is time to deploy the container to Azure.
There are multiple ways to deploy a container to Azure. In general, if you use containers heavily, you should use an orchestrator like Kubernetes, DC/OS or Docker Swarm. Azure Container Service (ACS) allows you to do that. To keep it simple though, we will deploy our container to Azure's App Service. The Linux variant of Azure App Service can host a custom container.
First create an App Service plan (I will use names of my choosing here; use your own names instead of rtweb-rg, rtplan and iot-rtweb):
az group create --name rtweb-rg --location westeurope

az appservice plan create -g rtweb-rg -n rtplan --is-linux --sku B1
The last command creates an App Service plan in pricing tier B1 (the lowest for Linux). Think of an App Service plan as the collection of physical resources to host your apps. You can run multiple types of apps in a single plan like Web Apps, Mobile Apps, API Apps or Function Apps. With the B1 plan, there is a maximum of three workers. For more information, see https://azure.microsoft.com/en-us/pricing/details/app-service/. Note that there is a cost involved here but that you can use the same plan to host many applications.
At this moment, there is nothing running in the plan. Let's add a web app to the plan:
az appservice web create -g rtweb-rg -p rtplan -n iot-rtweb
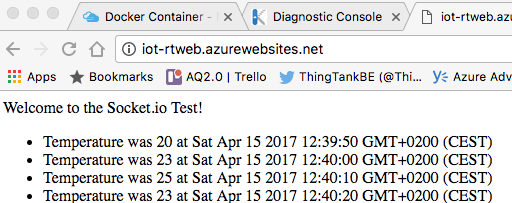
Now you have a web app called iot-rtweb that is accessible with the name http://iot-rtweb.azurewebsites.net. It should be clear that the name you choose must be unique so you probably will need to use something else. You can of course use a custom domain name for the app but we will not do that here.
Now deploy a container to the web app. Yes, you can do that right from the az command!
az appservice web config container update -n iot-rtweb -g rtweb-rg -r <acr-name>.azurecr.io \
    -c <acr-name>.azurecr.io/rt -u <acr-name> -p <password>
Replace <password> with the password to the registry you created earlier and <acr-name> with the name of your registry. Unlike the docker command line tool, you need to specify the server with the -r option. The server name is not derived from the repository name.
The container is now deployed and you can try to browse to it with http:/iot-rtweb.azurewebsites.net:8888. Well, I said "try" didn't I? As you have probably noticed, it is not working. The easiest way to solve this is to set the PORT application setting in the App settings. We will not do that however and change our code a bit. Find the following line:
var port = 8888;
Change it to:
var port = process.env.PORT||8888;
This will set the port the program uses to the value in the PORT environment variable or 8888 if that variable does not exist. In App Service, the default value for PORT is 80. Let's also update the CORS settings in the program. Change the following line
var io = require('socket.io')(server, { origins: 'localhost:8888'});
and change it to:
var io = require('socket.io')(server, { origins: '*:*'});

or

var io = require('socket.io')(server, { origins: 'iot-rtweb.azurewebsites.net:80'});
In the Dockerfile, you can also remove the line that contains EXPOSE.
Now we need to update our image in Azure Container Registry and update the container in Azure App Service. This is pretty annoying since it is all manual work. In a later chapter, we will automate this though. For now use the following commands to build and test the image on your local machine (from the folder that contains the Dockerfile):
docker stop realtime

docker rm realtime

docker build -t <acr-name>.azurecr.io/rt .

docker run -d -e PORT=80 -p 80:80 --name realtime <acr-name>.azurecr.io/rt
The last command sets the environment variable PORT in the container to 80 so our Node.js program can use that. You should now be able to connect to http://localhost to check if the realtime service works.
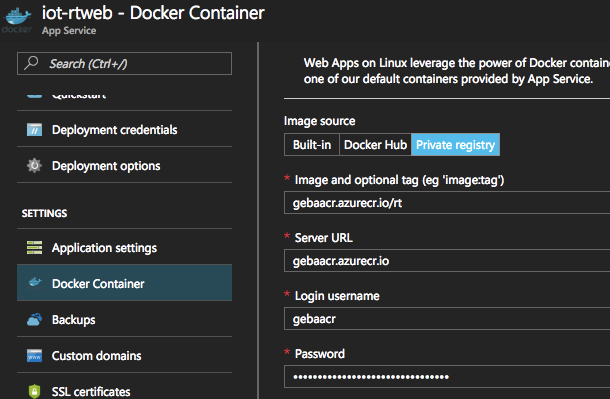
You should now update the container in App Service with the same command as before:
az appservice web config container update -n iot-rtweb -g rtweb-rg -r <acr-name>.azurecr.io \
    -c <acr-name>.azurecr.io/rt -u <acr-name> -p <password>
In App Service, verify that the Docker Container is properly set.
If everything went well, you should be able to connect to the URL of this App Service: