Particle Photon
In this section, we will cover the basics of writing a simple sketch for the Particle Photon that sends events to the Particle Cloud. I covered this topic on my blog in late 2016. When you send events to the Particle Cloud, they are not stored there. It is up to you to do something with the events. In our case, we will forward the events to Azure IoT Hub.
What do you need to follow along?
- A Particle Photon of course; I ordered mine in Belgium from Antratek
- A free account for the Particle Cloud so you can access the IDE and the Console
- IDE: https://build.particle.io/build
- Console: https://console.particle.io/
Naturally, the IDE is where you write the software for your Photon and you will get to do that in just a second. The console will be used to configure the integration with Azure IoT Hub. Particle also supports Webhooks and Google Cloud Platform.
I am not going to cover how to configure the device so that you can flash it over the air. That is described very well in the Particle Docs and summarized in IoT with Particle: a smooth experience. By the way, did I mention you can also use the Particle Cloud from a Raspberry Pi? Well, you can but it is still in Beta though. So if you have a Raspberry Pi lying around, just use that. If it's already running Raspbian, you are all set!
So let's write the sketch using the Particle IDE. We will not use a sensor here and just send a random value (within a range) from the device to the Particle Cloud. With a little help from Particle functions and variables, you will be able to control the minimum and maximum boundaries of the range.
int t;

int vmin = 20;
int vmax = 30;

void setup() {
    // min and max should be Particle variables
    Particle.variable("vmin", &vmin, INT);
    Particle.variable("vmax", &vmax, INT);

    // functions to set vmin and vmax
    Particle.function("setvmax", setVmax);
    Particle.function("setvmin", setVmin);
}

void loop() {
    // generate a random value between 20 and 30 to Particle Cloud
    t = random(vmin,vmax);

    // publish this event
    Particle.publish("temperature", String(t), 60, PRIVATE);

    // sleep 10 seconds
    delay(10000);

}

int setVmax(String command) {
    vmax=command.toInt();
    return vmax;
}

int setVmin(String command) {
    vmin=command.toInt();
    return vmin;
}
In the IDE, this looks like this:

With the Flash button, the sketch is sent to the device and the device is rebooted. When the device comes up, it starts sending random values between 20 and 30 to the Particle Cloud. That can be checked using the Particle Console as shown below: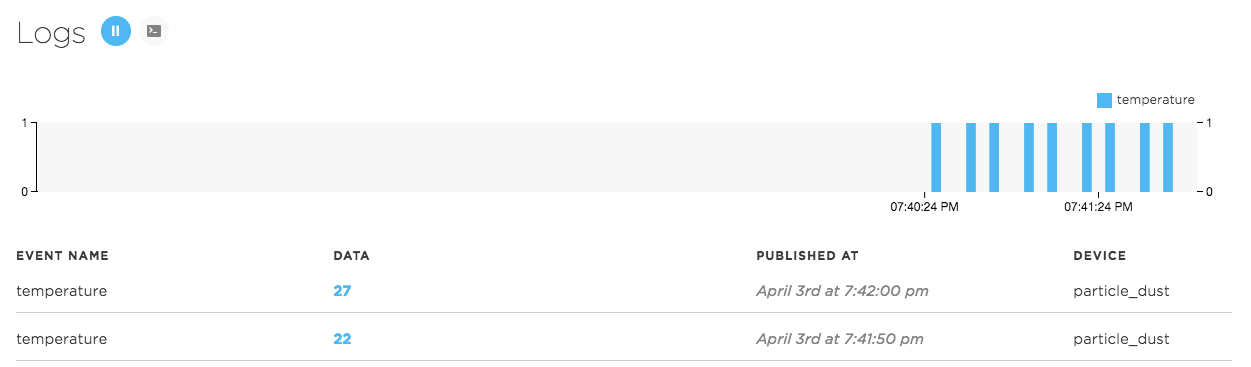
The call to Particle.publish is sending the events. The data in the event is of type String and it is up to the developer to format the data as she sees fit. Although JSON is a popular format, there are circumstances where a binary format would make more sense. In this case, the event is set as PRIVATE which only allows the owner of the device to subscribe to these events. It is possible to set the events as PUBLIC (default) which allows anyone to subscribe to the events.
You do not have to use the Console to see the stream of data. If you are so inclined, you can use cURL as well like so:
curl https://api.particle.io/v1/devices/events?access_token=<your access token>
The access token can be obtained from the Logs screen if you click the Terminal icon (next to the pause/play button).
The functions and variables defined in the sketch can be used to query the vmin and vmax variables in the code and to set vmin and vmax as well. The easiest way to do this is via the My Devices screen as shown below.
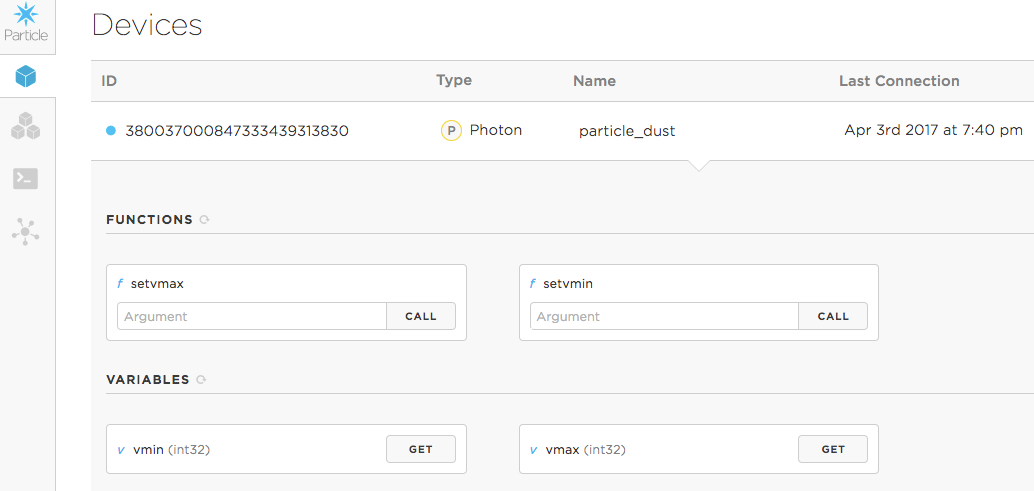
Although a Particle function is defined on the device, it is supposed to be called from the cloud. The interface above provides a nice front-end to the functions you define but you can just as well call the function by doing a HTTP POST. With cURL that would be something like:
curl https://api.particle.io/v1/devices/<deviceid>/<funcname> \
     -d access_token=<your_access_token> \
     -d "args=<your_argument_as string"
In our example sketch, you can set the vmin and vmax boundaries to have the device return random values in a different range.
The Particle variables are useful to retrieve values from the device. In our case, the variables can be used to query the vmin and vmax boundaries. With cURL, you can obtain these values as well:
curl https://api.particle.io/v1/devices/<deviceid>/<variable_name>?access_token=<your_access_token>