Redis
Redis is a popular open source in-memory data structure store, used as a database, cache and message broker (for Pub/Sub). You choose the data structures to store in Redis. In our case, we will store simple strings that holds JSON received from IoT Hub. Redis is often used as the backbone of pub/sub systems. Pusher for example, a Pub/Sub service, uses Redis extensively.
Azure Redis Cache is a fully managed hosted Redis service and we will deploy it with Azure CLI 2.0.
Let's first create a resource group that will hold our Redis deployment.
az group create -l westeurope -n <resource_group_name>
Note that I used shorter arguments -l and -n for location and resource group name instead of --location and --name. Next, create the Redis server in the resource group you just created.
az redis create -g <resource_group_name> --sku-capacity 0 --sku-family C --sku-name Basic --debug \
    -n <name_for_Redis> -l westeurope
This time, the --debug parameter was used to get detailed debugging output when you run az commands. The command above deploys Azure Redis Cache in the Basic tier which provides no SLA. The Basic tier uses single nodes and are useful for testing only. The C0 size (family C and capacity 0) allows for 250MB of cache with low performance on shared infrastructure. At the time of writing, C0 cost 13,8 euros per month. The above command will start a deployment and then return. Give it some time and then check for a successful deployment with:
az redis show --name <name_for_Redis> -g <resource_group_name>
The above command will return a bunch of JSON: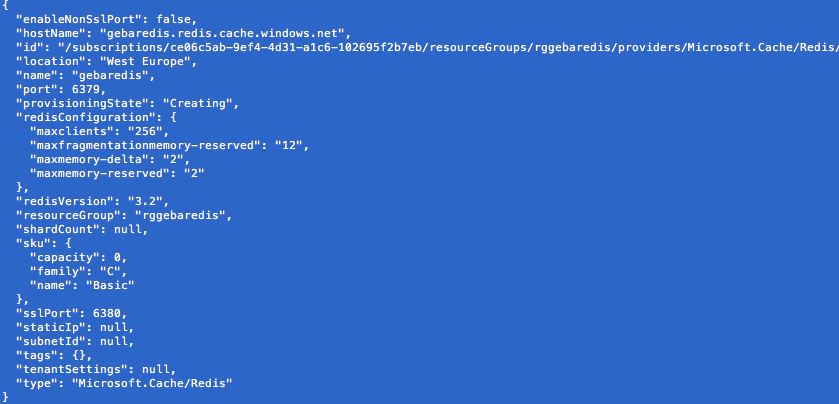 Above, the provisioningState is still Creating. When it is set to Succeeded you can start working with the Redis server.
Sending data to Redis channels
Redis can be used in different ways and we will use its publish/subscribe (Pub/Sub) functionality. With Pub/Sub, data from our device is sent to a channel. The channel does not need to be created beforehand. It gets created dynamically when you publish a message for the first time. Clients that are interested in the data in the channel, subscribe to it. Let's see how we can publish data to some Redis channels with a very simple Node.js application:
var client=require("redis").createClient(6380, "<Name_of_Redis>.redis.cache.windows.net",
    {auth_pass: '<Auth_Pass>',
     tls: {servername:  '<Name_of_Redis>.redis.cache.windows.net'}});

client.on('error', function(err) {
    console.log('Error occurred: ' + err);
})

setInterval( function() {
    console.log("Publishing to 4 channels...");
    client.publish("device1", Math.random() * 40);
    client.publish("device2", Math.random() * 40);
    client.publish("device3", Math.random() * 40);
    client.publish("device4", Math.random() * 40);
}, 1000);
Azure Redis Cache uses SSL by default although you can enable an unsecured port. We will use the secure port 6380 which is also listed in the earlier JSON output as sslPort. The full name of the Redis server is the hostName field in the JSON output. But how do you obtain that <Auth_Pass>? Just use the command below to list the keys you can use:
az redis list-keys -g <resource_group_name> --name <Name_of_Redis>
Make sure you update the above JavaScript code with the correct name of your Redis server and the key. Then save the file as redis-pub.js in a new folder. From a command prompt, navigate to that folder and use the following commands:
npm install redis

node redis-pub.js
The first command installs the redis module as it is required by the code. The second command runs the JavaScript code which publishes a random value to four channels every second. As explained earlier, the channels are not created beforehand. They are created automatically during the call to client.publish.
Reading values from Redis
Now, let's read these values back with a subscriber. Use the following code:
var subscriber=require("redis").createClient(6380, "<Name_of_Redis>.redis.cache.windows.net",
{auth_pass: '<Auth_Pass>',
tls: {servername: '<Name_of_Redis>.redis.cache.windows.net'}});
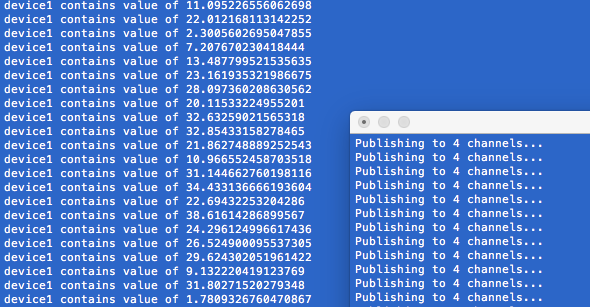
subscriber.on("message", function(channel, message) {
console.log(channel + " contains value of " + message);
});
subscriber.subscribe("device1")
Save the above file as redis-sub.js, with the name of your Redis server and key filled in, and put it in the same folder as redis-pub.js. Now open two consoles and run redis-pub.js in one console and redis-sub.js in the other. Whenever a publish happens, you will notice that redis-sub.js immediately picks this up. Note that the subscriber is only interested in the device1 channel in this case. Subscribers can subscribe to multiple channels by listing them all or by using a pattern subscribe.
Great! You have now successfully deployed a Redis server and you have used the Redis Pub/Sub functionality to publish messages to Redis and read them back. Now it is time to push our Particle event data to Redis and we will use an Azure Function to achieve that.