Infrastructure as Code
Throughout this book, Azure resources were deployed imperatively using Azure CLI 2.0 or the Azure Portal. In Azure, resources can also be deployed declaratively using Azure Resource Manager (ARM) templates.
Prepare your tools
ARM templates are just text files that contain JSON. Although you can write templates with any editor, I strongly recommend using Visual Studio Code in combination with the Azure Resource Manager Tools.
First, download Visual Studio Code (VS Code) for your platform from https://code.visualstudio.com. It is available for Windows, Mac and Linux. Next, open VS Code, press Ctrl-P and type:
ext install msazurermtools.azurerm-vscode-tools
The extension will be shown in a list. Install it and restart VS Code or click the Reload button.

Create a starter template
There are many ways to get started with ARM templates. Some first deploy a resource in Azure and then use the Automation script link to see the template and download it:
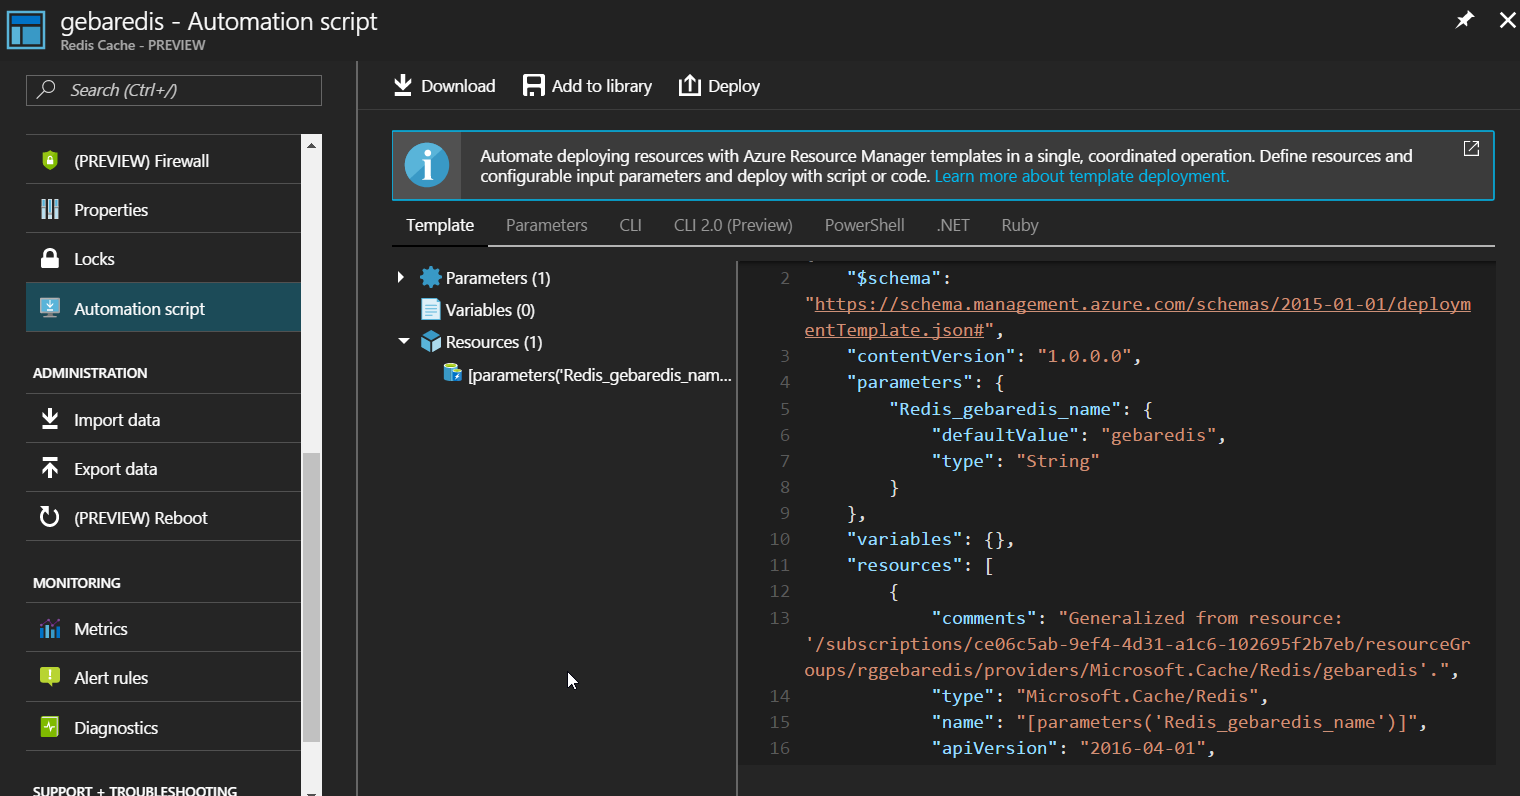
I prefer starting from scratch and then adding sections as needed. You can find a blank template below:
{
  "$schema": "http://schema.management.azure.com/schemas/2015-01-01/deploymentTemplate.json#",
  "contentVersion": "1.0.0.0",
  "parameters": {  },
  "variables": {  },
  "resources": [  ],
  "outputs": {  }
}
In some scenarios, for complex resource types, you can of course deploy the resource with the Azure Portal to see how you should structure your JSON properly.
Adding resources
Resources are at the core of Azure Resource Manager and represent entities you can deploy such as a storage account, an IoT Hub, a Redis Cache and most other resources. One of the easiest ways to find out about resources and the syntax to follow is via https://docs.microsoft.com/en-us/azure/templates/. Let's head over there and find out how we can deploy a Redis Cache. The template reference is here: https://docs.microsoft.com/en-us/azure/templates/microsoft.cache/redis. I have chosen Redis Cache because it is a simple template and we have already deployed and used Redis in this book imperatively with Azure CLI 2.0 commands.
Create a new folder on your file system and open VS Code in that folder (type code . from the command prompt to quickly do that). From within VS Code, add a file called azureDeploy-redis.json.
Copy the blank template text into the file to get started. In the resources array, copy the Redis Cache template reference. Because of the ARM extension, VS Code provides help where needed. Your template should like like the code below:
{
    "$schema": "http://schema.management.azure.com/schemas/2015-01-01/deploymentTemplate.json#",
    "contentVersion": "1.0.0.0",
    "parameters": {},
    "variables": {},
    "resources": [
        {
            "name": "string",
            "type": "Microsoft.Cache/Redis",
            "apiVersion": "2016-04-01",
            "location": "string",
            "tags": {},
            "properties": {
                "redisConfiguration": {},
                "enableNonSslPort": boolean,
                "tenantSettings": {},
                "shardCount": "integer",
                "subnetId": "string",
                "staticIP": "string",
                "sku": {
                    "name": "string",
                    "family": "string",
                    "capacity": "integer"
                }
            },
            "resources": []
        }
    ],
    "outputs": {}
}
The Redis Cache template reference web page contains information about the values you need to set and which ones are optional. We will set a name for the Redis Cache and define its location first. We will also remove fields we do not need so the file looks like:
{
    "$schema": "http://schema.management.azure.com/schemas/2015-01-01/deploymentTemplate.json#",
    "contentVersion": "1.0.0.0",
    "parameters": {},
    "variables": {},
    "resources": [
        {
            "name": "gebaredis2",
            "type": "Microsoft.Cache/Redis",
            "apiVersion": "2016-04-01",
            "location": "[resourceGroup().location]",
            "properties": {
                "redisConfiguration": {},
                "enableNonSslPort": boolean,
                "tenantSettings": {},
                "shardCount": "integer",
                "subnetId": "string",
                "staticIP": "string",
                "sku": {
                    "name": "string",
                    "family": "string",
                    "capacity": "integer"
                }
            }
        }
    ],
    "outputs": {}
}
We set the name to gebaredis2 and we used a Resource Manager template function to retrieve the location during deployment. With resourceGroup().location we obtain the location of the resource group that will contain the Redis Cache. The resource group is specified during deployment of the template.
We also removed the resources field which is used to define firewall rules. Now, let's turn to the contents of the properties object. Here we will set the sku and remove all the fields we do not need. The template now looks like:
{
    "$schema": "http://schema.management.azure.com/schemas/2015-01-01/deploymentTemplate.json#",
    "contentVersion": "1.0.0.0",
    "parameters": {},
    "variables": {},
    "resources": [
        {
            "name": "gebaredis2",
            "type": "Microsoft.Cache/Redis",
            "apiVersion": "2016-04-01",
            "location": "[resourceGroup().location]",
            "properties": {
               "sku": {
                    "name": "Basic",
                    "family": "C",
                    "capacity": 0
                }
            }
        }
    ],
    "outputs": {}
}
Most of the properties are only valid in Premium tiers. Other properties define specific Redis settings that we are not concerned with at the moment. The template above should be sufficient to deploy a Basic Redis Cache of type C0. We deployed such a service in Chapter 1, to serve as the back-end for our realtime service.
To set the values for name, family and capacity, VS Code can provide help when you hover over the value. You can also use Ctrl-Space for hints.
This template can be further improved but for now, let's see how we can deploy it with Azure CLI 2.0. First create a resource group:
az group create --name <rg-name> --location <location>
Substitute <rg-name> with a name of your choice and set <location> to a valid Azure location like westeurope. Now, kick off a deployment in this resource group like so:
az group deployment create --name <deploymentname> --resource-group <rg-name> \
        --template-file .\azureDeploy-redis.json
Substitute <deploymentname> with a name of your choice. The template will be submitted to Azure Resource Manager which will start to deploy the resources in the template. Depending on the resources in the template, that can take quite a while. You can check the status with:
az group deployment list -g <rg-name>
The above command is a more generic way to check deployments in a resource group. The Redis deployment will be listed.
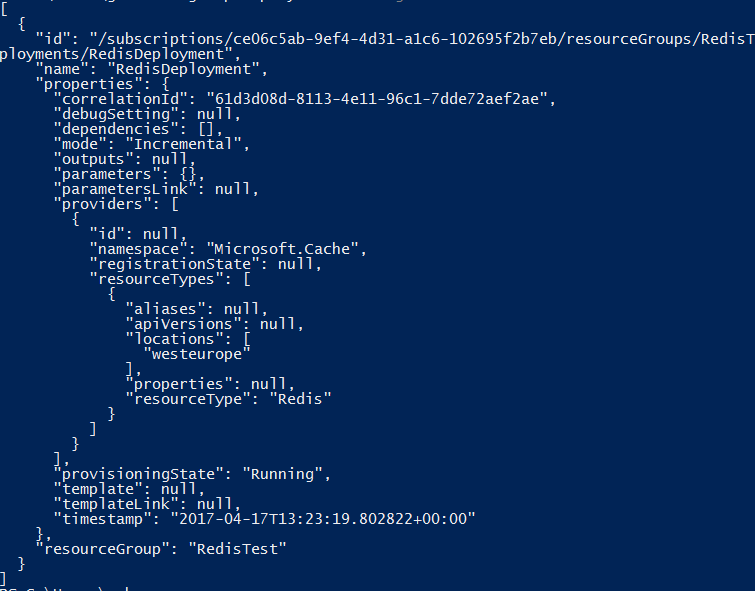
From the output above, we can see that the Redis deployment is still running in the provisioningState.
If you want to make a change to the deployment, like scaling from C0 to C1, just update the template and run the following command:
az group deployment create --name <deploymentname> --resource-group <rg-name> \
        --template-file .\azureDeploy-redis.json
Likewise, if you are deploying multiple resources and deployment of one or more resources fails, just submit the template again.
Parameters
In the Redis template, the name property was set directly in the template. However, values can also be set via parameters. Defining and using a parameter is easy. The template below defines and uses a hostName parameter to supply the name of the Redis server.
{
    "$schema": "http://schema.management.azure.com/schemas/2015-01-01/deploymentTemplate.json#",
    "contentVersion": "1.0.0.0",
    "parameters": {
        "hostName": {
            "type": "string",
            "maxLength": 15,
            "metadata": {
                "description": "The hostname of the Redis server"
            }
        }
    },
    "variables": {},
    "resources": [
        {
            "name": "[parameters('hostName')]",
            "type": "Microsoft.Cache/Redis",
            "apiVersion": "2016-04-01",
            "location": "[resourceGroup().location]",
            "properties": {
                "sku": {
                    "name": "Basic",
                    "family": "C",
                    "capacity": 0
                }
            }
        }
    ],
    "outputs": {}
}
To submit this template, you will have to provide a value for the parameter. You can do so in the deployment command.
az group deployment create --name <deploymentname> --resource-group <rg-name> \
        --template-file .\azureDeploy-redis.json \
        --parameters '{\"hostName\":{\"value\":\"gebaredis2\"}}'
In the above command, parameters are supplied by passing a rawJSON string. On Windows, you will need to properly escape the double quotes in the JSON with . In Bash, it should work without escaping.
If you have many parameters, you can supply them in a parameters file with the following format:
{
    "$schema": "https://schema.management.azure.com/schemas/2015-01-01/deploymentParameters.json#",
    "contentVersion": "1.0.0.0",
    "parameters": {
        "hostName": {
            "value": "gebaredis2"
        }
    }
}
You can then use the parameters file with the following command if the parameters are in azureDeploy-redis-params.json:
az group deployment create --name <deploymentname> --resource-group <rg-name> \
        --template-file .\azureDeploy-redis.json \
        --parameters @azureDeploy-redis-params.json
What if we want to only allow Basic C0, C1 and C2? This means we only want to accept 0, 1 or 2 in the capacity field. We can define a hostCapacity parameter in the template:
{
    "$schema": "http://schema.management.azure.com/schemas/2015-01-01/deploymentTemplate.json#",
    "contentVersion": "1.0.0.0",
    "parameters": {
        "hostName": {
            "type": "string",
            "maxLength": 15,
            "metadata": {
                "description": "The hostname of the Redis server"
            }
        },
        "hostCapacity": {
            "type": "int",
            "allowedValues": [0,1,2],
            "defaultValue": 0,
            "metadata": {
                "description": "The capacity in basic tier C family only 0, 1 or 2"
            }
        }
    },
    "variables": {},
    "resources": [
        {
            "name": "[parameters('hostName')]",
            "type": "Microsoft.Cache/Redis",
            "apiVersion": "2016-04-01",
            "location": "[resourceGroup().location]",
            "properties": {
                "sku": {
                    "name": "Basic",
                    "family": "C",
                    "capacity": "[parameters('hostCapacity')]"
                }
            }
        }
    ],
    "outputs": {}
}
The hostCapacity parameter is of type int and only allows 0, 1 or 2. If the parameter is not provided, the value will default to 0. Now add the variable to the parameters file:
{
    "$schema": "https://schema.management.azure.com/schemas/2015-01-01/deploymentParameters.json#",
    "contentVersion": "1.0.0.0",
    "parameters": {
        "hostName": {
            "value": "gebaredis2"
        },
        "hostCapacity": {
            "value": 3
        }
    }
}
When you try to deploy the template, you should get an error because a value of 3 is not allowed by the template. Change the value to 2 and deploy the template. Your existing Redis instance will be scaled to C2. Note that you cannot scale a Redis instance back to C0.
Variables
Variables allow you to construct values that can be used throughout your template. In this section, we will provide a random name for our Redis instance with a chosen prefix you set via a parameter. Here's the template:
{
    "$schema": "http://schema.management.azure.com/schemas/2015-01-01/deploymentTemplate.json#",
    "contentVersion": "1.0.0.0",
    "parameters": {
        "hostNamePrefix": {
            "type": "string",
            "maxLength": 15,
            "metadata": {
                "description": "The hostname of the Redis server"
            }
        },
        "hostCapacity": {
            "type": "int",
            "allowedValues": [0,1,2],
            "defaultValue": 0,
            "metadata": {
                "description": "The capacity in basic tier C family only 0, 1 or 2"
            }
        }
    },
    "variables": {
        "hostName": "[concat(parameters('hostNamePrefix'), uniqueString(resourceGroup().id))]"
    },
    "resources": [
        {
            "name": "[variables('hostName')]",
            "type": "Microsoft.Cache/Redis",
            "apiVersion": "2016-04-01",
            "location": "[resourceGroup().location]",
            "properties": {
                "sku": {
                    "name": "Basic",
                    "family": "C",
                    "capacity": "[parameters('hostCapacity')]"
                }
            }
        }
    ],
    "outputs": {}
}
We now define a hostNamePrefix parameter. In the variables section, we define a variable that concatenates the prefix and a unique string. To generate the unique string, we use another Template function.
If you use a parameters file like below and deploy the resource, you will end up with a random name like redis-prodc4lldfqbdbqwi.
{
    "$schema": "https://schema.management.azure.com/schemas/2015-01-01/deploymentParameters.json#",
    "contentVersion": "1.0.0.0",
    "parameters": {
        "hostNamePrefix": {
            "value": "redis-prod"
        },
        "hostCapacity": {
            "value": 0
        }
    }
}
You can achieve quite a lot with parameters, variables and functions. For more information about the available functions, check https://docs.microsoft.com/en-us/azure/azure-resource-manager/resource-group-template-functions.
Deploy multiple resources
Remember the example from Chapter 1? In this section, we will create an ARM template that deploys the required resources to build the realtime service. These resources are:
- IoT Hub
- Azure Function App
- Redis Cache
- Azure Web App
Although possible, we will not create the Azure Container Registry since that typically is a resource that is created once to hold the Docker images for multiple applications.
Let's start by creating a resource group called realtime-rg in West Europe.
az group create --name realtime-rg --location westeurope
Creating an IoT Hub from an ARM template is a bit more complicated than a Redis service because there are many more settings. On the other hand, many of the IoT Hub settings can be removed which lets Azure Resource Manager pick defaults.
IoT Hub, a Storage Account and App Services Plan get created synchronously. When those resources are ready, a Function App is created in the App Services Plan. The Function App uses the Storage account to store settings and the code of your functions. The settings are stored in blobs, while the code is stored on a file share.
The template that deploys the four components described above is shown below:
{
    "$schema": "http://schema.management.azure.com/schemas/2015-01-01/deploymentTemplate.json#",
    "contentVersion": "1.0.0.0",
    "parameters": {
        "iotHubName": {
            "type": "string",
            "metadata": {
                "description": "Name of the IoT Hub"
            }
        },
        "appName": {
            "type": "string",
            "metadata": {
                "description": "The name of the function app that you wish to create."
            }
        },
        "storageAccountType": {
            "type": "string",
            "defaultValue": "Standard_LRS",
            "allowedValues": [
                "Standard_LRS",
                "Standard_GRS",
                "Standard_ZRS",
                "Premium_LRS"
            ],
            "metadata": {
                "description": "Storage Account type"
            }
        }
    },
    "variables": {
        "functionAppName": "[parameters('appName')]",
        "hostingPlanName": "[parameters('appName')]",
        "storageAccountName": "[concat(uniquestring(resourceGroup().id), 'azfunc')]",
        "storageAccountid": "[concat(resourceGroup().id,'/providers/','Microsoft.Storage/storageAccounts/', variables('storageAccountName'))]"
    },
    "resources": [
        {
            "type": "Microsoft.Storage/storageAccounts",
            "name": "[variables('storageAccountName')]",
            "apiVersion": "2015-06-15",
            "location": "[resourceGroup().location]",
            "properties": {
                "accountType": "[parameters('storageAccountType')]"
            }
        },
        {
            "name": "[parameters('iotHubName')]",
            "type": "Microsoft.Devices/IotHubs",
            "apiVersion": "2016-02-03",
            "location": "[resourceGroup().location]",
            "properties": {
                "features": "None"
            },
            "sku": {
                "name": "S1",
                "capacity": 1
            }
        },
        {
            "type": "Microsoft.Web/serverfarms",
            "apiVersion": "2015-04-01",
            "name": "[variables('hostingPlanName')]",
            "location": "[resourceGroup().location]",
            "properties": {
                "name": "[variables('hostingPlanName')]",
                "computeMode": "Dynamic",
                "sku": "Dynamic"
            }
        },
        {
            "apiVersion": "2015-08-01",
            "type": "Microsoft.Web/sites",
            "name": "[variables('functionAppName')]",
            "location": "[resourceGroup().location]",
            "kind": "functionapp",
            "dependsOn": [
                "[resourceId('Microsoft.Web/serverfarms', variables('hostingPlanName'))]",
                "[resourceId('Microsoft.Storage/storageAccounts', variables('storageAccountName'))]"
            ],
            "properties": {
                "serverFarmId": "[resourceId('Microsoft.Web/serverfarms', variables('hostingPlanName'))]",
                "siteConfig": {
                    "appSettings": [
                        {
                            "name": "AzureWebJobsDashboard",
                            "value": "[concat('DefaultEndpointsProtocol=https;AccountName=', variables('storageAccountName'), ';AccountKey=', listKeys(variables('storageAccountid'),'2015-05-01-preview').key1)]"
                        },
                        {
                            "name": "AzureWebJobsStorage",
                            "value": "[concat('DefaultEndpointsProtocol=https;AccountName=', variables('storageAccountName'), ';AccountKey=', listKeys(variables('storageAccountid'),'2015-05-01-preview').key1)]"
                        },
                        {
                            "name": "WEBSITE_CONTENTAZUREFILECONNECTIONSTRING",
                            "value": "[concat('DefaultEndpointsProtocol=https;AccountName=', variables('storageAccountName'), ';AccountKey=', listKeys(variables('storageAccountid'),'2015-05-01-preview').key1)]"
                        },
                        {
                            "name": "WEBSITE_CONTENTSHARE",
                            "value": "[toLower(variables('functionAppName'))]"
                        },
                        {
                            "name": "FUNCTIONS_EXTENSION_VERSION",
                            "value": "~1"
                        },
                        {
                            "name": "WEBSITE_NODE_DEFAULT_VERSION",
                            "value": "6.5.0"
                        }
                    ]
                }
            }
        }
    ],
    "outputs": {}
}
Credit where credit is due here. The Microsoft documentation for ARM deployment of Function Apps is not great. But luckily, there is a good template up on GitHub: https://github.com/Azure/azure-quickstart-templates/blob/master/101-function-app-create-dynamic/azuredeploy.json.
With the following parameters
{
    "$schema": "https://schema.management.azure.com/schemas/2015-01-01/deploymentParameters.json#",
    "contentVersion": "1.0.0.0",
    "parameters": {
        "iotHubName": {
            "value": "geba-s1"
        },
        "appName": {
            "value": "rtfunc"
        },
        "storageAccountType": {
            "value": "Standard_LRS"
        }
    }
}
and this deployment command
az group deployment create --name realtimedep --resource-group realtime-rg \
    --template-file .\azureDeploy-realtime.json --parameters @azureDeploy-realtime-params.json
you will get the following result after deployment:
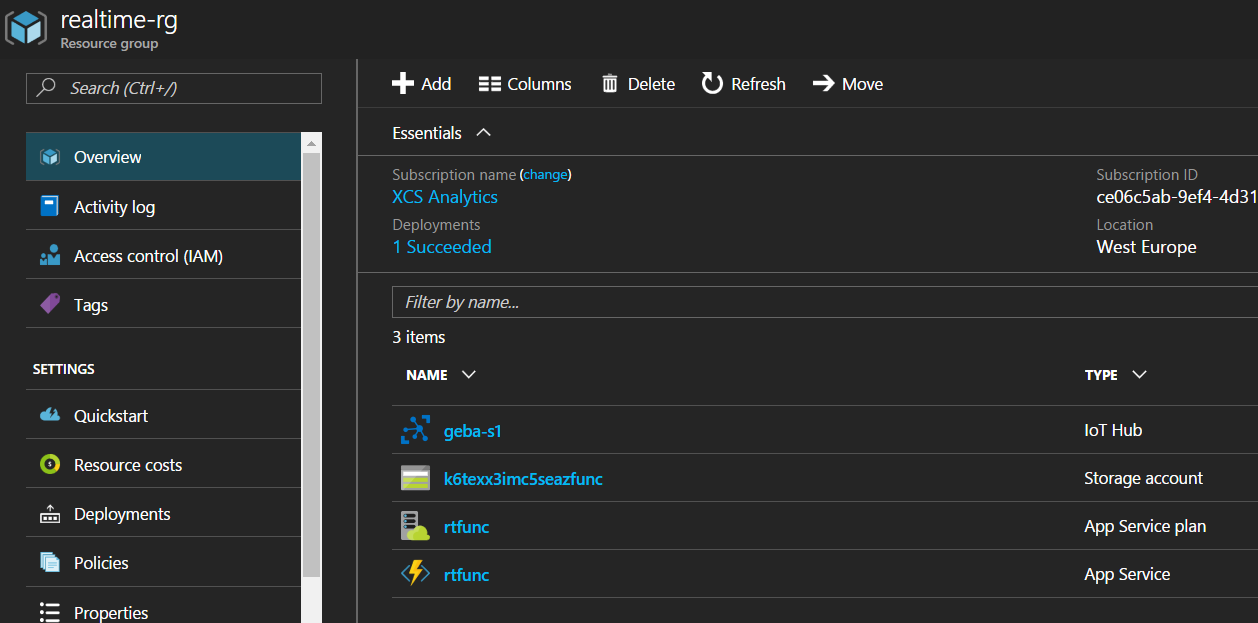
This is already great. However, if we know we are going to create a function with an Event Hub trigger, we can put the connection string in the App settings ready for our developer to use. The ARM template was changed to the following:
{
    "$schema": "http://schema.management.azure.com/schemas/2015-01-01/deploymentTemplate.json#",
    "contentVersion": "1.0.0.0",
    "parameters": {
        "iotHubName": {
            "type": "string",
            "metadata": {
                "description": "Name of the IoT Hub"
            }
        },
        "primaryKey": {
            "type": "string"
        },
        "secondaryKey": {
            "type": "string"
        },
        "appName": {
            "type": "string",
            "metadata": {
                "description": "The name of the function app that you wish to create."
            }
        },
        "storageAccountType": {
            "type": "string",
            "defaultValue": "Standard_LRS",
            "allowedValues": [
                "Standard_LRS",
                "Standard_GRS",
                "Standard_ZRS",
                "Premium_LRS"
            ],
            "metadata": {
                "description": "Storage Account type"
            }
        }
    },
    "variables": {
        "functionAppName": "[parameters('appName')]",
        "hostingPlanName": "[parameters('appName')]",
        "storageAccountName": "[concat(uniquestring(resourceGroup().id), 'azfunc')]",
        "storageAccountid": "[concat(resourceGroup().id,'/providers/','Microsoft.Storage/storageAccounts/', variables('storageAccountName'))]"
    },
    "resources": [
        {
            "type": "Microsoft.Storage/storageAccounts",
            "name": "[variables('storageAccountName')]",
            "apiVersion": "2015-06-15",
            "location": "[resourceGroup().location]",
            "properties": {
                "accountType": "[parameters('storageAccountType')]"
            }
        },
        {
            "name": "[parameters('iotHubName')]",
            "type": "Microsoft.Devices/IotHubs",
            "apiVersion": "2016-02-03",
            "location": "[resourceGroup().location]",
            "properties": {
                "authorizationPolicies": [
                    {
                        "keyName": "iothubowner",
                        "rights": "RegistryRead, RegistryWrite, ServiceConnect, DeviceConnect"
                    },
                    {
                        "keyName": "functionpolicy",
                        "primaryKey": "[parameters('primaryKey')]",
                        "secondaryKey": "[parameters('secondaryKey')]",
                        "rights": "ServiceConnect"
                    }],
                "features": "None"
                },
                "sku": {
                    "name": "S1",
                    "capacity": 1
                }
            },
            {
                "type": "Microsoft.Web/serverfarms",
                "apiVersion": "2015-04-01",
                "name": "[variables('hostingPlanName')]",
                "location": "[resourceGroup().location]",
                "properties": {
                    "name": "[variables('hostingPlanName')]",
                    "computeMode": "Dynamic",
                    "sku": "Dynamic"
                }
            },
            {
                "apiVersion": "2015-08-01",
                "type": "Microsoft.Web/sites",
                "name": "[variables('functionAppName')]",
                "location": "[resourceGroup().location]",
                "kind": "functionapp",
                "dependsOn": [
                    "[resourceId('Microsoft.Web/serverfarms', variables('hostingPlanName'))]",
                    "[resourceId('Microsoft.Storage/storageAccounts', variables('storageAccountName'))]"
                ],
                "properties": {
                    "serverFarmId": "[resourceId('Microsoft.Web/serverfarms', variables('hostingPlanName'))]",
                    "siteConfig": {
                        "appSettings": [
                            {
                                "name": "AzureWebJobsDashboard",
                                "value": "[concat('DefaultEndpointsProtocol=https;AccountName=', variables('storageAccountName'), ';AccountKey=', listKeys(variables('storageAccountid'),'2015-05-01-preview').key1)]"
                            },
                            {
                                "name": "AzureWebJobsStorage",
                                "value": "[concat('DefaultEndpointsProtocol=https;AccountName=', variables('storageAccountName'), ';AccountKey=', listKeys(variables('storageAccountid'),'2015-05-01-preview').key1)]"
                            },
                            {
                                "name": "WEBSITE_CONTENTAZUREFILECONNECTIONSTRING",
                                "value": "[concat('DefaultEndpointsProtocol=https;AccountName=', variables('storageAccountName'), ';AccountKey=', listKeys(variables('storageAccountid'),'2015-05-01-preview').key1)]"
                            },
                            {
                                "name": "WEBSITE_CONTENTSHARE",
                                "value": "[toLower(variables('functionAppName'))]"
                            },
                            {
                                "name": "FUNCTIONS_EXTENSION_VERSION",
                                "value": "~1"
                            },
                            {
                                "name": "WEBSITE_NODE_DEFAULT_VERSION",
                                "value": "6.5.0"
                            },
                            {
                                "name": "ParticleConnection",
                                "value": "[concat('Endpoint=', reference(parameters('iotHubName')).eventHubEndpoints.events.endpoint, ';SharedAccessKeyName=functionpolicy',';SharedAccessKey=', parameters('primaryKey'))]"
                            }
                        ]
                    }
                }
            }
        ],
        "outputs": {}
    }
We added an App Setting to the appSettings object with name ParticleConnection. Setting the value is a tad more complicated though. Remember that the connection string has the following format:
Endpoint=<Event Hub-compatible endpoint>;SharedAccessKeyName=<policy_name>;SharedAccessKey=<primary_key>
With the concat() template function, it is easy to create the above string but we also have to get values for the endpoint, policy name and key. The Event Hub-compatible endpoint is a property of the IoT Hub created by the template. The endpoint name can be retrieved with the reference() template function as follows:
reference(parameters('iotHubName'))
With the above function, we obtain a reference to the IoT Hub just by using its name which is itself a parameter. When you have the reference, you can get to the Event Hub-compatible name with:
reference(parameters('iotHubName')).eventHubEndpoints.events.endpoint
If you have an existing IoT Hub, you can use Azure Resource Explorer to discover the values you can retrieve. The screenshot below shows the IoT Hub created by this template:
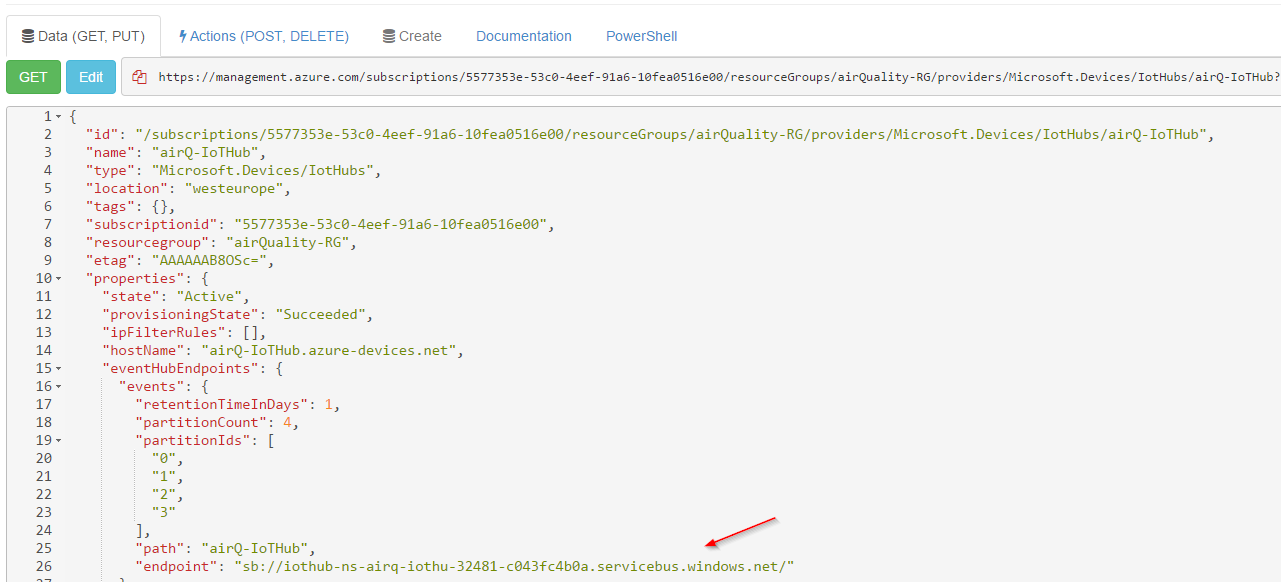 As you probably noticed, including the properties object is not needed.
The policy name is obtained by creating the policy in the template. If you look at the IoT Hub resource, you will notice an authorizationPolicies object that defines two policies: iothubowner and functionpolicy. The iothubowner policy does not have defined keys but the functionpolicy has. The keys for the functionpolicy are set with parameters and one of them, the primaryKey is used in the Event Hub-compatible endpoint.
So, our full expression becomes (one one line):
[concat('Endpoint=', reference(parameters('iotHubName')).eventHubEndpoints.events.endpoint,
    ';SharedAccessKeyName=functionpolicy',';SharedAccessKey=', parameters('primaryKey'))]
Of course, you will need a new parameters file as well:
{
    "$schema": "https://schema.management.azure.com/schemas/2015-01-01/deploymentParameters.json#",
    "contentVersion": "1.0.0.0",
    "parameters": {
        "iotHubName": {
            "value": "geba-s1"
        },
        "appName": {
            "value": "rtfunc"
        },
        "storageAccountType": {
            "value": "Standard_LRS"
        },
        "primaryKey": {
            "value": "2ICVWz8y6rVdgTTRrLLUsz1rxgO5PlQq3zRDwggre23="
        },
        "secondaryKey": {
            "value": "hCd1WhDRgj9fWmE5DByN74cpWBZs3DQW0IHbILLBt56="
        }
    }
}
Note that when a reference to a resource is obtained with reference(), the resource needs to be completely created before the resource that uses the reference can be built. In our example, this means that the Function App will wait for the IoT Hub to be created. It is not needed to use a dependsOn property.
I don't like entering keys in the parameters file. In general, it is better to let Azure set the keys to a random value. Subsequently, the generated key can be picked up using a template function. To pick up the primary key of an IoT Hub policy, use the following:
listKeys(resourceId('Microsoft.Devices/IotHubs/IotHubKeys', parameters('iotHubName'),
    parameters('policyName')),'2016-02-03').primaryKey
There is one more thing to do. Just one, I promise! Let's add the Redis server to the template and create App Settings in the Function App for the hostname of the Redis instance and a key to connect. Here are the settings to add to the appSettings array:
{
        "name": "REDISHOST",
        "value": "[reference(variables('redisHostName')).hostName]"
},
{
        "name": "REDISKEY",
        "value": "[listKeys(resourceId('Microsoft.Cache/Redis', variables('redisHostName')),'2016-04-01').primaryKey]"
}
Adding the hostName of the Redis instance is as simple as referring to the Redis host resource of the template and retrieving the hostName property.
The primaryKey or secondaryKey can be retrieved with the listKeys() template function. Above, yet another template function, resourceId() was used to refer to the Redis instance. listKeys() requires a second parameter which is the API version of the resource.
The full template, including the Redis resource and parameters is shown below. Retrieving the IoT Hub policy primaryKey is also included:
{
    "$schema": "http://schema.management.azure.com/schemas/2015-01-01/deploymentTemplate.json#",
    "contentVersion": "1.0.0.0",
    "parameters": {
        "tagValues": {
            "type": "object",
            "defaultValue": {
                "environment": "prod",
                "project": "realtime",
                "billTo": "IT",
                "managedBy": "[email protected]"
            }
        },
        "iotHubName": {
            "type": "string",
            "metadata": {
                "description": "Name of the IoT Hub"
            }
        },
        "policyName": {
            "type": "string",
            "metadata":{
                "description": "Name of policy to create"
            }

        },
        "appName": {
            "type": "string",
            "metadata": {
                "description": "The name of the function app that you wish to create."
            }
        },
        "storageAccountType": {
            "type": "string",
            "defaultValue": "Standard_LRS",
            "allowedValues": [
                "Standard_LRS",
                "Standard_GRS",
                "Standard_ZRS",
                "Premium_LRS"
            ],
            "metadata": {
                "description": "Storage Account type"
            }
        },
        "redisHostNamePrefix": {
            "type": "string",
            "maxLength": 15,
            "metadata": {
                "description": "The hostname of the Redis server"
            }
        },
        "redisHostCapacity": {
            "type": "int",
            "allowedValues": [0,1,2],
            "defaultValue": 0,
            "metadata": {
                "description": "The capacity in basic tier C family only 0, 1 or 2"
            }
        }
    },
    "variables": {
        "functionAppName": "[parameters('appName')]",
        "hostingPlanName": "[parameters('appName')]",
        "storageAccountName": "[concat(uniquestring(resourceGroup().id), 'azfunc')]",
        "storageAccountid": "[concat(resourceGroup().id,'/providers/','Microsoft.Storage/storageAccounts/', variables('storageAccountName'))]",
        "redisHostName": "[concat(parameters('redisHostNamePrefix'), uniqueString(resourceGroup().id))]"
    },
    "resources": [
        {
            "name": "[variables('redisHostName')]",
            "type": "Microsoft.Cache/Redis",
            "apiVersion": "2016-04-01",
            "location": "[resourceGroup().location]",
            "tags": "[parameters('tagValues')]",
            "properties": {
                "sku": {
                    "name": "Basic",
                    "family": "C",
                    "capacity": "[parameters('redisHostCapacity')]"
                }
            }
        },
        {
            "type": "Microsoft.Storage/storageAccounts",
            "name": "[variables('storageAccountName')]",
            "apiVersion": "2015-06-15",
            "location": "[resourceGroup().location]",
            "tags": "[parameters('tagValues')]",
            "properties": {
                "accountType": "[parameters('storageAccountType')]"
            }
        },
        {
            "name": "[parameters('iotHubName')]",
            "type": "Microsoft.Devices/IotHubs",
            "apiVersion": "2016-02-03",
            "location": "[resourceGroup().location]",
            "tags": "[parameters('tagValues')]",
            "properties": {
                "authorizationPolicies": [
                    {
                        "keyName": "iothubowner",
                        "rights": "RegistryRead, RegistryWrite, ServiceConnect, DeviceConnect"
                    },
                    {
                        "keyName": "[parameters('policyName')]",
                        "rights": "ServiceConnect"
                    }],
                "features": "None"
                },
                "sku": {
                    "name": "S1",
                    "capacity": 1
                }
            },
            {
                "type": "Microsoft.Web/serverfarms",
                "apiVersion": "2015-04-01",
                "name": "[variables('hostingPlanName')]",
                "location": "[resourceGroup().location]",
                "tags": "[parameters('tagValues')]",
                "properties": {
                    "name": "[variables('hostingPlanName')]",
                    "computeMode": "Dynamic",
                    "sku": "Dynamic"
                }
            },
            {
                "apiVersion": "2015-08-01",
                "type": "Microsoft.Web/sites",
                "name": "[variables('functionAppName')]",
                "location": "[resourceGroup().location]",
                "tags": "[parameters('tagValues')]",
                "kind": "functionapp",
                "dependsOn": [
                    "[resourceId('Microsoft.Web/serverfarms', variables('hostingPlanName'))]",
                    "[resourceId('Microsoft.Storage/storageAccounts', variables('storageAccountName'))]"
                ],
                "properties": {
                    "serverFarmId": "[resourceId('Microsoft.Web/serverfarms', variables('hostingPlanName'))]",
                    "siteConfig": {
                        "appSettings": [
                            {
                                "name": "AzureWebJobsDashboard",
                                "value": "[concat('DefaultEndpointsProtocol=https;AccountName=', variables('storageAccountName'), ';AccountKey=', listKeys(variables('storageAccountid'),'2015-05-01-preview').key1)]"
                            },
                            {
                                "name": "AzureWebJobsStorage",
                                "value": "[concat('DefaultEndpointsProtocol=https;AccountName=', variables('storageAccountName'), ';AccountKey=', listKeys(variables('storageAccountid'),'2015-05-01-preview').key1)]"
                            },
                            {
                                "name": "WEBSITE_CONTENTAZUREFILECONNECTIONSTRING",
                                "value": "[concat('DefaultEndpointsProtocol=https;AccountName=', variables('storageAccountName'), ';AccountKey=', listKeys(variables('storageAccountid'),'2015-05-01-preview').key1)]"
                            },
                            {
                                "name": "WEBSITE_CONTENTSHARE",
                                "value": "[toLower(variables('functionAppName'))]"
                            },
                            {
                                "name": "FUNCTIONS_EXTENSION_VERSION",
                                "value": "~1"
                            },
                            {
                                "name": "WEBSITE_NODE_DEFAULT_VERSION",
                                "value": "6.5.0"
                            },
                            {
                                "name": "ParticleConnection",
                                "value": "[concat('Endpoint=', reference(parameters('iotHubName')).eventHubEndpoints.events.endpoint, ';SharedAccessKeyName=', parameters('policyName'), ';SharedAccessKey=', listKeys(resourceId('Microsoft.Devices/IotHubs/IotHubKeys', parameters('iotHubName'),parameters('policyName')),'2016-02-03').primaryKey)]"
                            },
                            {
                                "name": "REDISHOST",
                                "value": "[reference(variables('redisHostName')).hostName]"
                            },
                            {
                                "name": "REDISKEY",
                                "value": "[listKeys(resourceId('Microsoft.Cache/Redis', variables('redisHostName')),'2016-04-01').primaryKey]"
                            }
                        ]
                    }
                }
            }
        ],
        "outputs": {}
    }
The full parameters file:
{
    "$schema": "https://schema.management.azure.com/schemas/2015-01-01/deploymentParameters.json#",
    "contentVersion": "1.0.0.0",
    "parameters": {

        "iotHubName": {
            "value": "geba-s1"
        },
        "appName": {
            "value": "rtfunc"
        },
        "storageAccountType": {
            "value": "Standard_LRS"
        },
        "policyName": {
            "value": "functionpolicy"
        },
        "redisHostNamePrefix": {
            "value": "redis"
        },
        "redisHostCapacity": {
            "value": 0
        }
    }
}
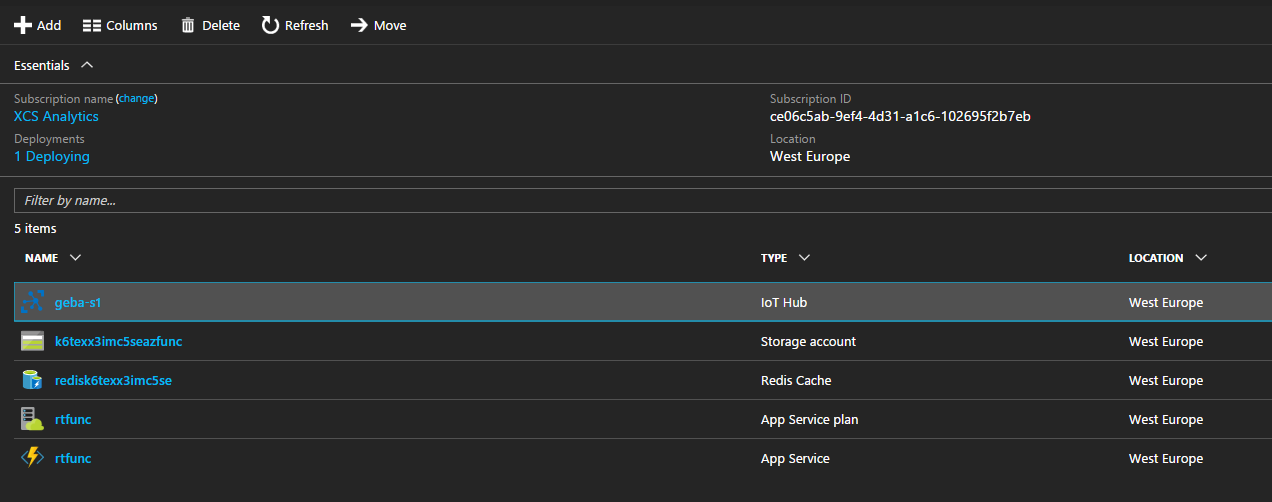
The full deployment results in the five deployed resources:
 A developer can now create the Azure Function and use the connection string that was already saved in the App Settings of the Function App:
 Note that above, the Event Hub name still needs to be filled in. In the template, this name was not specified but it will be set to the name of the IoT Hub. A developer either sets this value in the UI or in the path property in function.json like so:
{
  "bindings": [
    {
      "type": "eventHubTrigger",
      "name": "myEventHubTrigger",
      "direction": "in",
      "path": "geba-s1",
      "connection": "ParticleConnection"
    }
  ],
  "disabled": false
}
Like before, the function can use the App Settings in the code:
client=require("redis").createClient(6380, process.env["REDISHOST"],
        {auth_pass: process.env["REDISPASS"],
           tls: {servername: process.env["REDISHOST"]}});

module.exports = function (context, myEventHubTrigger) {

    particleEvent = JSON.stringify(myEventHubTrigger);
    context.log('Received Particle event:', particleEvent);

    // push the data to particle channel
    client.publish("particle", particleEvent);

    context.done();
};
It is possible to also get your code in the Function App from the template. See this example for integration with GitHub: https://github.com/Azure/azure-quickstart-templates/blob/master/201-function-app-dedicated-github-deploy/azuredeploy.json. The integration with a GitHub repository is at the bottom, as part of the resources array of the Microsoft.Web/sites resource.
Resource Tags
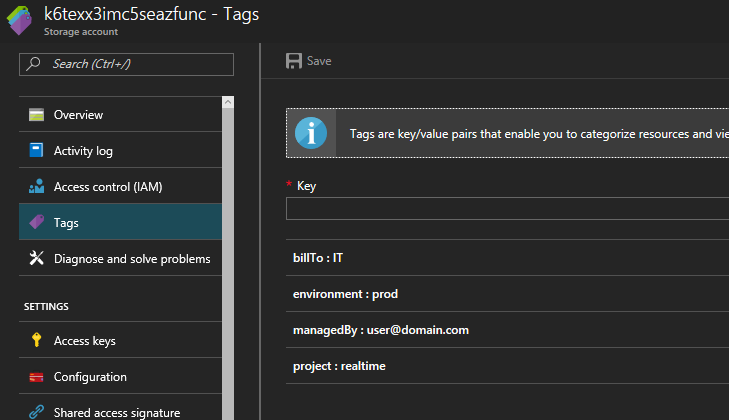
When you create a resource, you can add up to 15 key:value tags. Tags can be used to indicate the department or cost center the resource belongs to or to specify the environment like test or production. Although tags can be added to a resource group, they are not inherited by the child resources. As a best practice, add the tags to the template. To add the same tags to each resource, use a parameter like shown below:
"tagValues": {
            "type": "object",
            "defaultValue": {
                "environment": "prod",
                "project": "realtime",
                "billTo": "IT",
                "managedBy": "[email protected]"
            }
        }
To add the tag to a resource, add the tag property:
"tags": "[parameters('tagValues')]"
In the Portal, the resource tags can be shown:
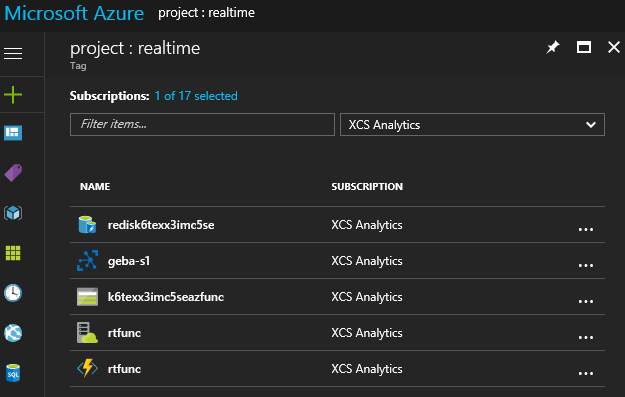
When you click the ... next to the tag, you can pin the tag to the dashboard. When you click on the dashboard tag, all resources that have this tag will be listed:
