Connect with MQTT
In this section, we will modify the device sketch from Chapter 2 that used MQTT to connect to the CloudMQTT service. The CloudMQTT service uses Mosquitto and is a general-purpose MQTT server. With such servers, you can create topic hierarchies according to your needs. Although Azure IoT Hub is an MQTT server, it is not a general-purpose one. You cannot just use any topic. Instead, you need to know the specific topic names you can use.
Before delving into the topic names though, you need to know how to connect to Azure IoT Hub with MQTT. Suppose your IoT Hub is called carhub, resulting in a hostname of carhub.azure-devices.net and you have a device called electricspeeder. The connection details are as follows:
- MQTT client id: device name (electricspeeder)
- MQTT server: hostname of your IoT Hub (carhub.azure-devices.net)
- MQTT port: the standard TLS port (8883)
- MQTT user: hostname/devicename/api-version=2016-11-14 (carhub.azure-devices.net/electricspeeder/api-version=2016-11-14)
- MQTT password: a SAS token
There are a couple of things to note here. It is imperative that you add api-version=2016-11-14 to the username. If you do not, you will able to connect and send and receive messages but you will not be able to use device twin functionality from the device such as setting a reported property or retrieving the device twin to check for desired properties.
As for the SAS token, you can generate it using Device Explorer. From the management tab, click SAS Token... and then select the device, set amount of days for TTL and click Generate. The SAS token will appear in the text box but do not use the entire string. Only use the text that starts with SharedAccessSignature sr=...:
SharedAccessSignature sr=IOTHUBNAME.azure-devices.net%2Fdevices%2FDEVICEID&sig=%2B8FkiDEmMogEacvupX5NO
    hhdCumrrbVfZfAoqImSe%2FGc%3D&se=1495138314
Note: the above token should be on one line
The se section in the token contains the time when the SAS token expires. Although using Device Explorer is great for testing, you should obviously not use this method in production to avoid an expired token. Instead, you can create the SAS token on the device as will be demonstrated at the end of this section. Let us now turn to writing a sketch that implements two-way communication and listens for a desired property called reportInterval that can be used by the device to adjust the interval between sensor readings.
If you need to set the MQTT version, use version 3.1.1. Note that IoT Hub does not support QoS 2. The PubSubClient library can only publish messages with QoS 0 which is basically fire-and-forget. When you use the Microsoft device SDKs, QoS 1 is used for publishing.
To connect to IoT Hub using PubSubClient, we first set some constants:
// MQTT connectivity variables
const char mqtt_client[] = "DEVICEID";
const char mqtt_server[] = "IOTHUBNAME.azure-devices.net";
const int mqtt_port = 8883;
const char mqtt_user[] = "IOTHUBNAME.azure-devices.net/mkr1000/api-version=2016-11-14";
const char mqtt_pass[] = "SharedAccessSignature sr=IOTHUBNAME.azure-devices.net%2Fdevices%2FDEVICEID&sig=N4mPqHaczwvhS8%2Fl5%2Bs%2FKR%2B3Zn4r5fFw%2BCIztsnb8aU%3D&se=1526307283";
We also need a callback function to call when a message is received on a topic. The callback function is only declared so we can use it during initialisation of PubSubClient. The actual implementation of the callback function is done later in the sketch.
// MQTT callback
void callback(char* topic, byte* payload, unsigned int length);

// use the generic SSL client in combination with PubSubClient
WiFiSSLClient wifiClient;
PubSubClient client(mqtt_server, mqtt_port, callback, wifiClient);
In this sketch, we do not want to use delay() because we want to be able to respond to incoming messages directly. We will use the same technique as in Movement, where we used millis().
The loop() function first checks if we have an MQTT connection and reconnects if necessary. Then it checks if the default interval of 5000 milliseconds has passed (interval variable). If it has, sensor readings are taken and sent to IoT Hub using a simple client.publish():
void loop() {
  // connect or reconnect to MQTT server
  if (!client.connected()) {
    reconnect(); // blocking
  }

  // get the current millis
  unsigned long currentMillis = millis();

  if(currentMillis - previousMillis >= interval) {
    // reset the timer
    previousMillis = currentMillis;

    // get temperature and humidity from DHT22
    float h = dht.readHumidity();
    // Read temperature as Celsius
    float t = dht.readTemperature();

    // Check if any reads failed and exit early (to try again).
    if (isnan(h) || isnan(t)) {
      Serial.println("Failed to read from DHT sensor!");
      return;
    }

    // build Json string and convert to char array for client.publish
    String postData = "{\"temperature\":" + String(t) + ",\"humidity\":" + String(h) +"}";
    char postBuffer[postData.length()+1];
    postData.toCharArray(postBuffer, postData.length()+1);

    Serial.println(postBuffer);

    // publish message to MQTT server
    client.publish("devices/DEVICEID/messages/events/", postBuffer);


  }

  client.loop();

}
The code above is pretty self-explanatory. Note that you have to send the telemetry (our postData string which contains Json) to a specific topic: devices/DEVICEID/messages/events/ where DEVICEID is the device's id as defined in IoT Hub.
The reconnect() function does several MQTT subscribes after it connects:
void reconnect() {
  // Loop until we're reconnected
  while (!client.connected()) {
    Serial.print("Attempting MQTT connection...");
    // Attempt to connect
    if (client.connect(mqtt_client, mqtt_user, mqtt_pass)) {
      Serial.println("connected");
      // subscribe to D2C messages
      client.subscribe("devices/DEVICEID/messages/devicebound/#");
      // subscribe to operation responses
      client.subscribe("$iothub/twin/res/#");
      // subscribe to desired property updates
      client.subscribe("$iothub/twin/PATCH/properties/desired/#");
    } else {
      Serial.print("failed, rc=");
      Serial.print(client.state());
      Serial.println(" try again in 5 seconds");

      // Wait 5 seconds before retrying (blocking)
      delay(5000);
    }
  }
}
The subscribed topics are:
devices/DEVICEID/messages/devicebound/#: topic for C2D messages (cloud-to-device) where DEVICEID is the name of the device as defined in IoT Hub; you send C2D messages from back end code (or the Azure Portal and many other tools)
$iothub/twin/res/#: topic to receive results after reported property updates
$iothub/twin/PATCH/properties/desired/#: topic to listed for device twin desired property updates from the back end
To actually implement listening to desired property changes, the callback function checks if a message arrives on the $iothub/twin/PATCH/properties/desired/# topic:
void callback(char* topic, byte* payload, unsigned int length) {

  Serial.print("MQTT message arrived on topic: ");
  Serial.println(topic);

  // check if a messages comes in on $iothub/twin/PATCH/properties/desired/?$version={new version}
  // it is a desired property update notification
  if (String(topic).startsWith("$iothub/twin/PATCH/properties/desired")) {
    parseDesiredProperties(payload);
  }
}
When the code detects there is a desired property change, the payload that contains the change is handed to the parseDesiredProperties function:
void parseDesiredProperties(byte* payload) {

  JsonObject& root = jsonDesiredProperties.parseObject(payload);
  if(root.success()) {
    Serial.println("Parsed desired properties");
    int newMillis=root["reportInterval"];

    if(newMillis > 2999 && newMillis < 120001) {
      interval = newMillis;
      String postProperty = "{\"reportInterval\":" + String(newMillis) + "}";
      char postBuffer[postProperty.length()+1];
      postProperty.toCharArray(postBuffer, postProperty.length()+1);
      client.publish("$iothub/twin/PATCH/properties/reported/?$rid=1", postBuffer);

      Serial.print("Set new interval to: ");
      Serial.println(newMillis);
    }
   } else {
    Serial.println("Could not parse desired properties");
   }

}
The parseDesiredProperties function does the following:
- uses ArduinoJson to parse the payload into a JsonObject
- if the payload is successfully parsed, extract the reportInterval property
- if the reportInterval is valid, set the global variable interval equal to the extracted reportInterval
- report the new interval to the back end as a reported property in the device twin
Note that, to set a reported property, you merely have to send proper Json to the following topic: $iothub/twin/PATCH/properties/reported/?$rid=1
Note that the rid, or relative identifier, is something you set. After setting this property, you will get a message back with the status code of your update. The message also includes the rid so you can link the result to your operation. You can easily verify that in the serial monitor:
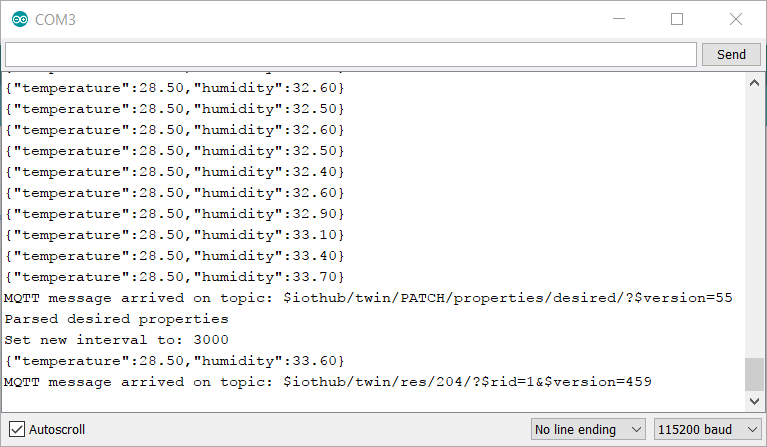
The last line is the message you receive after setting the reportInterval reported device twin property. The status code is 204 which means the property was updated.
For reference, the entire sketch is listed below. Note that this is your typical prototyping code which just demonstrates that it works. There are some things missing such as reading the device twin at startup to get the reportInterval. We have also stored secrets in the sketch, which is of course something you should never do in production.
#include <DHT.h>

#include <SPI.h>
#include <WiFi101.h>

#include <PubSubClient.h>

#include <ArduinoJson.h>

#define DHTPIN            2         // Pin which is connected to the DHT sensor.
#define DHTTYPE           DHT22     // DHT 22 (AM2302)

// init DHT with pin and type
DHT dht(DHTPIN, DHTTYPE);

// dynamic Json buffer for desired property notifications
DynamicJsonBuffer  jsonDesiredProperties;

// ssid and password of WiFi network
char ssid[] = "WIFISSID";
char pass[] = "WIFIPASSWORD";

// initial WiFi status
int status = WL_IDLE_STATUS;

// MQTT connectivity variables
const char mqtt_client[] = "DEVICEID";
const char mqtt_server[] = "IOTHUBNAME.azure-devices.net";
const int mqtt_port = 8883;
const char mqtt_user[] = "IOTHUBNAME.azure-devices.net/DEVICEID/api-version=2016-11-14";
const char mqtt_pass[] = "SharedAccessSignature sr=IOTHUBNAME.azure-devices.net%2Fdevices%DEVICEID&sig=N4mPqiuczwvhS8%2Fl5%2Bs%2FKR%2B3Zn4r5fFw%2BCIuksnb8aU%3D&se=1526307283";

// MQTT callback
void callback(char* topic, byte* payload, unsigned int length);

// use the generic SSL client in combination with PubSubClient
WiFiSSLClient wifiClient;
PubSubClient client(mqtt_server, mqtt_port, callback, wifiClient);

// vars for measuring every x seconds instead of delay
unsigned long previousMillis = 0;
long interval = 5000;

void setup() {
  Serial.begin(115200);
  while (!Serial) {
    ; // wait for the serial port to not miss messages - so open the serial monitor!!!

  }

  Serial.print("Checking for WiFi: ");
  if (WiFi.status() == WL_NO_SHIELD) {
    Serial.println("NOT AVAILABLE!");
    return;
  }
  Serial.println("PRESENT!");

  // try to connect to WiFi network
  while ( status != WL_CONNECTED) {
    Serial.print("Connecting to: ");
    Serial.println(ssid);
    status = WiFi.begin(ssid, pass);
    // wait 10 seconds for connection:
    delay(10000);
  }

  // we are connected now
  Serial.println("Connected to WiFi!");
  printWiFiStatus();

  dht.begin();

}

void loop() {
  // connect or reconnect to MQTT server
  if (!client.connected()) {
    reconnect(); // blocking
  }

  // get the current millis
  unsigned long currentMillis = millis();

  if(currentMillis - previousMillis >= interval) {
    // reset the timer
    previousMillis = currentMillis;

    // get temperature and humidity from DHT22
    float h = dht.readHumidity();
    // Read temperature as Celsius
    float t = dht.readTemperature();

    // Check if any reads failed and exit early (to try again).
    if (isnan(h) || isnan(t)) {
      Serial.println("Failed to read from DHT sensor!");
      return;
    }

    // build Json string and convert to char array for client.publish
    String postData = "{\"temperature\":" + String(t) + ",\"humidity\":" + String(h) +"}";
    char postBuffer[postData.length()+1];
    postData.toCharArray(postBuffer, postData.length()+1);

    Serial.println(postBuffer);

    // publish message to MQTT server
    client.publish("devices/DEVICEID/messages/events/", postBuffer);
  }

  client.loop();

}

void printWiFiStatus() {
  // print the SSID of the network you're attached to:
  Serial.print("SSID: ");
  Serial.println(WiFi.SSID());

  // print your WiFi shield's IP address:
  IPAddress ip = WiFi.localIP();
  Serial.print("IP Address: ");
  Serial.println(ip);

  // print the received signal strength:
  long rssi = WiFi.RSSI();
  Serial.print("signal strength (RSSI):");
  Serial.print(rssi);
  Serial.println(" dBm");
}

void reconnect() {

  // Loop until we're reconnected

  while (!client.connected()) {
    Serial.print("Attempting MQTT connection...");
    // Attempt to connect
    if (client.connect(mqtt_client, mqtt_user, mqtt_pass)) {
      Serial.println("connected");
      // subscribe to D2C messages
      client.subscribe("devices/DEVICEID/messages/devicebound/#");
      // subscribe to operation responses
      client.subscribe("$iothub/twin/res/#");
      // subscribe to desired property updates
      client.subscribe("$iothub/twin/PATCH/properties/desired/#");
    } else {
      Serial.print("failed, rc=");
      Serial.print(client.state());
      Serial.println(" try again in 5 seconds");

      // Wait 5 seconds before retrying (blocking)
      delay(5000);

    }

  }
}

void callback(char* topic, byte* payload, unsigned int length) {

  Serial.print("MQTT message arrived on topic: ");
  Serial.println(topic);

  // check if a messages comes in on $iothub/twin/PATCH/properties/desired/?$version={new version}
  // it is a desired property update notification
  if (String(topic).startsWith("$iothub/twin/PATCH/properties/desired")) {
    parseDesiredProperties(payload);
  }
}

void parseDesiredProperties(byte* payload) {

  JsonObject& root = jsonDesiredProperties.parseObject(payload);
  if(root.success()) {
    Serial.println("Parsed desired properties");
    int newMillis=root["reportInterval"];

    if(newMillis > 2999 && newMillis < 120001) {
      interval = newMillis;
      String postProperty = "{\"reportInterval\":" + String(newMillis) + "}";
      char postBuffer[postProperty.length()+1];
      postProperty.toCharArray(postBuffer, postProperty.length()+1);
      client.publish("$iothub/twin/PATCH/properties/reported/?$rid=1", postBuffer);

      Serial.print("Set new interval to: ");
      Serial.println(newMillis);
    }
   } else {
    Serial.println("Could not parse desired properties");
   }

}
Although it is just prototyping code, pasting the SAS token from Device Explorer into the code is just not right. Let's fix that by generating the SAS token directly in the sketch. It helps to understands the components of a SAS token:
SharedAccessSignature sig={signature-string}&se={expiry}&skn={policyName}&sr={URL-encoded-resourceURI}
In what follows, we will generate the above string from code. The skn section can be omitted since it is a device that connects with its unique symmetric key.
To generate the SAS token in C, you create a function that returns the token as a String like the generateSAS function below. You'll notice the reference to a GitHub repository where a variant of the code below was found. I helps to be kind and pay tribute to the original author!
// from https://github.com/andriyadi/AzureIoTHubMQTTClient
String generateSAS(String url, char* key, long expire) {
  // if expire is 0 then default to January 1, 2030 for now
  if( expire==0 ) {
    expire = 1893456000;
  }

  // create the string to sign which is the url + newline + expire
  //url is IOTHUBNAME.azure-devices.net/devices/DEVICEID
  url.toLowerCase();
  String stringToSign = url + "\n" + String(expire);

  // the signing key is a device key and needs to be
  // base64 decoded; decoded key in decodedKey variable
  int keyLen = strlen(key);
  int decodedLen = base64_dec_len(key, keyLen);
  char decodedKey[decodedLen];
  base64_decode(decodedKey, key, keyLen);

  // create the signature with the Sha256 library
  Sha256.initHmac( (const uint8_t*)decodedKey, decodedLen);
  Sha256.print(stringToSign);
  char* signature = (char*) Sha256.resultHmac();

  // the signature is base64 encoded
  int encodedLen = base64_enc_len(32);
  char encodedSign[encodedLen];
  base64_encode(encodedSign, signature, 32);

  // create SAS and url encode the base64 encoded signature
  return "SharedAccessSignature sr=" + url + "&sig=" + urlEncode(encodedSign) + "&se=" + String(expire);
}
To cook a SAS token, you need three ingredients:
- url: IOTHUBNAME.azure-devices.net/devices/DEVICEID where IOTHUBNAME is the prefix of your Iot Hub instance and DEVICEID is the id of the device in the IoT Hub device registry
- key: the symmetric key of the device which is base64 encoded; you can retrieve the key from the IoT Hub device registry
- expire: the Unix timestamp when the token becomes invalid; in the code above we set the expire value to 1893456000 which is January 1, 2030
To create the {signature-string} in the SAS token, you first concatenate the url, a newline (\n) and the expire Unix timestamp which will serve as the input to a SHA256-HMAC algorithm. Next, you base64 decode the key and use the resulting decoded key as the signing key in the SHA256-HMAC algorithm. In the above code, two new libraries are used:
- sha256: to use the SHA256-HMAC algorithm on our input data
- arduino-base64: to perform base64 decoding of the key and base64 encoding of the signature
Note that the base64 encoded signature is also url encoded in the returned SAS token. The urlEncode() function is defined as follows:
//http://hardwarefun.com/tutorials/url-encoding-in-arduino
String urlEncode(const char* msg)
{
    const char *hex = "0123456789abcdef";
    String encodedMsg = "";

    while (*msg!='\0'){
        if( ('a' <= *msg && *msg <= 'z')
            || ('A' <= *msg && *msg <= 'Z')
            || ('0' <= *msg && *msg <= '9') ) {
            encodedMsg += *msg;
        } else {
            encodedMsg += '%';
            encodedMsg += hex[*msg >> 4];
            encodedMsg += hex[*msg & 15];
        }
        msg++;
    }
    return encodedMsg;
}
To generate the SAS token on the fly, you can call the generateSAS() function in the reconnect() function. You will also need to define the key and url like below:
// MQTT connectivity variables
const char mqtt_client[] = "DEVICEID";
const char mqtt_server[] = "IOTHUBNAME.azure-devices.net";
const int mqtt_port = 8883;
const char mqtt_user[] = "IOTHUBNAME.azure-devices.net/DEVICEID/api-version=2016-11-14";

// SAS token variables
char device_key[] = "w1XVtLjiGgeUDmmFtkIjqls4ITJ4cyRJuqAXiiAHEt8=";
String device_url = String(mqtt_server) + "/devices/" + String(mqtt_client);
There is a glaring oversight in the generateSAS() function! We should set the expire Unix timestamp to the current timestamp plus the number of seconds you want the token to be valid. When the token is about to expire, you should generate a new token. You can use the information from MKR1000 and time to make the required changes.