Sending multiple measurements at once
Sending JSON
In the previous sections we attached several sensors to the Particle Photon. The sensor values were sent to the Particle Cloud using multiple calls to Particle.publish:
Particle.publish("temperature", String(t), 60, PRIVATE);
Particle.publish("humidity", String(h), 60, PRIVATE);
Particle.publish("light", String(l), 60, PRIVATE);
Particle.publish("motion", String(m), 60, PRIVATE);
Although sending multiple events is possible, you usually want to send these values in one step. If you do so, you need to decide on a data serialization format, of which there are many. The JSON serialization format is one of the most common formats. Not surprisingly, Particle Cloud and Azure IoT Hub work very well with this format.
The simplest way to serialize the above data, is to use the following JSON object (shown with some sample values):
{"temperature":27,"humidity":33.78,"light":1767,"motion":1}
The above object simply consists of four key:value pairs. Obviously, you choose the key names and you should choose the shortest key names possible to keep traffic to a minimum since JSON is quite verbose.
Now that we have decided on a serialization format, we need to know how to send JSON from the Photon. Although we could build a String or char array manually, I prefer to use a library with which you create JSON in a more structured way. The library we will use is called SparkJson and can be found at https://github.com/menan/SparkJson. It is actually the ArduinoJson library ported to Particle Photon so full details on how to use the library are at https://bblanchon.github.io/ArduinoJson/doc/index.html.
Before using SparkJson with our sensor data, let's create a small sketch that demonstrates how to send JSON from the Photon. Create a new application in Particle Build and include the SparkJson library. Then use the following code:
// This #include statement was automatically added by the Particle IDE.
#include <SparkJson.h>
// preallocated memory to reserve on the stack; use 200 bytes
StaticJsonBuffer<200> jsonBuffer;
// you can use a DynamicJsonBuffer that allocates memory on the heap
// preferred for a Photon which has enough RAM
// DynamicJsonBuffer jsonBuffer;
// create a JSON object
JsonObject& root = jsonBuffer.createObject();
void setup() {
}
void loop() {
delay(10000);
root["temperature"] = 20;
// floating point by default uses 2 digits
// use double_with_n_digits(2.34332223, 4) to use, in this case, 4 digits
// or use root.set("humidity", 2.34332223, 4) as an alternative
root["humidity"]= 33.887765;
root["light"]=1800;
root["motion"]=1;
// generate the JSON string
char output[200];
root.printTo(output, sizeof(output));
// publish to Particle
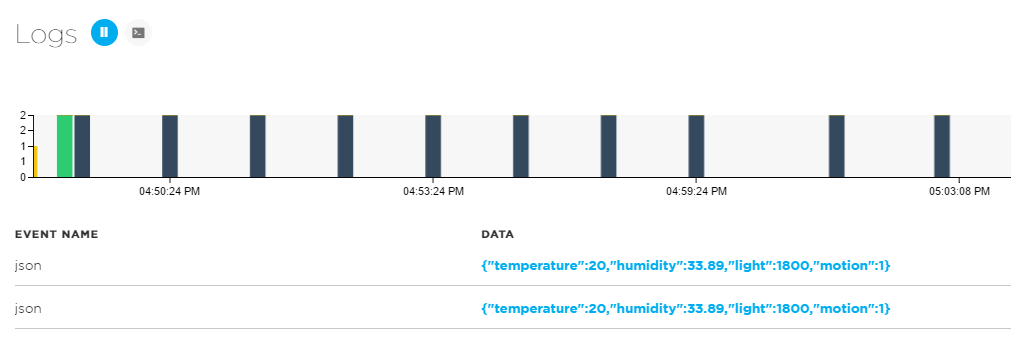
Particle.publish("json", output, 60, PRIVATE);
}
To create a JSON text (a char array) to publish to the Particle Cloud, you first need a jsonBuffer. The sketch above creates a static JSON buffer that allocates 200 bytes on the stack. In that buffer, an empty JSON object is added called root. In the loop, we add key:value pairs to the object for temperature, humidity, light and motion. Besides a JSON object, you can also add a JSON array. It's also possible to nest objects and arrays.
After you have added the key:value pairs, you have an in-memory representation of your JSON data that needs to be converted to a char array (called output above). The char array can contain 200 bytes and with the JSON object's printTo method, we generate the JSON as text by printing it to the buffer. With the JSON as text, we publish the data to the Particle Cloud:
Note that we have only scratched the surface of what you can do with the SparkJson library. For more details about the API and more examples, check out the ArduinoJson documentation.
Now we can apply what we learned to the sketch that uses the actual sensors.
// This #include statement was automatically added by the Particle IDE.
#include <SparkJson.h>

// This #include statement was automatically added by the Particle IDE.
#include <Adafruit_DHT.h>


#define DHTPIN 1     // what pin we're connected to
#define DHTTYPE DHT22        // DHT 22 (AM2302)
#define LIGHTPIN A0         // pin to detect light
#define MOTIONPIN D3        // pin to detect motion
#define LEDPIN D7

// preallocated memory to reserve on the stack; use 200 bytes
StaticJsonBuffer<200> jsonBuffer;

// create a JSON object
JsonObject& root = jsonBuffer.createObject();

// Variables for humidity and temperature
double h, t;

// Variable for light
int l;

// m for continuous detection and motion for
// detection in last 10 seconds
int m, motion = 0;

// init DHT library
DHT dht(DHTPIN, DHTTYPE);

// used for measuring every 10 seconds instead of delay
unsigned long previousMillis = 0;
const long interval = 10000;

void setup() {
    dht.begin();

    // Setup Particle variables
    Particle.variable("temperature", t);
    Particle.variable("humidity", h);
    Particle.variable("light", l);
    Particle.variable("lMotion", m);            // last motion
    Particle.variable("iMotion", motion);       // interval motion

    // Analog pin for light intensity
    pinMode(LIGHTPIN, INPUT);

    // Digital pin for motion
    pinMode(MOTIONPIN, INPUT);

    // Onboard LED to light when there is motion
    pinMode(LEDPIN, OUTPUT);
}

void loop() {
    // get the current millis
    unsigned long currentMillis = millis();

    // get readings after interval
    if(currentMillis - previousMillis >= interval) {
        // reset the timer
        previousMillis = currentMillis;

        // Reading temperature or humidity takes about 250 milliseconds!
        // Sensor readings may also be up to 2 seconds 'old' (its a
        // very slow sensor)
        h = dht.getHumidity();
        // Read temperature as Celsius
        t = dht.getTempCelcius();
        // Read light intensity
        l = analogRead(LIGHTPIN);

        // Check if any reads failed and exit early (to try again).
         if (isnan(h) || isnan(t)) {
            return;
         }

        root["temperature"]=t;
        root["humidity"]=h;
        root["light"]=l;
        root["motion"]=motion;

        // generate the JSON string
        char output[200];
        root.printTo(output, sizeof(output));

        // Publish to Particle
        Particle.publish("env", output, 60, PRIVATE);


        // to check for motion in next interval; reset motion
        motion = false;

    }

    // Detect motion continuously; when detected set motion to true
    // to indicate motion in the interval
    m = digitalRead(MOTIONPIN);
    if (m==HIGH) {
        digitalWrite(LEDPIN, HIGH);
        motion = true;
    } else {
        digitalWrite(LEDPIN, LOW);
    }

}
In the above code, only one event is published and it contains a JSON formatted string with our sensor values. In Particle Cloud, the event data gets formatted as:
{"data":"{\"temperature\":22.90,\"humidity\":37.60,\"light\":2474,\"motion\":0}",
    "ttl":"60",
    "published_at":"2017-05-06T14:34:02.424Z",
    "coreid":"380037000847333439313830",
    "name":"env"}
The device data is in the data key but you'll notice that something is off. The JSON we have sent from the device is formatted as a string instead of an actual JSON object. You do not want the data to end up like this in your back end systems.
One thing you do not want, is to send the above data to IoT Hub. However, there is something we can do in the Particle Cloud at the IoT Hub integration level. In Chapter 1, you configured the Particle IoT Hub integration to forward a simple data point. You probably noticed, that there was a link to Advanced Settings that you did not have to use at that point. But now we can. Create a new integration for the env event (as used in our latest sketch) and then use the following Advanced Settings:
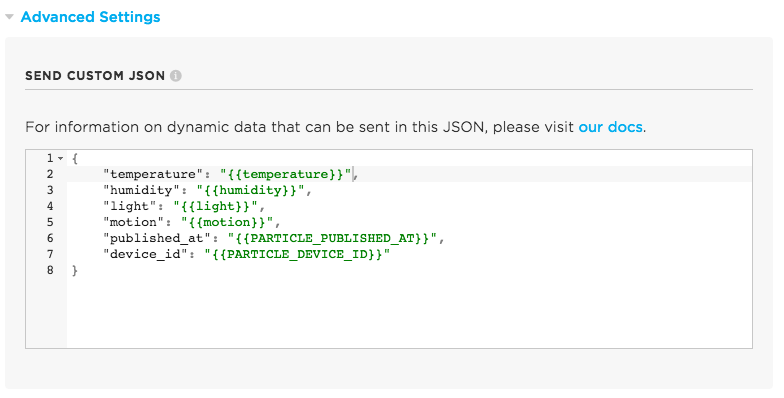
Notice how you can pick up the values by enclosing them in double curly braces. The values generated by the Particle Cloud such as the device id, can be retrieved with special variables. See the Particle documentation for more details about these variables.
Sadly, at this point in time, the values you send need to be strings. That is annoying since we will need to do casting at the back end to perform meaningful calculations. To send average values with Stream Analytics for instance, casting will be required in the Stream Analytics query.
In the next section, we will see how to send data using the MQTT protocol. At first, we will send the data to a generic MQTT server. In later chapters, we will use MQTT to send data directly to IoT Hub, bypassing the Particle Cloud and sending properly formatted JSON values.