Real-time Browser Updates
In this section, we will create a basic HTML page that displays real-time IoT data as illustrated in the screenshot below.

New data will be added to an HTML unordered list. The components required to make the above work are the following:
- Redis: we already demonstrated the use of Redis in Docker Primer
- Node.js application with socket.io: server-side component that provides the real-time data to the browser
- HTML page with socket.io JavaScript library: client-side component to accept real-time data from our Node.js application
Note that the use of Redis is not actually required. We could have used the PubSub functionality of Mosquitto instead.
Redis
Install Redis using Helm. The Helm chart contains a sample values.yaml file. Grab that file and make the following changes:
- under persistence, set enabled to false
- set usePassword to false
Indeed, we will not persist any data to disk as we merely use transient pub/sub functionality. We are also allowing anonymous access.
To install Redis, use the following command from the folder that contains the modified values.yaml:
helm install --name pubsub -f values.yaml stable/redis
Based on the release name pubsub, you will end up with a Kubernetes service called pubsub-redis. The service will be of type ClusterIP.
If you want to run the redis-cli from another pod, you can use the following command:
kubectl run pubsub-redis-client --rm --tty -i --image bitnami/redis:4.0.8-r0 -- bash
This runs bash from the bitnami Redis image. When you exit the pod (with the exit command), the pod will be removed because of the --rm flag. If you run redis-cli from another pod, connect to your Redis image with redis-cli -h pubsub-redis.
If you want to test pub/sub functionality, start another instance of redis-cli. In the first instance type subscribe mychannel. In the second instance type publish mychannel test. You should see the test value in the first instance.
Great! With the Redis server running, let's turn our attention to the real-time Node.js server.
Real-time Server
We have already built the real-time server as a container in Docker Primer. You will need to rebuild the container with a few changes to both index.js and index.html.
Index.js has just a few changes:
var express = require('express');
var path = require('path');
var app= express();
var server = require('http').Server(app);
var io = require('socket.io')(server, { origins: '*:*'});
var port = process.env.PORT||80;


var subscriber=require("redis").createClient(6379, process.env.REDISHOST);


app.get('/', function(req,res,next){
    res.sendFile(__dirname + '/index.html');
});


io.sockets.on('connection', function(socket){
    console.log("Connection from " + socket.id);
    socket.on('channel', function(channel){
        console.log('Message from client for: ' + channel);
        socket.join(channel);
    });
});

subscriber.on("pmessage", function(pattern,channel, message){
    console.log("Message from " + channel + " was: " + message);
    io.sockets.in(channel).emit('message', message);
});

subscriber.on('error', function(err) {
    console.log('An error occurred ' + err);
});

subscriber.psubscribe(process.env.SUBSCRIBEPATTERN || "*");


server.listen(port, function() {
    console.log('Listening on port ' + port);

});
The modifications are as follows:
- default port set to 80 or via the PORT environment variable
- the pattern subscribe is * or whatever is in the SUBSCRIBEPATTERN environment variable
In Redis, a pattern subscribe is a subscription to multiple channels based on a pattern with wildcards. Later, we will use airq:* as the pattern to match the MQTT topic which should start with airq/. Along the way, the MQTT topic will be converted to a Redis channel, changing the forward slashes (/) to colons (:).
You might wonder how the above code works! Let's go through it:
- express is used as the http server; socket.io coexists with express
- a client to Redis is created, using the REDISHOST environment variable; we will need to pass pubsub-redis as the hostname which is the name of our Kubernetes service
- the / handler is configured to serve the index.html file; that file contains the client-side socket.io code that displays real-time data
- On the line starting with io.sockets:on - when a connection on a socket is detected, log the socket.id and setup a handler that puts the socket in a socket.io channel (aka room) specified by the client; the client-side code in the HTML page is setup to join a socket.io channel like airq:city:building:room expressing the need to see real-time updates for that location
- On the line starting with subscriber.on (pmessage) - when a value arrives in one of the pattern-subscribed Redis channels, emit the message from that channel to all sockets that are in a room that matches the channel name
- subcriber.psubscribe does the actual pattern subscription
- last, but not least, the HTTP server (with socket.io) is started
My goodness, who makes up stuff like this? And what are those rooms all about? More often than not, an example of a real-time application is a chat application. In such an application, users join rooms and when they type a message, the other users in the room see the message. Hence the use of rooms in socket.io! But let's just call them channels ok?
Index.html also has a few changes:
<html>
    <head>
        <script src="/socket.io/socket.io.js"></script>
        <script src="https://code.jquery.com/jquery-1.11.1.js"></script>
    </head>
</html>
<body>
    <h1>Realtime IoT Data</h1>
    <ul id="messages"></ul>
    <script>
        var urlParams = new URLSearchParams(window.location.search);
        var socket = io();

        socket.emit('channel',urlParams.get('channel'));

        socket.on('message', function(msg){

            message = JSON.parse(msg);
            // message in form of: {"device": "simulator", "type": "airq","temperature": 33.84 , "humidity": 43.02}
            // need to add time later
            console.log(message);
            $('#messages').append($('<li>').text("Device: " + message.device + ". Temperature was " +
                message.temperature + ". Humidity was " + message.humidity));
        })
    </script>
</body>
URLSearchParams extracts URL parameters. The page expects a parameter called channel like so:
http://IP-or-HOST?channel=airq:city:building:room
With socket.emit, the client asks to join the channel and see real-time updates. With socket.on('message', ...) we setup a callback function that parses the JSON payload arriving in the channel. With a bit of jQuery, we append the data to an HTML unordered list.
With what you have learned so far, finish and deploy this service:
- create a Dockerfile that builds a container image for this service; do not forget to also put index.html in the image
- upload the container image to Docker Hub
- create a Kubernetes YAML file with a service and a deployment; you can use the YAML file in REST API to InfluxDB as an example; the service should be of type LoadBalancer
In my case, I deployed one instance of the real-time server:
kub-rt-77df5f6b7-6xnmh 1/1 Running 0 1d
With only one Redis server in the back-end, it does not make much sense to scale out the front-end. Load balancing socket.io connections can also be tricky because of the use of multiple protocols (long polling, WebSockets) and the networking devices between the client and the server. In the case of a cloud-based Kubernetes deployment, you have the cloud load balancer and kube-proxy. And then we have not talked about putting an Ingress Controller in between. In general, it will be easiest to get it to work if you take into account the following two items:
- use a layer 4 load-balancer that preserves the client IP address
- in your Kubernetes service of type LoadBalancer, in the spec, set sessionAffinity: ClientIP
Let's leave socket.io networking for what it is and focus on creating a bridge between MQTT and Redis.
MQTT to Redis Bridge
Similar to what we did in From MQTT to InfluxDB, we will write a small service that forwards data from Mosquitto to Redis. main.go is as follows:
package main

import (
    "fmt"
    "log"
    "os"
    "os/signal"
    "syscall"

    "github.com/go-redis/redis"
    "github.com/kelseyhightower/envconfig"
)

// Specification for environment variables
type Specification struct {
    MQTTHost  string `envconfig:"MQTT_MOSQUITTO_SERVICE_HOST" required:"true"`
    MQTTPort  int    `envconfig:"MQTT_MOSQUITTO_SERVICE_PORT" default:"8883"`
    MQTTUser  string `envconfig:"MQTT_USER" default:""`
    MQTTPass  string `envconfig:"MQTT_PASS" default:""`
    MQTTTopic string `envconfig:"MQTT_TOPIC" default:"airq/#"`
    RedisHost string `envconfig:"PUBSUB_REDIS_SERVICE_HOST" required:"true"`
    RedisPort string `envconfig:"PUBSUB_REDIS_SERVICE_PORT" required:"true"`
}

var redisClient *RedisClient

// defined at package level; initialised in init()
var s Specification

func init() {
    // get environment variables via Specification
    err := envconfig.Process("", &s)
    if err != nil {
        log.Fatal(err.Error())
    }
}

func main() {
    c := make(chan os.Signal, 1)
    signal.Notify(c, os.Interrupt, syscall.SIGTERM)

    log.Println("Setting up Redis client")
    redisAddress := fmt.Sprintf("%s:%s", s.RedisHost, s.RedisPort)
    redisOptions := &redis.Options{Addr: redisAddress}
    var err error
    redisClient, err = NewRedisClient(redis.NewClient(redisOptions))
    if err != nil {
        log.Println("Error during creation of Redis client ", err)
    }

    log.Println("Setting up MQTT client")
    err = NewMQTTClient(s.MQTTHost, s.MQTTPort, s.MQTTUser, s.MQTTPass, s.MQTTTopic)
    if err != nil {
        log.Println("Error during creation of  MQTT client ", err)
    }
    log.Println("Created MQTT client. Forwarding data...")

    // wait for SIGTERM
    <-c

}
To interact with Redis, the package github.com/go-redis/redis is used. On the line that starts with redisAddress, we format the Redis address as hostname:port and we use the Kubernetes service environment variables. Remember that those environment variables are injected into the pods automatically. The call to NewRedisClient returns a pointer to RedisClient which is defined in redis.go (see later). RedisClient has a method called Publish, to publish a message to a channel.
The call to NewMQTTClient sets up an MQTT client connection based on the passed parameters, which are all environment variables. mqtt.go contains the MQTT logic.
redis.go contains the following code:
package main

import (
    "github.com/go-redis/redis"
)

// RedisClient struct
type RedisClient struct {
    Client *redis.Client
}

// NewRedisClient returns a point to RedisClient
func NewRedisClient(client *redis.Client) (*RedisClient, error) {
    // try to ping the Redis server
    err := client.Ping().Err()

    // return *RedisClient and error
    // even with error, connection can come back up later
    return &RedisClient{Client: client}, err
}

// Publish a message to a channel and return error if any
func (redis *RedisClient) Publish(channel, message string) error {
    return redis.Client.Publish(channel, message).Err()
}
RedisClient is our own struct that gets initialised with a call to NewRedisClient. NewRedisClient needs a pointer to an actual redis.Client. It returns a pointer to our RedisClient and initializes the Client field. The Publish method of our struct can then use the Client field to perform Redis commands. Doing it controller-style with dependency injection is a bit of overkill here but it can pay off if you need to implement more complex custom logic.
mqtt.go is not implemented like redis.go and uses a more traditional approach:
package main

import (
    "crypto/tls"
    "errors"
    "fmt"
    "log"
    "os"
    "strings"

    MQTT "github.com/eclipse/paho.mqtt.golang"
)

var mqttClient MQTT.Client

// Location derived from MQTT topic
type Location struct {
    City     string
    Building string
    Room     string
}

// NewMQTTClient sets up the MQTT client
func NewMQTTClient(host string, port int, user string, password string, topic string) error {
    server := fmt.Sprintf("tcps://%s:%v", host, port)
    hostname, _ := os.Hostname()
    connOpts := MQTT.NewClientOptions()
    connOpts.AddBroker(server)
    connOpts.SetClientID(hostname)
    connOpts.SetCleanSession(true)
    connOpts.SetUsername(user)
    connOpts.SetPassword(password)
    tlsConfig := &tls.Config{InsecureSkipVerify: true}
    connOpts.SetTLSConfig(tlsConfig)
    connOpts.OnConnect = func(c MQTT.Client) {
        if token := c.Subscribe(topic, 0, onMessageReceived); token.Wait() && token.Error() != nil {
            panic(token.Error())
        }
    }
    mqttClient = MQTT.NewClient(connOpts)
    if token := mqttClient.Connect(); token.Wait() && token.Error() != nil {
        return token.Error()
    }

    log.Println("MQTT client connection to ", server)
    return nil

}

// onMessageReceived is triggered by subscription on MQTTTopic (default #)
func onMessageReceived(client MQTT.Client, message MQTT.Message) {
    log.Printf("Received message on MQTT topic: %s\n", message.Topic())

    //verify the MQTT topic; is it like airq/city/building/room?
    //if not, log the error and return; no data sent to Redis
    location, err := verifyTopic(message.Topic())
    if err != nil {
        log.Println(err)
        return
    }

    // write data to Redis
    // airq/city/building/room becomes airq:city:building:room
    channel := fmt.Sprintf("airq:%s:%s:%s", location.City, location.Building, location.Room)

    // note that message.Payload() is the original payload sent by the device to Mosquitto
    err = redisClient.Publish(channel, string(message.Payload()))
    if err != nil {
        // log the error but continue
        log.Println("Could not publish to Redis ", err)
    } else {
        log.Printf("Forwarded message to Redis on channel: %s\n", channel)
    }

}

// verifyTopic checks the MQTT topic conforms to airq/city/building/room
func verifyTopic(topic string) (*Location, error) {
    location := &Location{}
    items := strings.Split(topic, "/")
    if len(items) != 4 {
        return nil, errors.New("MQTT topic requires 4 sections: airq, city, building, room")
    }

    location.City = items[1]
    location.Building = items[2]
    location.Room = items[3]

    if items[0] != "airq" {
        return nil, errors.New("MQTT topic needs to start with airq")
    }

    if location.City == "" || location.Building == "" || location.Room == "" {
        return nil, errors.New("MQTT topic needs to to airq/city/building/room")
    }

    return location, nil
}
The code is almost identical to the code used in From MQTT to InfluxDB. The main difference is the call to redisClient.Publish. If that call results in an error, we simple log the error and continue.
With what you have learned so far, the next steps are easy:
- build a Linux executable, on Linux and MacOS set the GOOS environment variable to linux
- create a Dockerfile
- build the container image from the Dockerfile
- push the container image to Docker Hub
- create a YAML file for a Kubernetes deployment; there is no need for a service
The full code is available in https://github.com/gbaeke/mqtt-redis. You can use dep ensure to install the dependencies automatically. See https://golang.github.io/dep/docs/introduction.html for more information about dep.
If you got all of this working, data you send to Mosquitto using a channel like airq/city/building/room will be forwarded to a Redis channel like airq:city:building:room. The real-time socket.io server subscribes to those Redis channels and forwards the channel payload to connected socket.io clients. Our socket.io client is simple and just shows an HTML unordered list. But you could just as well use a JavaScript chart library and update charts in real-time. The possibilities are endless!
Bonus: Freeboard
Freeboard is an open source dashboarding tool that can easily be installed and configured. The screenshot below shows a few gauges and sparklines that connect to our socket.io server.
 You will find full installation instructions over at https://github.com/Freeboard/freeboard. The installation instructions require npm and grunt. Make sure you have Node.js installed and also install grunt with npm install -g grunt. Because Freeboard is just HTML and JavaScript, run it from a web server. I installed http-server with npm install -g http-server and then ran http-server -p 80.
By default, Freeboard does not support socket.io sources. You will need to install a plugin. You will find such a plugin and instructions over at https://github.com/hugocore/freeboard.io-plugins/tree/master/datasources/plugin_nodejs_sample. I just took the plugin_node.js file and dropped it in the plugins/thirdparty folder. In the index.html file, add the plugin:
<script type="text/javascript">
        head.js("js/freeboard_plugins.min.js",
                // *** Load more plugins here ***
                "plugins/thirdparty/plugin_node.js",
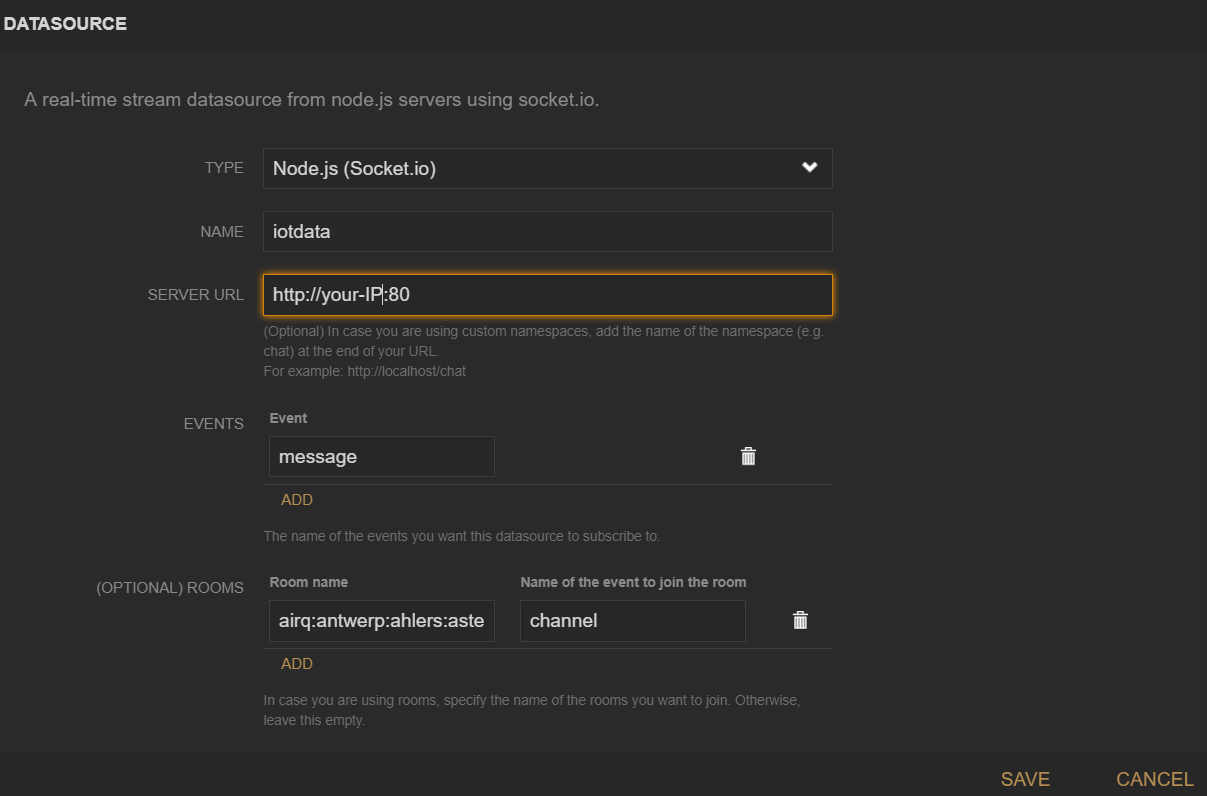
When you run http-server -p 80 in the folder that contains index.html, Freeboard can be accessed from your browser at http://localhost. Now add a datasource:
 Change your-IP to the IP address of your socket.io server. As you can see, the plugin supports rooms. Because we use the event channel to join a room, you need to set the rooms configuration as above. After joining a room, our socket.io server uses the message event to send data so set message as the event name.
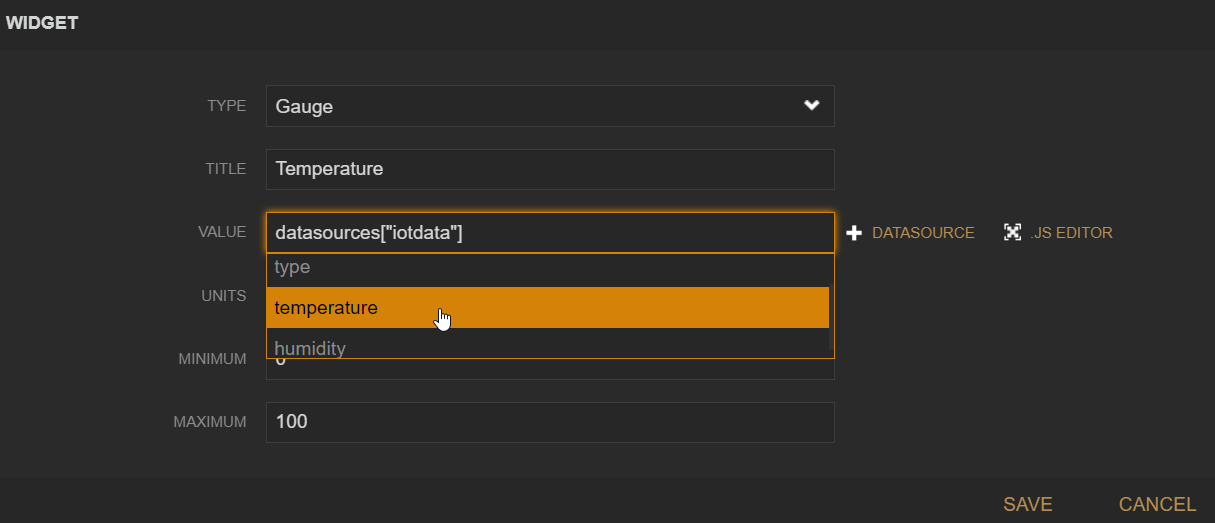
That's it. When you add a widget to the dashboard, you can specify the datasource. The properties such as temperature and humidity should be in the dropdown list if the connection to your socket.io server is successful.

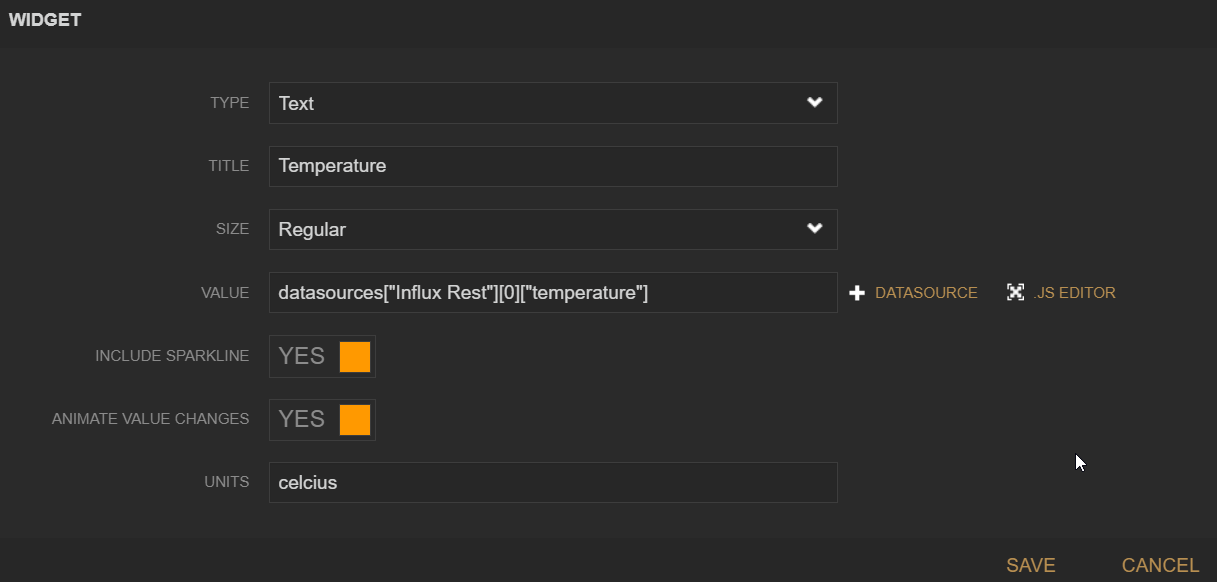
Note that you can also use the JSON datasource with the REST API we created in REST API to InfluxDB. I created a JSON datasource that connects to https://your-hostname/measurements/last/1. In a widget, you use the returned data as follows:
 Indeed, the REST API returns an array so we take out the first and only item at index 0.
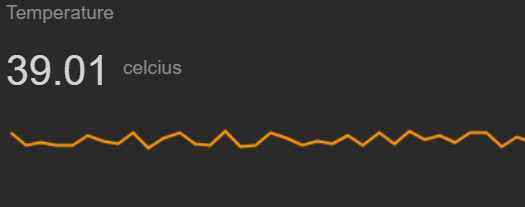
The resulting widget looks like the image below:

Freeboard can also be used as a service from http://freeboard.io.
In the next section, we will look at application monitoring.