Connecting a real device
In this chapter, we will use a Particle Electron to measure temperature and humidity in the real world. The Particle Electron is 3G-enabled and comes with a SIM card that provides global coverage. Naturally, you need to pay for such a service but the monthly costs are very reasonable. I pay 2.99$ monthly for 3GB of data.
The DHT22 sensor I used is not very accurate but it is fine for prototyping. It is very simple to connect to the Particle. But let's not get ahead of ourselves and take a closer look at the Particle ecosystem.
Particle ecosystem
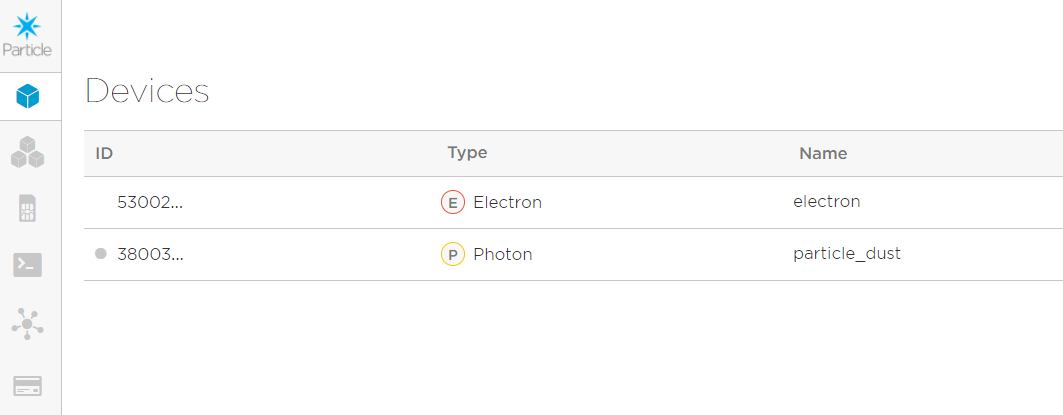
Particle provides both devices and a cloud platform to manage your fleet of IoT devices, the Device Cloud. When you buy a Particle device like the Electron or Photon, you also get access to this cloud environment at no extra cost. The screenshot below shows two devices in the Particle Console, an Electron and a Photon:
When you click on a device, you get the details like the device ID, its firmware version, and more:
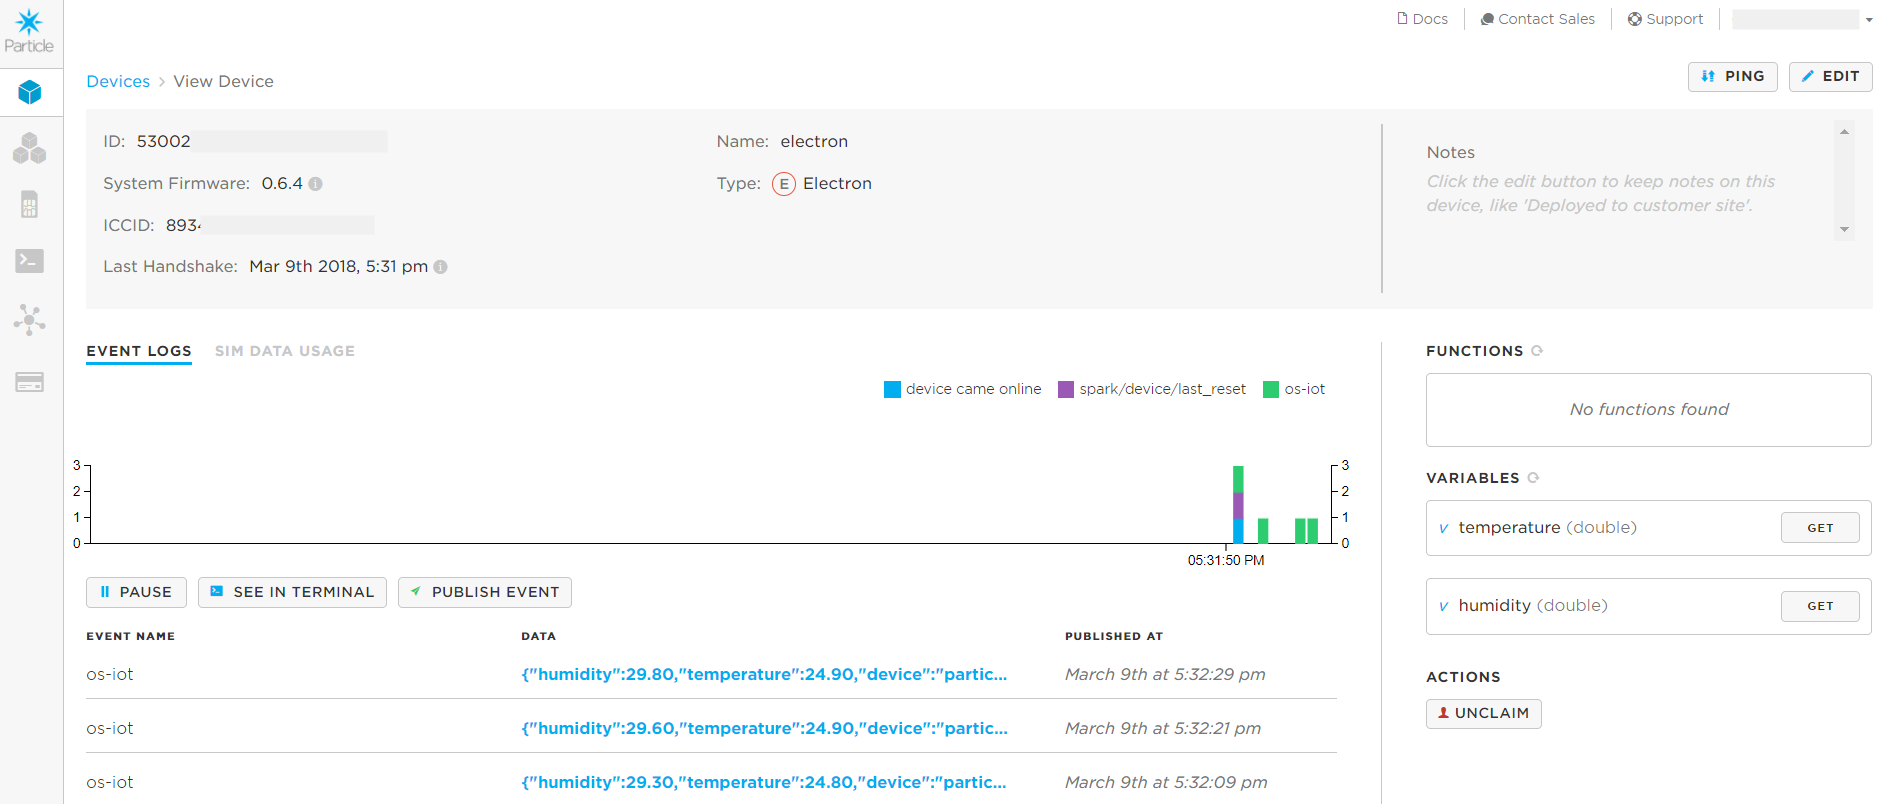
The firmware version has no relation to the firmware you will create later. Particle devices have a lower level system firmware that provides all sorts of features such as the ability to create functions and variables. The firmware we will develop later has been tested with the Electron system firmware 0.6.4.
The screenshot also shows incoming events. In this case, the events are JSON strings that contain the humidity and temperature values. Note that those events are coming into the Particle Device Cloud. We still need to perform additional actions to get the data to our MQTT server.
Particle also provides APIs to interact with your devices. When you click the See in terminal button, you get a curl command that allows you to track events from the command line:
curl https://api.particle.io/v1/devices/events?access_token=ACCESS_TOKEN
When I use the command with the provided access token, the result is:
event: os-iot
data: {"data":"{\"humidity\":26.70,\"temperature\":26.00,\"device\":\"particle_electron\",\"type\":
    \"airqmobile\",\"topic\":\"airq/hamme/home/desk\"}","ttl":60,"published_at":"2018-03-09T16:41:18.397Z",
    "coreid":"COREID"}


event: os-iot
data: {"data":"{\"humidity\":26.90,\"temperature\":26.00,\"device\":\"particle_electron\",\"type\":
    \"airqmobile\",\"topic\":\"airq/hamme/home/desk\"}","ttl":60,"published_at":"2018-03-09T16:41:32.845Z",
    "coreid":"COREID"}
In the above output, the word COREID replaces the actual core ID which is a unique identifier for your device. You can control the event name which, in the above example, is os-iot.
If you want the device to send these events and do other meaningful work, you will have to write some code. Although you can use the Atom IDE with Particle plugins, Particle also provides a cloud-based IDE called Particle Build:
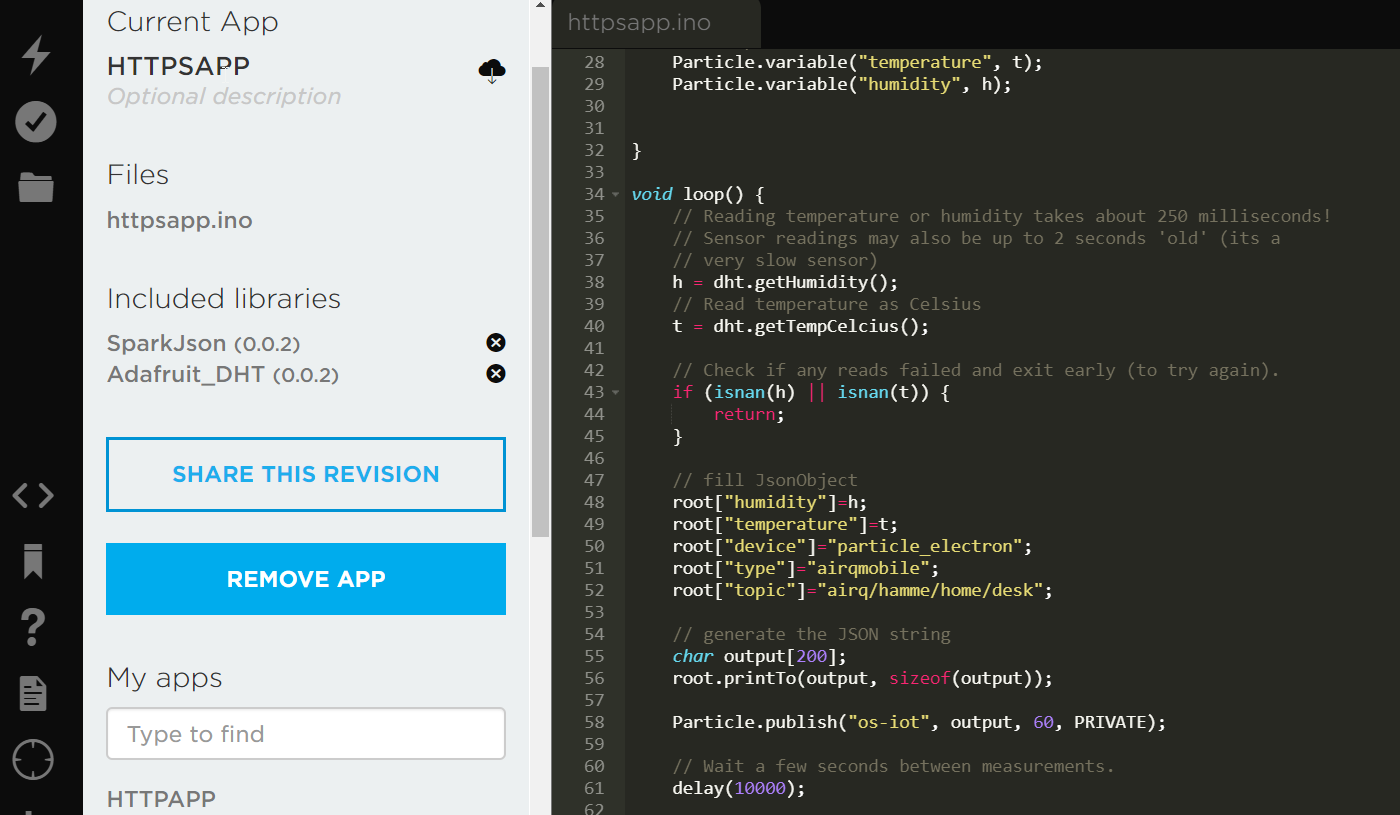
For our needs, Particle Build will do fine. As shown in the above image, you can include libraries in your code. I have included a JSON library to easily create a JSON object and a library to work with the DHT22 sensor.
Wiring the sensor
Use digital pin 2... more details to be added...
Creating the firmware
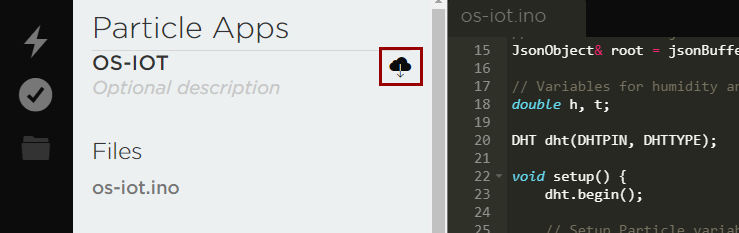
Open up the Particle IDE and create a new app called os-iot:
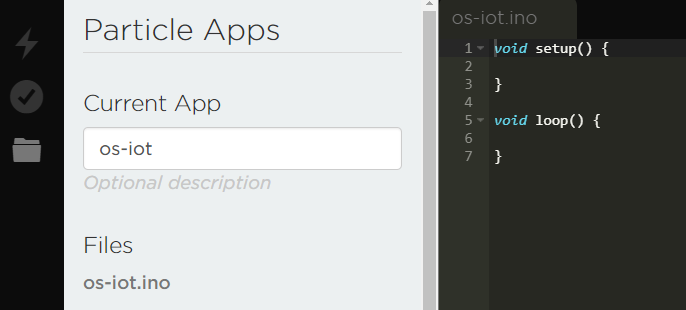
Particle apps are like Arduino apps and contain a setup() and loop() function. Remove the code and replace it with the following:
#define DHTPIN 2 // what pin we're connected to

#define DHTTYPE DHT22 // DHT 22 (AM2302)

// preallocated memory to reserve on the stack; use 200 bytes
StaticJsonBuffer<200> jsonBuffer;

// create a JSON object
JsonObject& root = jsonBuffer.createObject();

// Variables for humidity and temperature
double h, t;

DHT dht(DHTPIN, DHTTYPE);

void setup() {
    dht.begin();

    // Setup Particle variables
    Particle.variable("temperature", t);
    Particle.variable("humidity", h);


}

void loop() {
    // Reading temperature or humidity takes about 250 milliseconds!
    // Sensor readings may also be up to 2 seconds 'old' (its a
    // very slow sensor)
    h = dht.getHumidity();
    // Read temperature as Celsius
    t = dht.getTempCelcius();

    // Check if any reads failed and exit early (to try again).
    if (isnan(h) || isnan(t)) {
        return;
    }

    // fill JsonObject
    root["humidity"]=h;
    root["temperature"]=t;
    root["device"]="particle_electron";
    root["type"]="airqmobile";
    root["topic"]="airq/hamme/home/desk";

    // generate the JSON string
    char output[200];
    root.printTo(output, sizeof(output));

    Particle.publish("os-iot", output, 60, PRIVATE);

    // Wait a few seconds between measurements.
    delay(10000);


}
Now use CTRL-S to save your work. Because we use the SparkJson and Adafruit_DHT libraries in our code, we need to include them.

Click the Libraries button (yellow square above) and search for SparkJson. Click the library and click Include in project. Next, select your app and click Confirm. Repeat the steps for the Adafruit_DHT library. You should now have two #include statements in your code and the libraries are listed:

Now we can verify the code by clicking the button with the checkmark in the left hand corner, under the lightning symbol. The bottom of the screen will show the text Compiling code... If there are no issues you will see Code verified! Great work!
Let's take a look at the code, excluding the libraries. If you want to know how the libraries do their work, check out the following links:
- SparkJson: https://github.com/menan/SparkJson
- Adafruit_DHT: https://github.com/adafruit/DHT-sensor-library
In the setup() function, there are two calls to Particle.variable. Each call sets up a variable where the name is the first parameter and the second parameter is a variable in the code. The code uses t and h, two doubles used to gather the temperature and humidity from the sensor. Particle variables can be inspected from the console or from the API. For instance with curl:
curl "https://api.particle.io/v1/devices/COREID/temperature?access_token=ACCESS_TOKEN"
The result:
{"cmd":"VarReturn","name":"temperature","result":26.899999618530273,"coreInfo":{"last_app":"",
"last_heard":"2018-03-09T17:36:40.356Z","connected":true,"last_handshake_at":"2018-03-09T16:31:56.534Z",
"deviceID":"COREID","product_id":10}
Great stuff! With a simple API call you can retrieve the last measured temperature from the device in real time!
Near the end of the code, you will find the call that publishes the JSON string to device cloud:
Particle.publish("os-iot", output, 60, PRIVATE);
With a simple call to Particle.publish, an event called os-iot is pushed to device cloud. The event contains the generated JSON and has a time to live (TTL) of 60 seconds. At the time of this writing 60 seconds is the default. Particle have not yet implemented the support for longer TTL values and you cannot access previously published but TTL-unexpired events.
The event is private which means only the owner can subscribe to such events. When you set the event to public, anyone can subscribe. See the Particle.subcribe() information if you want to subscribe to events from other devices. We will not use that functionality.
Note that, unlike our simulator, you should not send more than one event per second. In the code, the delay(10000) call pauses the loop for 10 seconds.
Loading the firmware
If you use a Particle Photon, you can easily compile the firmware in Particle Build and update the device over the air. With an Electron, the firmware should be updated over USB. But first, compile and download the firmware with the cloud button in the Particle Build IDE:
To update the firmware over USB, install the Particle CLI by following the instructions in the documentation. If you downloaded the firmware as firmware.bin, run the following command from the folder that contains the firmware:
particle flash --usb firmware.bin
Not too fast though, because the device needs to be in DFU mode. See https://docs.particle.io/guide/getting-started/modes/electron/#dfu-mode-device-firmware-upgrade for instructions.
With the device flashing yellow, use the particle flash command above. The result should be:
Found DFU device 2b04:d00a
spawning dfu-util -d 2b04:d00a -a 0 -i 0 -s 0x08080000:leave -D firmware.bin
dfu-util 0.8

Copyright 2005-2009 Weston Schmidt, Harald Welte and OpenMoko Inc.
Copyright 2010-2014 Tormod Volden and Stefan Schmidt
This program is Free Software and has ABSOLUTELY NO WARRANTY
Please report bugs to dfu-util@lists.gnumonks.org

Opening DFU capable USB device...
ID 2b04:d00a
Run-time device DFU version 011a
Claiming USB DFU Interface...
Setting Alternate Setting #0 ...
Determining device status: state = dfuIDLE, status = 0
dfuIDLE, continuing
DFU mode device DFU version 011a
Device returned transfer size 4096
DfuSe interface name: "Internal Flash   "
Downloading to address = 0x08080000, size = 13236
Download        [=========================] 100%        13236 bytes
Download done.
File downloaded successfully
Invalid DFU suffix signature
A valid DFU suffix will be required in a future dfu-util release!!!

Flash success!
The device will now boot and start sending measurements to device cloud.
Sending the events to Mosquitto
Although it is straightforward to send sensor data to Device Cloud, we want to send the data to our Mosquitto server. We can do this in two ways:
- on the device, use an MQTT library that supports TLS
- on the device, send the data to Device Cloud and have Device Cloud forward the data to our MQTT server
Although there are open-source libraries that provide MQTT support over TLS for Particle devices, they do not work reliably. The Particle system is optimized to securely send data to Particle Cloud, not leaving much room for anything else.
The other approach is to grab the data when it arrives in Device Cloud and then forward the data to our Mosquitto server using an integration. Several integration types are available:
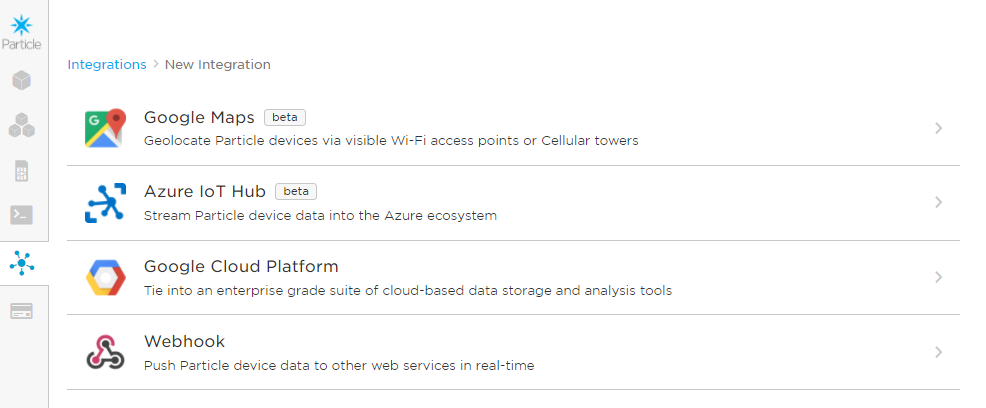
The available integrations sadly do not have support for MQTT directly. In the next chapter, we will use the Webhook feature in combination with a Kubeless function that forwards the data to our MQTT server. Kubeless is a FaaS (Funcions As A Service) solution for Kubernetes.