Adding Authentication to the REST API
In this section, the REST API will be secured. To make a call to the /since action of the measurement resource, a JWT (JSON Web Token) will be required. This token should be added to the Authorization HTTP header. Before we start to modify code, take a look at how you add this token to a request with Postman:
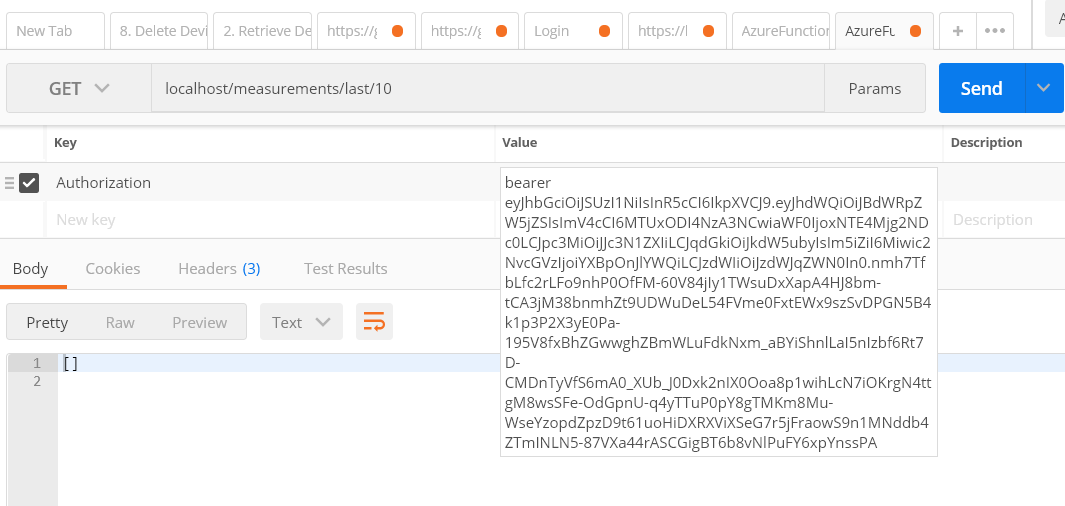
The API was started on my local machine so the call from Postman is to http://localhost. As you can see, an Authorization header was added with the token added after the word bearer.
Generating a JWT token
A JWT token can be generated from code or with tools. One of those tools is the excellent jwtgen from https://github.com/vandium-io/jwtgen. When you generate a JWT token, it needs to be signed so the token receiver (our API) can validate the token. How the token gets validated, depends on the signing algorithm. Several signing methods are available:
- you can sign the token with a symmetric key; our API will require the same key to validate the signature; an example is HS256 (HMAC with SHA256)
- you can sign the token with a private key; our API will require the public key (derived from the private key) to validate the signature; an example is RS256 (RSA signature with SHA-256)
We will sign the JWT with a private key and use RS256.
The token will contain a collection of claims. Some of those claims are standard and part of the spec, and some will be our own. You will find a brief intro to the standard fields on Wikipedia. Our token will contain these standard claims, in addition to a scopes claim with value api:read. With api:read in the scopes claim, our API will accept the token. Without api:read, you will not be able to make the call!
Goa, with the help of some JWT middleware, will validate the JWT token. Required scopes can be added to the design specification, freeing you from having to write code to validate the scopes. In the action handlers, you can further inspect the token for custom processing.
Before we write the code, generate a private key with openssl:
openssl genpkey -algorithm RSA -out influx.key -pkeyopt rsa_keygen_bits:2048
The above command generates a 2048 bits private key in PEM format in a file called influx.key. Next, generate the public key:
openssl rsa -pubout -in influx.key -out influx.key.pub
The application that generates the JWT will need to read the influx.key file. It will sign the JWT with that key. Our API will need to read the influx.key.pub file. It will verify the signature with that key. Let's create the JWT generator in Go. We will use the excellent jwt-go library at https://github.com/dgrijalva/jwt-go. Install it with:
go get github.com/dgrijalva/jwt-go
Now create a new folder and copy influx.key to it. Next, add the following main.go file:
package main

import (
    "fmt"
    "io/ioutil"
    "log"
    "time"

    jwt "github.com/dgrijalva/jwt-go"
)

func main() {
    fmt.Println("Creating a JSON Web Token")

    b, err := ioutil.ReadFile("./influx.key")
    if err != nil {
        log.Fatal(err)
    }
    key, err := jwt.ParseRSAPrivateKeyFromPEM(b)
    if err != nil {
        log.Fatal(err)
    }

    token := jwt.New(jwt.SigningMethodRS256)
    in10m := time.Now().Add(time.Duration(10) * time.Minute).Unix()
    token.Claims = jwt.MapClaims{
        "iss":    "Issuer",          // who creates the token and signs it
        "aud":    "Audience",        // to whom the token is intended to be sent
        "exp":    in10m,             // time when the token will expire (10 minutes from now)
        "jti":    "Unique",          // a unique identifier for the token
        "iat":    time.Now().Unix(), // when the token was issued/created (now)
        "nbf":    2,                 // time before which the token is not yet valid (2 minutes ago)
        "sub":    "subject",         // the subject/principal is whom the token is about
        "scopes": "api:read",        // token scope - not a standard claim
    }

    tokenString, err := token.SignedString(key)

    fmt.Println(tokenString, err)

}
The private key file, influx.key, is read from the file system and stored in b, a slice of bytes ([]byte). Because it is in the PEM format, the utility function jwt.ParseRSAPrivateKeyFromPEM reads it and stores the result in key. Next, we generate a new token and use RS256. As you can see, I was not very imaginative with the claims and they are not all filled in as they should. That is ok for our purposes. Note that the token will only be valid for 10 minutes (exp) after the generation time (iat). At the end, the token is signed with the key and printed to the screen:
eyJhbGciOiJSUzI1NiIsInR5cCI6IkpXVCJ9.eyJhdWQiOiJBdWRpZW5jZSIsImV4cCI6MTUxODI4O
TE4MywiaWF0IjoxNTE4Mjg4NTgzLCJpc3MiOiJJc3N1ZXIiLCJqdGkiOiJVbmlxdWUiLCJuYmYiOjI
sInNjb3BlcyI6ImFwaTpyZWFkIiwic3ViIjoic3ViamVjdCJ9.OR2s2q03UI68_lNRmVIt567qJICY
xoPRLAB6hJmzyAI2IroJeRaU3lgQ8SbCpkMp4kja4z_rYlXWQGXN6OgIy5GSYQyN6KD0fO6kxxkD9Z
dp6WN35O8W5GN4bXRmbHz0qXqcjN7JKVuJjUHxmostC-JjsESSY8byLbfmBgXPOO8_2KW4mzkTLKQO
04vZMrMnN7IUjj3tIk9FJ-MYwJzFnDu2OKKTEKj5EqeMDgMZTSKuMUFBaXjptYXIsYsw-7yOwvOh2b
ncmEi3SleEiwTPhUBR5L8TN9jpLIzhsyvuDKprVNiG51kc7_XgUB4H-QlC96G2LgiVPWovgAfNkPQzNA
Note that in the above output, newlines were added to the token for readability. Not very exciting, this bunch of characters. If you load this into the debugger over at https://jwt.io however, you can see the contents:
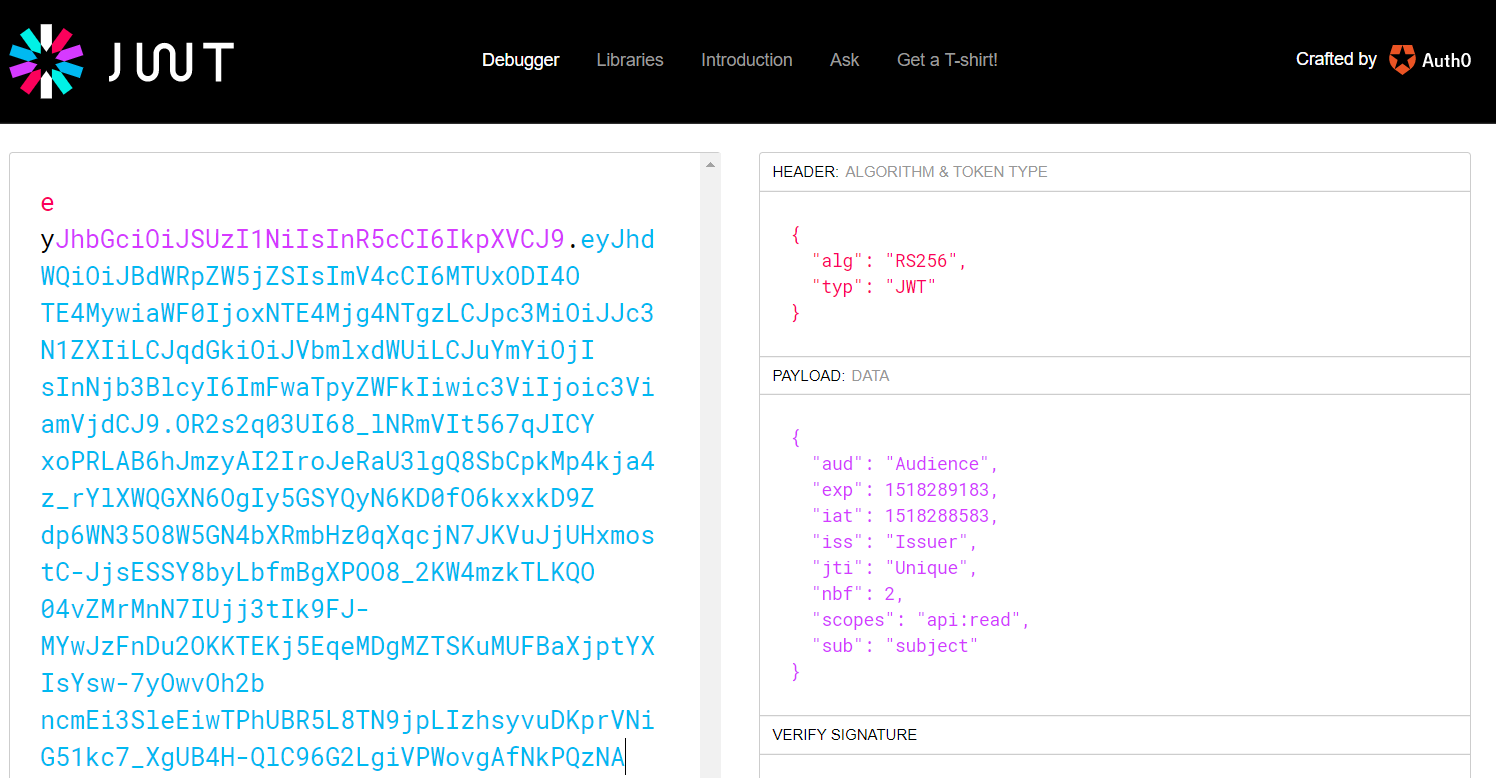
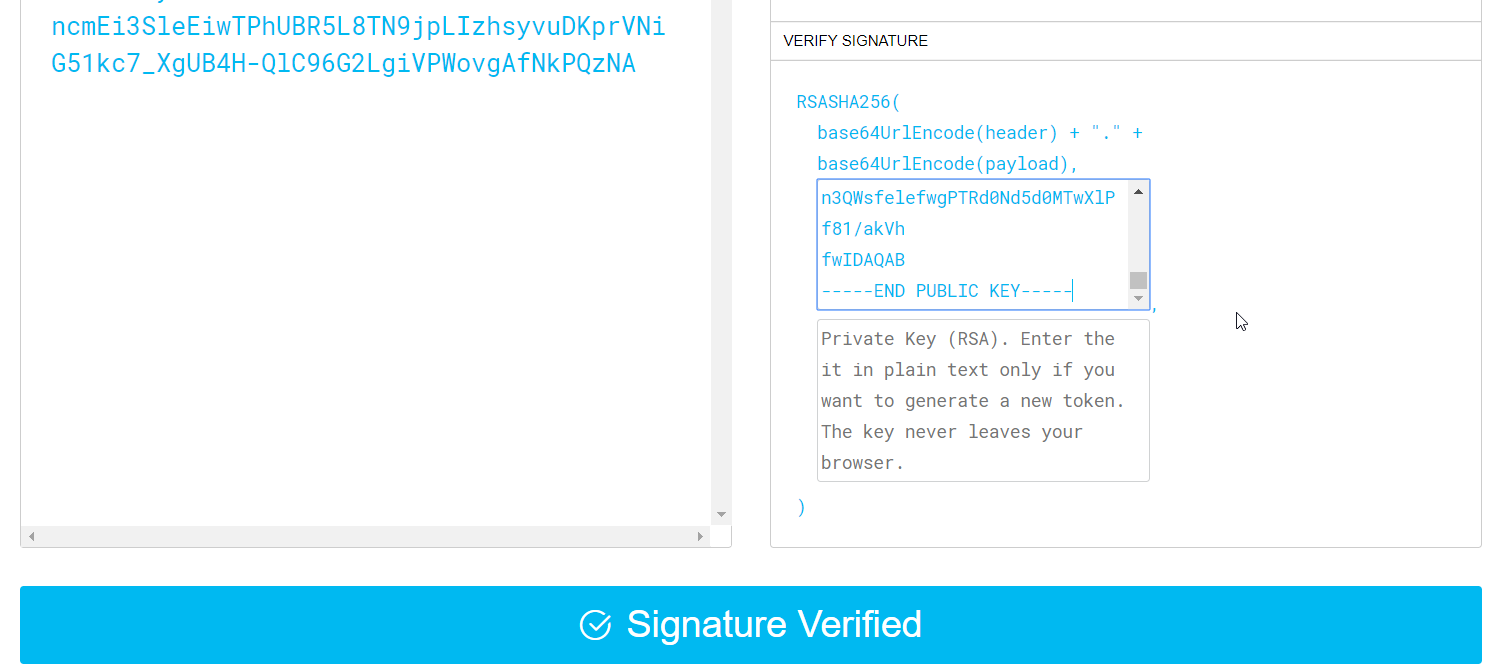
The debugger knows we used RS256 to sign the token and can extract the payload. If you are paying attention (of course you are), it is clear that a JWT is not encrypted. Luckily, we already took care of enabling TLS to securely send the token to our API. If you want to verify the signature, you can paste the public key in the debugger:
Generating the JWT using code or a tool is great for learning and exploring. A full-fledged identity solution however, has many more moving parts. One such part is an identity provider which holds identities, passwords and profile information. For our purposes, having a simple method to generate the token is sufficient. In the next section, we will secure the /since action and leave the /last action unsecured. That way, our mobile app keeps working!
Securing the API
Using the goa DSL, we can specify security parameters:
package design

import (
    . "github.com/goadesign/goa/design"
    . "github.com/goadesign/goa/design/apidsl"
)

var JWT = JWTSecurity("jwt", func() {
    Header("Authorization")
    Scope("api:read", "Provides read access")
})

var _ = Resource("measurement", func() {
    Files("/", "/public/index.html", func() {
        Description("Serve home page")
        NoSecurity()
    })

    Security(JWT, func() {
        Scope("api:read")
    })

    BasePath("/measurements")

    Action("last", func() {
        Description("Get last measurements")
        Routing(GET("/last/:number"))
        NoSecurity()
        Params(func() {
            Param("number", Integer, "Last number of measurements", func() {
                Minimum(1)
            })
        })
        Response(OK, ArrayOf(MeasurementMedia))
        Response(NotFound)
    })

    Action("since", func() {
        Description("Get measurements since current time minus a number of seconds")
        Routing(GET("/since/:seconds"))
        Params(func() {
            Param("seconds", Integer, "Number of seconds to subtract for current time", func() {
                Minimum(1)
            })
        })
        Response(OK, ArrayOf(MeasurementMedia))
        Response(NotFound)
        Response(Unauthorized)
    })
})
To add JWT security, the JWT variable is set with a call to JWTSecurity. In that call, we define the api:read scope. Inside the measurement resource, we add security with a call to Security, passing the JWT variable and specifying we require the api:read scope. Inside the last action, we use NoSecurity() to be able to call this action without passing a JWT.
Now you can run go generate (from the main.go folder) to generate the app again!
Sadly, adding these modifications is not enough. Some middleware will have to be added to make all of this work, as this example shows: https://github.com/goadesign/examples/tree/master/security. I added the file jwt.go the same folder as main.go, which is based on the example provided by the folks at goa:
package main

import (
    "fmt"
    "io/ioutil"
    "path/filepath"

    jwtgo "github.com/dgrijalva/jwt-go"

    "github.com/gbaeke/influx-rest/app"
    "github.com/goadesign/goa"
    "github.com/goadesign/goa/middleware/security/jwt"
)

func NewJWTMiddleware() (goa.Middleware, error) {
    keys, err := LoadJWTPublicKeys()
    if err != nil {
        return nil, err
    }
    return jwt.New(jwt.NewSimpleResolver(keys), nil, app.NewJWTSecurity()), nil
}

// LoadJWTPublicKeys loads PEM encoded RSA public keys used to validata and decrypt the JWT.
func LoadJWTPublicKeys() ([]jwt.Key, error) {
    keyFiles, err := filepath.Glob("./jwtkey/*.pub")
    if err != nil {
        return nil, err
    }
    keys := make([]jwt.Key, len(keyFiles))
    for i, keyFile := range keyFiles {
        pem, err := ioutil.ReadFile(keyFile)
        if err != nil {
            return nil, err
        }
        key, err := jwtgo.ParseRSAPublicKeyFromPEM([]byte(pem))
        if err != nil {
            return nil, fmt.Errorf("failed to load key %s: %s", keyFile, err)
        }
        keys[i] = key
    }
    if len(keys) == 0 {
        return nil, fmt.Errorf("couldn't load public keys for JWT security")
    }

    return keys, nil
}
The main action here is to load one or more public keys in PEM format that can be used to verify the JWT. The code looks for .pub files in the ./jwtkey folder so make sure you add influx.key.pub to that folder. NewJWTMiddleWare() creates the middleware which provides a way to validate the JWT.
Naturally, you need to load the middleware in main.go, after the middlewares that were generated:
// Mount security middlewares
jwtMiddleware, err := NewJWTMiddleware()
if err != nil {
    log.Fatal(err)
}
app.UseJWTMiddleware(service, jwtMiddleware)
That's it! Build your code and run it. Upon start, you should see:
2018/02/10 22:02:21 [INFO] mount ctrl=Measurement action=Last route=GET /measurements/last/:number
2018/02/10 22:02:21 [INFO] mount ctrl=Measurement action=Since route=GET /measurements/since/:seconds security=jwt
2018/02/10 22:02:21 [INFO] mount ctrl=Measurement files=/public/index.html route=GET /
2018/02/10 22:02:21 [INFO] listen transport=http addr=:80
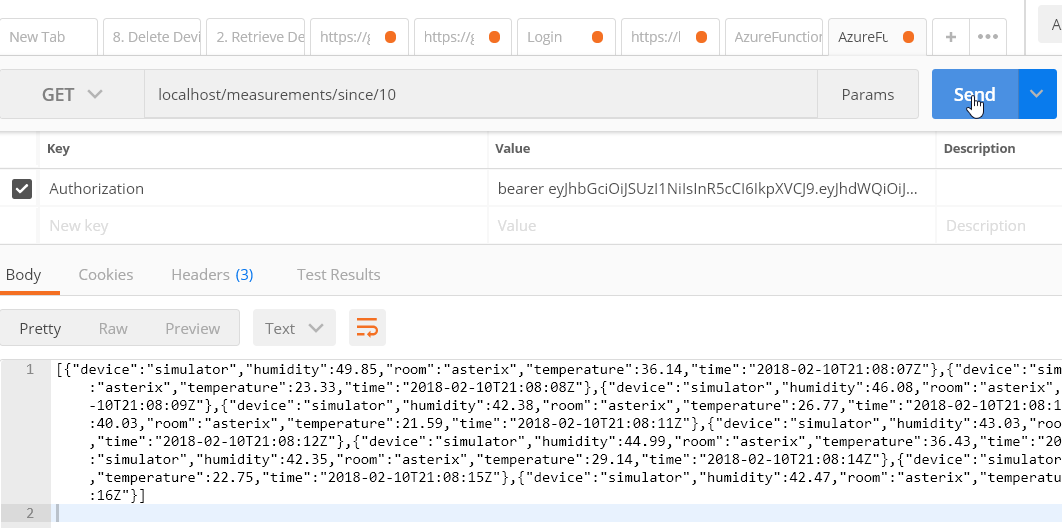
The Since (/since) action has jwt security. If you run the API on your local machine, port forward to the InfluxDB container and generate a JWT. Next, start Postman and try to connect to /since with the token:
 Now try to connect with an invalid token or without an Authorization header. An invalid token:
{"id":"b2rgSgVw","code":"jwt_security_error","status":401,"detail":"JWT validation failed"}
Without the header:
{"id":"Mnp4DTrh","code":"jwt_security_error","status":401,"detail":"missing header \"Authorization\""}
You should be able to connect to /last without authentication:
Now it is time to get this modified API running in Kubernetes. With everything you have seen until now, that should be a breeze. Do not forget to put the jwtkey folder and the .pub file in the container and make sure your application uses the correct path to load it. Good luck!