Installing Mosquitto
As described at https://mosquitto.org, Mosquitto is an open-source message broker that supports MQTT 3.1 and 3.1.1. Let's delve right in and explore how to install Mosquitto step by step.
Basic Installation
If you have a Kubernetes cluster deployed and you have installed and configured kubectl and helm you are ready to go! Let's install Mosquitto with helm. We will use the following Helm chart: https://github.com/smizy/charts/tree/master/mosquitto
First add the repository to Helm:
helm repo add smizy https://smizy.github.io/charts
To install the chart, you can use:
helm install smizy/mosquitto
If you use the above command, several resources will be deployed:
- Deployment (and underlying ReplicaSet)
- Pod that actually runs the Mosquitto container (using the image smizy/mosquitto:1.4.12-alpine at this time of writing)
- PersistentVolumeClaim that provisions persistent storage to the pod, even if it gets rescheduled to another node
- ConfigMap to hold Mosquitto configuration data
- Service to expose the MQTT service on TCP port 1883 to other pods in the cluster; by default only a ClusterIP is configured which means the service is not exposed to the outside world
Depending on where you run your Kubernetes cluster, the configuration of the persistent volume will be different. In Google Cloud for instance, a gcePersistentDisk will automatically be created by the dynamic provisioner. In Azure, the dynamic provisioner will also create a disk and attach it to the host. For Azure, you will have to add the storageClass because it uses default instead of standard:
helm install --set persistence.storageClass=default smizy/mosquitto
To obtain information about the created volume, issue the following command:
kubectl get pv
By default, a volume of 2GB is created and mounted on /mosquitto/data. The volume is used by the Mosquitto persistence database if persistence is configured. Check the Mosquitto documentation for more information about persistence. By default, persistence is not enabled which means data is in-memory only.
Talking about configuration of Mosquitto, the ConfigMap contains data which is mapped to a file in the container at /mosquitto/config/mosquitto.conf. The configuration is basic:
log_dest stdout
listener 1883
listener 9090
protocol websockets
Two listeners are defined. The first listener uses the mqtt protocol. Because mqtt is the default protocol, there is no need to configure the protocol explicitly. The second listener uses the websockets protocol, which allows browsers to talk to Mosquitto via a JavaScript library. In Realtime Browser Updates, we will use an alternative approach with Redis and the socket.io Node.js library instead of websockets support in Mosquitto. Note that the default Windows and Linux install packages are not compiled with websockets support.
If you want to see the configuration file in the container, first get a shell to the container:
kubectl exec -it your-Mosquitto-pod /bin/sh
Then issue this command:
cat /mosquitto/config/mosquitto.conf
To obtain the name of the pod, use:
kubectl get pods
Note that you have to use /bin/sh as the Mosquitto image is based on Alpine Linux. Of course, you can also just get information about the ConfigMap like so:
kubectl get configmap -o yaml
The output will be something like:
apiVersion: v1
items:
- apiVersion: v1
  data:
    mosquitto.conf: |-
      log_dest stdout
      listener 1883
      listener 9090
      protocol websockets
  kind: ConfigMap
  metadata:
    creationTimestamp: 2018-01-31T14:12:00Z
    labels:
      app: nordic-grizzly-mosquitto
      .....
You might wonder where the name nordic-grizzly comes from. Similar to Docker, when you deploy a Helm chart, the pod is given a random name. You can see the name in the output of the helm list command:
NAME            REVISION        UPDATED                         STATUS          CHART           NAMESPACE
nordic-grizzly  1               Wed Jan 31 15:12:00 2018        DEPLOYED        mosquitto-0.1.3 default
If you want to specify your own, potentially much more boring name, do the following during deployment:
helm install --name mqtt smizy/mosquitto
The name (or release name) of the installed chart will be mqtt. The pod name will start with mqtt-mosquitto followed by random text and the service will be called mqtt-mosquitto.
We don't actually want a default deployment so let's delete the chart:
helm delete <your-release-name> --purge
If you do not know the release name, use the helm list command.
Custom Installation
Instead of the default installation, we want to change a few things. If you check https://github.com/smizy/charts/tree/master/mosquitto, the Configuration section contains a table with a subset of parameters you can change. Many of the parameters are related with volume provisioning. For instance, if you want to set the size of the persistent disk to 4GB , use:
helm install --name mqtt --set persistence.size=4Gi smizy/mosquitto
If you want to set multiple parameters, seperate them with commas like so: --set param1=value,param2=value
The values.yaml file contains all the parameters that can be set:
# Default values for mosquitto.
# This is a YAML-formatted file.
# Declare variables to be passed into your templates.

image: smizy/mosquitto:1.4.12-alpine

imagePullPolicy: IfNotPresent

ingress:
  enabled: false

service:
  enabled: true
  type: "ClusterIP"

persistence:
  enabled: true
  accessMode: ReadWriteOnce
  size: 2Gi
  storageClass: standard

resources:
  requests:
    cpu: 50m
    memory: 100Mi

config: |-
  log_dest stdout
  listener 1883
  listener 9090
  protocol websockets
To be really precise, create your own values.yaml file and use it during helm install:
helm install --name mqtt -f values.yaml smizy/mosquitto
So, what exactly do we want to change in this configuration? For starters, we want to enable access to the MQTT broker from the Internet. In the values.yaml, modifying the service type to LoadBalancer should do the trick but that is not implemented in this chart. To play around with modifying the internals of a Helm chart, I have forked the smizy/charts to gbaeke/charts. Next, clone the gbaeke/charts repository to your local system to illustrate installing a chart from files on your machine:
git clone https://github.com/gbaeke/charts.git
The cloned repository has will have several changes that are implemented in the next few paragraphs. The service changes are as follows:
- mosquitto/values.yaml: type set to LoadBalancer (without the double quotes)
- mosquitto/templates/svc.yaml: in spec, type is set to Values.service.type which picks up the value set in values.yaml
If you cd into the cloned charts folder, you can issue the following command:
helm install --name mqtt ./mosquitto/
There is no need to use the -f flag because Helm will use the values.yaml in the mosquitto folder automatically.
With the above command, Kubernetes will provision a load balancer in your cloud environment. Use kubectl get svc to check the result. It should be like:
NAME             CLUSTER-IP      EXTERNAL-IP     PORT(S)          AGE
kubernetes       10.43.240.1     <none>          443/TCP          5h
mqtt-mosquitto   10.43.250.227   <your-LB-IP>    1883:30865/TCP   12m
To test your configuration, open two terminal windows. Make sure you have the Mosquitto client tools installed. On Ubuntu, use sudo apt-get mosquitto-clients. In the first window, type:
mosquitto_sub -h <your-LB-IP> -t mytopic
With the above command, you subscribe to a topic called mytopic. Whenever a message is published on that topic, it should appear. In the other window, type:
mosquitto_pub -h <your-LB-IP> -t mytopic -m Hello
You should see Hello appear in the first terminal window. Now that was not terribly difficult was it? The problem is that anyone can send messages to your server and that messages are sent in clear text. Let's see if we can do something about that!
Mosquitto Configuration
In the next sections, we will enable authentication and configure TLS security.
Authentication
Mosquitto supports several authentication options, including simple user names and passwords. To configure user names and passwords, you need to use a tool called mosquitto_passwd (part of the Mosquitto installation). For example, to add a new user, use the following command:
mosquitto_passwd -c /etc/mosquitto/passwd gbaeke
You will be asked for a password and the user name and password will be stored in /etc/mosquitto/passwd. Subsequently, you need to add two lines to mosquitto.conf:
password_file /etc/mosquitto/passwd
allow_anonymous false
The resulting passwd file will look like the text below: :
gbaeke:hashed_password
Let's make changes to the chart so that we can provide the passwd file and instruct Mosquitto to use it. First add the following to values.yaml:
passwd: |-
  mqttuser:$6$CugH57SaJ4bXB5Ui$jHWGbmIw1XmBCe9aIAbZHD7O45YeLbKOCAE4dTWz6LxT1yiek6CVcpMiJd3YUbVvfEo4ScpqT9JT60wLFN3vQA=
The above line defines a user called mqttuser with a password of test. Next, in the mosquitto/templates folder, create a new ConfigMap file called configmap-passwd.yaml with the following contents:
apiVersion: v1
kind: ConfigMap
metadata:
  name: mqtt-passwd
  labels:
    app: {{ template "fullname" . }}
    chart: {{ .Chart.Name }}-{{ .Chart.Version | replace "+" "_" }}
    release: {{ .Release.Name }}
    heritage: {{ .Release.Service }}
data:
  passwd: |-
{{- if .Values.passwd }}
{{ .Values.passwd | indent 4 }}
{{- end -}}
The file is essentially a copy of the other ConfigMap for mosquitto.conf. To use this ConfigMap, you need to modify deployment.yaml. Add the following lines under volumeMounts:
- name: passwd
  mountPath: /etc/mosquitto/passwd
  subPath: passwd
  readOnly: true
Under volumes, add the following:
- name: passwd
  configMap:
    name: mqtt-passwd
Modify values.yaml to actually use the passwd file and to turn off anonymous authentication:
config: |-
  log_dest stdout
  listener 1883
  listener 9090
  protocol websockets
  password_file /etc/mosquitto/passwd
  allow_anonymous false
If you deploy this modified chart directly from the cloned folders, Mosquitto will now require authentication. Test it with the command below:
mosquitto_pub -h <your-LB-IP> -t mytopic -m Hello -u mqttuser -P test
If you want to modify the passwd file, you can change the ConfigMap directly with kubectl edit cm mqtt-passwd. This will open your favourite editor vim which, if you are not used to it, can be a bit unintuitive. Type i to go in insert/edit mode, make your changes and then press ESC. Next, type :wq to save your changes and quit.
Now that the ConfigMap is changed, kill the Mosquitto pod with kubectl delete pod pod-name. Because the pod is part of a ReplicaSet which is responsible for keeping the pods it manages running, the Mosquitto pod will be recreated with the modified ConfigMap.
Making changes imperatively is usually not a good practice. It would be better to change the passwd configuration in the values.yaml file and then upgrade our release with helm upgrade mqtt . (if you are in the root folder of your chart, which contains the values.yaml file, specify the . after the release name). There is an issue however. When you change the passwd data in values.yaml and perform the upgrade, you will get a new ConfigMap but the running pod will not pick up the change. To force a recreation of the pod with the updated ConfigMap, there's a small trick you can use. Modify deployment.yaml as follows:
spec:
  strategy:
    type: Recreate
  template:
    metadata:
      labels:
        app: {{ template "fullname" . }}
        release: {{ .Release.Name }}
      annotations:
        checksum/config: {{ .Values.passwd | sha256sum }}
Find the above section in deployment.yaml, and add the two last lines under the line that says release. This effectively adds an annotation to the deployment's template that contains the hash of the passwd data in values.yaml. When you change that section, the hash will change, forcing a recreation of the pod.
TLS Security
I don't know about you, but I find configuring TLS and messing around with certificates extremely boring. Annoying as it may be, we have to configure it because we do not want our data and our usernames and passwords to be transmitted as clear text. There are several ways to enable TLS for Mosquitto. You could, for instance, put a reverse proxy like Nginx Plus in front of it and terminate the TLS connection at the proxy. Although such a solution is great, it is beyond the scope of this guide. Instead, we will provide our Mosquitto pod with the required key and certificate files and configure TLS in mosquitto.conf. Let's see how that works!
Let's first generate the certificates as described in https://mosquitto.org/man/mosquitto-tls-7.html. We use openssl to do all the work. You could also use a tool like cfssl.
openssl req -new -x509 -days 1000 -extensions v3_ca -keyout ca.key -out ca.crt
The above line generates the key and certificate for our certificate authority, which will issue the Mosquitto server certificate. Next, generate the Mosquitto server private key (2048 bits). The key is not protected with a password:
openssl genrsa -out server.key 2048
With this key, we can generate a CSR (certificate signing request):
openssl req -out server.csr -key server.key -new
A CSR is normally submitted to an actual certificate authority. In our case, we will use our self-signed CA to sign the Mosquitto server certificate:
openssl x509 -req -in server.csr -CA ca.crt -CAkey ca.key -CAcreateserial -out server.crt -days 1000
After this process, you will need the following files to configure Mosquitto for TLS:
- ca.crt: the certificate of our certificate authority
- server.key: the private key
- server.crt: the server's certificate
We need a way to provide the above files to our Mosquitto pod. In this case, we will use Kubernetes secrets to do so although the ca.crt file is not actually secret. We will create the secrets using kubectl with the following two commands:
kubectl create secret tls mqtt-tls --cert=server.crt --key=server.key

kubectl create secret generic mqtt-ca --from-file=./ca.crt
The first secret is specific for tls and takes the certificate and private key. The second secret is of the generic type and can contain anything including the contents of a file. Check the secrets with kubectl get secret. To get more info about a secret you can use kubectl get secret mqtt-tls -o yaml.
With the secrets in place, we can modify deployment.yaml in the Helm Chart to mount the secrets as files so we can reference these files in mosquitto.conf. Add the following content under volumeMounts:
 - name: tls-ca
   mountPath: /mosquitto/tls-ca
   readOnly: true
 - name: tls-server
   mountPath: /mosquitto/tls-server
   readOnly: true
Under volumes, add the following:
- name: tls-ca
  secret:
    secretName: mqtt-ca
- name: tls-server
  secret:
    secretName: mqtt-tls
Modify mosquitto.conf in values.yaml as follows:
config: |-
  log_dest stdout
  listener 8883
  password_file /etc/mosquitto/passwd
  allow_anonymous false
  cafile /mosquitto/tls-ca/ca.crt
  certfile /mosquitto/tls-server/tls.crt
  keyfile /mosquitto/tls-server/tls.key
As you can see, the port was changed to 8883, the standard for MQTT over TLS. You should also change the port elsewhere in values.yaml, in addition to deployment.yaml and svc.yaml.
With both the secrets and the chart modifications, a fresh deployment of the chart should only allow secure TLS connections. To easily test this, we will use MQTT.fx from http://www.mqttfx.org. You will need to provide the ca.crt file to the tool when you configure it for TLS.
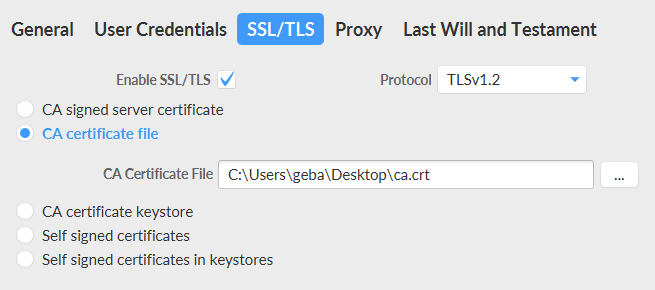
To test the connection, first create a connection profile. With the profile selected, press the Connect button and subscribe to a random channel:
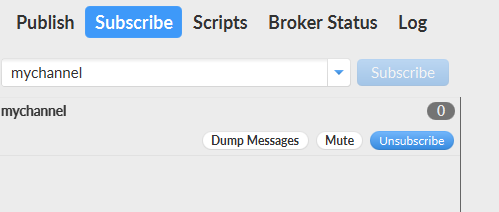
Next, publish a message to the channel and verify that you received it.
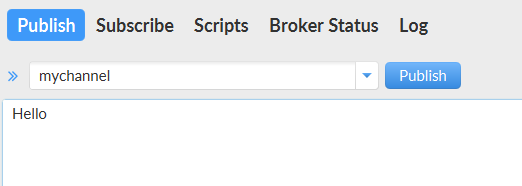
If this succeeded, you succesfully configured Mosquitto for TLS with a self-signed certificate. Of course, you should generate the secrets with the chart instead of manually creating them. I will leave that exercise to you! You can find the answer at https://github.com/gbaeke/charts in the mosquitto folder.