Docker Primer
In this section we will take a look at the essentials of Docker. This topic is huge so we will only scratch the surface. But hopefully, the next paragraphs give you just enough information to get started. If you feel you already know the basics, by all means skip this section.
To start, we will look at Docker in the context of packaging your own code. We will create a container image, push that image to a registry and run a container based on the image.
We will use some sample code, written in Go, that you can find here: https://github.com/gbaeke/realtime-go. Make sure you have git installed! Create a folder on your file system and run the following command to grab the code:
git clone https://github.com/gbaeke/realtime-go
If you want to learn more about git, take a look at http://rogerdudler.github.io/git-guide/ for an introduction.
The above command creates a folder called realtime-go with the code files. In that folder, you will find the following:
- main.go: webserver for socket.io on http://localhost:8888/socket.io and a web app at http://localhost:8888
- assets folder: contains index.html, a small Vue.js application that can display real time data
To run the code, you will need to install Go. In Go Primer you can find more information about installing Go. With Go installed, first use the following command to download the dependency on the go-socket.io package:
go get github.com/googollee/go-socket.io
There are other and better ways to work with dependencies in Go but for now, this will do just fine. The above command results in the folder %GOPATH%\src\github.com\googollee where %GOPATH% refers to the folder that you selected as your Go path. See https://github.com/golang/go/wiki/SettingGOPATH for more information.
You can now run the application with the following command:
go run main.go
Unless you have a Redis database running on port 6379, you will get an error. The application requires Redis as a backing Pub/Sub server and it is not available. Line 22 of the code generates the following error:
panic: dial tcp [::1]:6379: connectex: No connection could be made because the target machine actively refused it.

goroutine 1 [running]:
main.main()
        C:/Users/geba/realtime-go/main.go:22 +0x48c
exit status 2
We will get this fixed in a moment and run Redis in a container.
Starting a Docker Container
Before you can start a Docker container, you need to install Docker on your local machine. I bet you saw that coming way earlier than I did! You can find good installation instructions here if you use Windows 10, as I did.
Because our application depends on Redis, we will run it as a container on our local machine. In order to run a container, you need a container image. Virtually all well known (and lesser known) open source applications today have pre-built images. It will come as no surprise that this is also the case for Redis. The image can be found on Docker Hub at https://hub.docker.com/_/redis. That page contains instructions for running a Redis container:
docker run --name realtime-redis -d redis
The above command tells Docker to run a container and call it realtime-redis. The -d parameter runs the container in the background and gives you the container ID. Finally, the word redis at the end is the name of the image. Docker will automatically look for an image with that name on Docker Hub.
It is important to note that the Redis image first needs to be downloaded (or pulled) to your local machine. You can do that explicitly with docker pull redis or just let Docker figure it out and pull the image when needed.
Go ahead and try the above command to run a Redis container. Run the next command to list running containers:
docker container list
A list of running containers will be shown. The Redis container is in the list as:
CONTAINER ID        IMAGE   COMMAND                  CREATED             STATUS              PORTS       NAMES
87e89693dba1        redis   "docker-entrypoint.s…"   2 minutes ago       Up 2 minutes        6379/tcp    realtime-redis
You should be able to connect to your Redis container via redis-cli. If you do not have redis-cli installed on your local machine, or you do not want to, you can get a shell in your container:
docker container exec -it realtime-redis /bin/bash
With the container exec command, you can run an executable in the container. When you want to run a shell, like the bash shell above, also specify -it. Use docker container exec -h to find out more about parameters like -i or -t. Inside the shell, you can now run redis-cli which connects to localhost on port 6379 automatically.
Run the code again with go run main.go. Did it work? Probably not. The reason why it fails is that although the container exposes port 6379, that port is not mapped to a port on your local computer automatically. One option is to run the container with the -P flag. When you use -P, a random port on your computer gets mapped to the exposed port. You can find out which one with docker container list realtime-redis. You will see something like:
CONTAINER ID  IMAGE    COMMAND                  CREATED              STATUS              PORTS
d56225f5b42d  redis    "docker-entrypoint.s…"   About a minute ago   Up About a minute   0.0.0.0:32768->6379/tcp
Alternatively, we can use port mapping to map arbitrary ports. I prefer that approach above using -P. Let's remove the container and start it with port mapping. Run the following commands:
docker container stop realtime-redis
docker container rm realtime-redis
docker run --name realtime-redis -p 6379:6379 -d redis
The last command runs the container but maps port 6379 of your local machine to 6379 of the container. The reason why you need to map ports is that Docker uses its own networks local to your machine. You can see those networks with the following command:
docker network ls
Inspect the default bridge network with:
docker network inspect bridge
When you use inspect, you will see all the gory details including the containers that belong to the network and the IP range the container gets its IP address from.
When you run the code again, you should not get errors when it tries to connect to Redis. Great! Now open a browser to http://localhost:8888. A simple web app, written in Vue.js, will be shown:
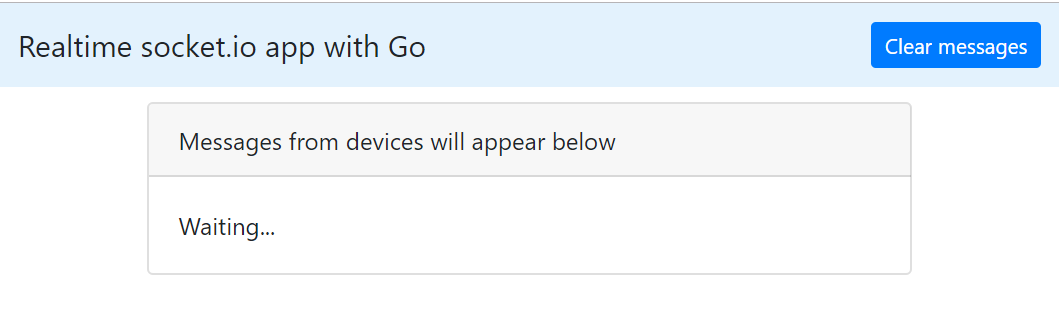 The app just sits there, waiting! In the background it has already done a few things though:
- it connected to the socket.io server at http://localhost:8888/socket.io
- it connected to the Redis server and subscribed to all channels using a pattern subscribe (PSUBSCRIBE)
- it sent a message to the socket.io server, asking to join a room called device01; that name is hardcoded in the Vue app
The application listens to all Redis channels. When it sees a message in a channel, it broadcasts the message to a socket.io room that matches the channel's name. If there are socket.io clients connected to that room, those clients will receive the message.
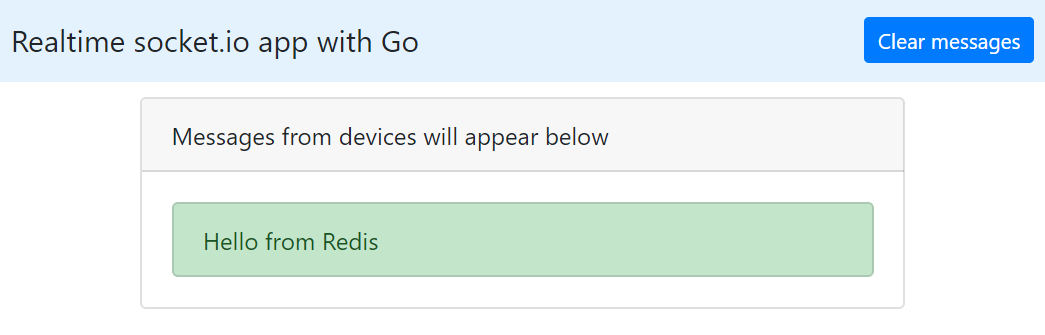
The only thing we need to do is to use the redis-cli command and publish a message to the device01 channel:
publish device01 "Hello from Redis"
The message will now be shown in the Vue app:
You did quite a lot in a short time already! You ran a container based on a pre-built public image on Docker Hub. Along the way you saw some basic, but useful commands to create, stop and remove containers. You also saw how to do port mapping and how to run commands or even a full shell inside the container.
Instead of just running containers from a pre-built image, we will now turn to building our own.
Building a Container Image
If you pulled the realtime-go repository from GitHub, the realtime-go folder contains a Dockerfile:
FROM golang:alpine

ADD realtime /go
ADD assets /go/assets

CMD ["/go/realtime"]
A Dockerfile contains instructions to build a container image. In this case, we start from an existing image called golang-alpine. You can find more information about this image in Docker Store. Next, our own image is built with the basic ADD and CMD commands. Those are just a subset of the commands you can use. Let's go through them one-by-one.
| Command | Description |
|---|---|
| ADD realtime /go | The golang:alpine image contains a folder called go. With the ADD command, we add the realtime file from our local machine to the /go folder in the container image. |
| ADD assets /go/assets | With this command, the folder assets and its content from our local machine is added to the /go folder in the container. We need to do this because this folder contains the Vue app in index.html. |
| CMD ["/go/realtime"] | CMD sets defaults for an executing container. These defaults can include an executable like in our example. When the executable (realtime) fails, the container will exit unless you set restart options or run the container in an orchestrator like Kubernetes. More information about CMD can be found here to understand why the command needs to be formatted with a JSON array (exec form versus shell form). |
The Dockerfile has all the necessary instructions to build our image. Try it with the following command:
docker image build -t realtimetest .
You should get the following result:
Sending build context to Docker daemon  90.11kB
Step 1/4 : FROM golang:alpine
alpine: Pulling from library/golang
4fe2ade4980c: Pull complete
2e793f0ebe8a: Pull complete
77995fba1918: Pull complete
6b343150750a: Pull complete
517b41dec3aa: Pull complete
Digest: sha256:c2c6c46c11319fd458a42aa3fc3b45e16bacb49e3f33f1e2a783f0122a9d8471
Status: Downloaded newer image for golang:alpine
 ---> c283ac5a8f78
Step 2/4 : ADD realtime /go
ADD failed: stat /var/lib/docker/tmp/docker-builder141063847/realtime: no such file or directory
The build requires the golang:alpine image which is pulled from Docker Hub. But the build fails because it cannot find the realtime file. You first need to compile the Go code to an executable with that name. If you are running on Windows or Mac, you will need to set an environment variable that instructs Go to build a Linux executable:
SET GOOS=linux
Then build the executable with:
go build -o realtime
Now you can build the image again. The output should be similar to the output below:
Sending build context to Docker daemon  10.52MB
Step 1/4 : FROM golang:alpine
 ---> c283ac5a8f78
Step 2/4 : ADD realtime /go
 ---> 142e8040ee08
Step 3/4 : ADD assets /go/assets
 ---> 5f4c1ae6fd94
Step 4/4 : CMD ["/go/realtime"]
 ---> Running in 609ba27ecff9
Removing intermediate container 609ba27ecff9
 ---> 0d2d73415e39
Successfully built 0d2d73415e39
Successfully tagged realtimetest:latest
SECURITY WARNING: You are building a Docker image from Windows against a non-Windows Docker host. All files and directories added to build context will have '-rwxr-xr-x' permissions. It
is recommended to double check and reset permissions for sensitive files and directories.
You now have a new container image called realtimetest. We used the -t flag to indicate we want to tag the image but we actually have not given the image a tag. The tag is behind the name like in realtimetest:v1. When there is no tag, the command will assume the tag latest. We tell Docker to use the Dockerfile from the current folder by using the . at the end. Note that we are using the new format of Docker commands. Instead of just docker build we use docker image build. The older form docker build still works but it is good to get used to the new style.
Use docker image list realtimetest to get more information about the image:
REPOSITORY          TAG                 IMAGE ID            CREATED             SIZE
realtimetest        latest              5ca0c524d07f        11 minutes ago      73.7MB
Note that the tag is latest as discussed above. We can now use the image to create a container that runs the application:
docker container run --name rt -p 8888:8888 -d realtimetest
We told Docker to spin up a container, based on the realtimetest image, give it the name rt and map port 8888 of our local machine to port 8888 of the container. Let's check the logs of this container with docker container logs rt:
panic: dial tcp 127.0.0.1:6379: connect: connection refused

goroutine 1 [running]:
main.main()
        C:/Users/geba/realtime-go/main.go:22 +0x485
Bummer! It seems that our application cannot connect to our Redis instance. When you think of it, that is not very surprising. From the point of view of the container, there is no Redis application running on 127.0.0.1! We will fix that later.
You have now seen how to create your own image to run an application in a container. It was a Go application, so we had to take care of some specifics for that environment like using golang:alpine and building the executable with go build. If you want to clean up your environment and experiment, the following commands will be useful:
- List running containers: docker container list
- Stop the running rt container: docker container stop rt
- Start the stopped rt container: docker container start rt
- Remove the stopped rt container: docker container rm rt
- Remove the realtimetest image with force: docker image rm realtimetest --force
In the next section, we will connect the realtime container with the Redis container.
Network Communications between Containers
The task ahead is clear: the realtime container needs to be able to check the Redis container for messages published to a channel. In order to achieve that, we will do two things:
- start the Redis container without port mapping; we will not use -P or -p because we do not need access to Redis from the Docker host (i.e. your computer that runs Docker)
- start the realtime container and link it to the Redis container
I will use legacy container links to accomplish the task because they are still quite common. In general, you should avoid using links and use user-defined networks instead.
Before starting, stop and delete the Redis and realtime containers. Next, start the Redis container like so:
docker run --name redis -d redis
We call the container redis and start it in the background. Plain and simple! The container is connected to the Docker bridge network and gets an IP address on that network.
We can now run the realtime container and link it to the Redis container. On my system, I built a new realtime image with a name of realtime and a tag of v1 (realtime:v1):
docker run --name rt -d -p 8888:8888 --link redis realtime:v1
You know most of the parameters by now. We still want to access the realtime container from the host so we map port 8888 of the host to port 8888 of the container.
There is an issue though. With the --link parameter, we instruct Docker to provide a tunnel to the container called redis. The name of the link is redis as well. When we link our containers this way, resolv.conf in the rt container is modified with an entry for redis and its IP address in the default bridge network. That means our realtime server can connect to the Redis container with a hostname of redis. We have two options to use that hostname in our code:
- modify the source code and replace localhost with redis
- modify the source code and use an environment variable instead of localhost; we can then specify the contents of the environment variable when we run the rt container
We will use the second approach as it is a common pattern to use environment variables to configure containers.
First add this extra function above main():
func getEnv(key, fallback string) string {
    value, exists := os.LookupEnv(key)
    if !exists {
        value = fallback
    }
    return value
}
This function takes two parameters: the environment variable you want to check and the value you want to return if the environment variable is not set.
Then modify the code in main() that sets up the Redis connection:
// redis connection
client := redis.NewClient(&redis.Options{
    Addr: getEnv("REDISHOST", "localhost:6379"),
})
The getEnv function is used to retrieve the value of the REDISHOST environment variable. If it is not set, the code will try to connect to localhost:6379. Do not forget to build the executable with go build. You also need to build the container image realtime:v1 again.
Now remove the rt container and issue the command below which also sets the REDISHOST environment variable:
docker run --name rt -d -p 8888:8888 --env REDISHOST=redis --link redis realtime:v1
You should now be able to connect to http://localhost:8888 with both socket.io and Redis running in a container.
Setting environment variables inside a container is a technique you will use a lot, also with Kubernetes. We will not spend more time on Docker networking because our main focus will be on Kubernetes. It uses different techniques to connect containers to each other.
Creating Small Go Images
Most of the code in this book is written in Go, so we need to take a look at techniques to create an optimal Docker image. One of the ways to optimize an image is to reduce the image size. The smaller the image, the quicker you can push and pull it and the least amount of storage is consumed. In this section, multistage builds will be used to build your executable in one container and then include it in another. Although you can just build your executable manually and then include it in a small image, I prefer a multistage build for consistency.
Let's see how this works by creating the following Dockerfile:
# First step: build Go app
FROM golang:1.10

RUN mkdir -p /go/src/github.com/gbaeke/influx-rest
WORKDIR /go/src/github.com/gbaeke/influx-rest
COPY . .

ENV CGO_ENABLED=0

RUN go get -d -v ./...
RUN go build -v ./...

# Second step: build image from scratch
FROM scratch
COPY --from=0 /go/src/github.com/gbaeke/influx-rest/influx-rest /
ADD public /public
ADD jwtkey /jwtkey

CMD ["/influx-rest"]
The above Dockerfile can be used with the REST API from REST API to InfluxDB. Let's discuss it step-by-step. In the first stage, we use the golang:1.10 image from Docker Hub which contains all the tools you need to build Go apps with that version. On my physical machine, the code is under the src folder at github.com/gbaeke/influx-rest. We create a folder /go/src/github.com/gbaeke/influx-rest in the build container to match. This is required because our code references packages within that folder structure (in the app folder under influx-rest). Then we copy the code from my local machine to the build container (all files and folders).
Next, we set the environment variable CGO_ENABLED to 0 using the ENV statement. This turns off cgo support. Some packages, such as the net package, use cgo to link with C libraries. When you turn off cgo support, a native Go implementation will be used. We need to do this because the image we will create in the second step is based on scratch which contains absolutely nothing. So no C libraries either! There are other ways to achieve the same result, but if you are not using C with your Go code anyway it is easier to just turn off cgo.
Next, we run the command go get -d -v ./... This command can download and install packages and dependencies. With -d you instruct go get to not install the packages and just download them. With -v you ask for verbose output which is handy during the build process. Go get starts from the current folder (./) and then goes down recursively (...).
When the downloads are finished, the build process can start. The end result is an executable called influx-rest in the /go/src/github.com/gbaeke/influx-rest folder. We will need to get that file from the build container and pass it to the second stage.
The second stage image is built from the scratch image. See https://hub.docker.com/_/scratch/ for more information about this empty image. Much ado about nothing! In the scratch image, we copy influx-rest from the build container to the root path / and also copy some files that our executable needs.
Now we are ready to build this image from the path that contains the above Dockerfile:
docker image build -t gbaeke/influx-rest .
Although the build step is very fast, you will have to wait a while for the download of the packages in the go get step. When the downloads are finished and the build succeeds, you should have a relatively small image:
REPOSITORY          TAG                 IMAGE ID            CREATED             SIE
influx-rest         latest              a3a1d7157b7f        41 minutes ago      9.96MB
The image is only 9.96MB in size, just a bit larger than the size of the executable and the extra files.
You have now see how to build a small image for you Go application. In the section where we build Go applications, we will use the golang:alpine image. The reason for this is that we sometimes want a shell in our application. If you use scratch, you do not have the ability to start a shell because it does not contain the required executables and libraries. For brevity, we will typically use a Dockerfile like the one below for influx-rest in REST API to InfluxDB:
FROM golang:alpine

ADD influx-rest /

ADD public /public

ADD jwtkey /jwtkey

CMD ["/influx-rest"]
If you prefer to use golang:alpine with a multistage build in the upcoming chapters, you can use the multistage Dockerfile above and replace scratch with golang:alpine. That image will still be around 280MB though.
A smaller image for realtime-go
Earlier in this chapter, you built a container for realtime-go based on the golang-alpine image. That image is way too big if you ask me. We can do a lot better!
With the Dockerfile below, you can build a container image that is about 10.5MB large:
# First step: build Go app
FROM golang:1.11.2

RUN mkdir -p /go/src/realtime
WORKDIR /go/src/realtime
COPY . .

ENV CGO_ENABLED=0

RUN go get -d -v ./...
RUN go build -o realtime -v ./...

# Second step: build image from scratch
FROM scratch
COPY --from=0 /go/src/realtime /
ADD assets /assets

CMD ["/realtime"]
To build the image, just use the command below:
docker build -t your_image_name:your_tag .
I used the above command like so:
docker build -t gbaeke/realtime-go .
I also pushed the image to a public repository on Docker Hub:
docker push gbaeke/realtime-go
If you want to use this image yourself, you can always pull it or include it in a Docker compose file or Kubernetes YAML file. The example below shows how you can use the image with Azure Container Instances (ACI):
apiVersion: 2018-06-01
location: westeuope
name: realtime-app
properties:
  containers:
  - name: realtime-service
    properties:
      image: gbaeke/realtime-go
      resources:
        requests:
          cpu: 1
          memoryInGb: 0.5
      ports:
      - port: 8888
  - name: realtime-redis
    properties:
      image: library/redis
      resources:
        requests:
          cpu: 1
          memoryInGb: 1.5
      ports:
      - port: 6379
  osType: Linux
  ipAddress:
    dnsNameLabel: realtime-go-app
    type: Public
    ports:
    - protocol: tcp
      port: '8888'
    - protocol: tcp
      port: '6379'
  restartPolicy: Always
tags: null
type: Microsoft.ContainerInstance/containerGroups
We will take a look at Azure Container Instances later where we will reuse the above configuration file.