Adding an Ingress Controller
In REST API to InfluxDB, we created a REST API without authentication and http. That leaves a lot of room for improvement so let's start with configuring the service for https. In Installing Mosquitto, we configured TLS by creating a Kubernetes secret that holds the private key and certificate and by mounting that secret in the filesystem of the Mosquitto container. In mosquitto.conf, we point to the certificate and private key to configure TLS in the container itself.
To configure HTTPS for the REST API, we will use an Ingress Controller. The TLS connection will be terminated at the Ingress Controller, with a regular HTTP connection to the API. That way we do not have to configure TLS directly in the container.
Ingress Controllers can be implemented in many ways, often depending on the cloud environment:
- Azure AKS: no automatic provisioning of an Ingress Controller; you can deploy the nginx-ingress chart using helm install --name release-name stable/nginx-ingress (see https://github.com/kubernetes/charts/tree/master/stable/nginx-ingress); the nginx Ingress Controllers needs to be accessible on the Internet so make sure you expose the deployment with type LoadBalancer
- Google Cloud Platform: HTTP load balancers are used; see https://cloud.google.com/compute/docs/load-balancing/http; when you configure Ingress resources in Kubernetes, a HTTP load balancer is provisioned automatically much like a deployment of a layer 4 load balancer
No matter how the Ingress Controller is implemented, you configure ingress capabilities by creating Ingress resources. An Ingress resource is just another Kubernetes API object (like a pod or deployment) that, in this case, manages external access to services in a cluster. Let's look at an example Ingress definition in YAML (from the Kubernetes documentation):
apiVersion: extensions/v1beta1
kind: Ingress
metadata:
  name: test
  annotations:
    ingress.kubernetes.io/rewrite-target: /
spec:
  rules:
  - host: foo.bar.com
    http:
      paths:
      - path: /foo
        backend:
          serviceName: s1
          servicePort: 80
      - path: /bar
        backend:
          serviceName: s2
          servicePort: 80
The above Ingress resource states that, when a request for foo.bar.com comes in, the path should be extracted. Depending on the path, the request is sent to a different backend. From this example, it is clear that the Ingress Controller works at the application layer (http). The above Ingress resource is an example of fanout.
Of course, you can also tell the backing http load balancer to route requests based on the host header. This means that, if you have multiple services like web sites and a bunch of APIs, you can use one http load balancer to route traffic to all of these services. This negates the need to expose all those services on their own public IP address. An example of such a configuration (from the Kubernetes documentation) is shown below:
apiVersion: extensions/v1beta1
kind: Ingress
metadata:
  name: test
spec:
  rules:
  - host: foo.bar.com
    http:
      paths:
      - backend:
          serviceName: s1
          servicePort: 80
  - host: bar.foo.com
    http:
      paths:
      - backend:
          serviceName: s2
          servicePort: 80
To show you how Ingress resources work, we will configure a simple Ingress resource that routes requests to our API using http. We will add TLS later. But first, in the influx-rest service, switch the type from LoadBalancer to NodePort. We do not want Internet access via a standard load balancer. Use the command below to edit the service:
kubectl edit service influx-rest
When you exit the editor (:wq remember?), the configuration will be changed if your changes were correct. Run kubectl get svc to verify that the external address was removed. We set the type to NodePort because that effectively opens up a port on each host that forwards to your service. The Ingress Controller load balances between the NodePorts.
Note that the use of a NodePort service is required if the load balancer is external to Kubernetes. If you are following along with GKE (Google Kubernetes Engine), that is indeed the case. However, if you are using an Ingress Controller like nginx-ingress, the service can be configured with ClusterIP only.
Now create the Ingress resource YAML:
apiVersion: extensions/v1beta1
kind: Ingress
metadata:
  name: influx-rest-ingress
spec:
  backend:
    serviceName: influx-rest
    servicePort: 80
If you use nginx, also add the following annotation: kubernetes.io/ingress.class: nginx
Create the resource with kubectl apply -f your-Ingress.yaml and then use kubectl get ingress to see the Ingress resources. Use kubectl describe ingress influx-rest-ingress to see more details:
Name:                   influx-rest-ingress
Namespace:              default
Address:                <your-Ingress-IP>
Default backend:        influx-rest:80 (10.40.1.54:80,10.40.2.24:80)
...
If you wait for the provisioning of the http load balancer, the public IP address will be shown. Use the curl command to see if you can reach the API!
Well, did it work? Depending on the cloud environment you work with, there might be an issue. If you use Google Cloud Platform, Google provisions an http load balancer which requires a 200 OK response from /. Because our Influx REST API does not return such a response, the http load balancer marks the backend as unhealthy and refuses to forward traffic. If you want to fix this issue, implement the steps below in Modifying the REST API.
Modifying the REST API
To return http status code 200 when you request http://ingress-IP, just add the code below to resources.go (design folder), within the measurements resource:
Files("/", "/public/index.html", func() {
  Description("Serve home page")
})
When a request comes in for /, we serve index.html in /public. Easy! Next, run go generate to update the generated code.
Because we reference /public/index.html, add a folder called public in the root folder of your project and create the index.html file inside of it. You will also need that folder in your container so modify the Dockerfile:
FROM golang:alpine

ADD influx-rest /

ADD public /public

CMD ["/influx-rest"]
The command ADD public /public makes sure the public folder and its contents are copied to the root folder. If you just use ADD public / you will only copy index.html to the root folder.
Next, run the commands to build the Linux executable, build the container image and upload that image to Docker Hub. Delete your existing pods so that they will be rebuilt with the new image.
Adding TLS
Now comes the fun part: adding TLS! There are several approaches we can take:
- obtain a certificate manually (e.g. from https://www.sslforfree.com/ which uses Let's Encrypt), add the files to a secret and create an Ingress resource with a reference to the secret
- obtain a certificate automatically and renew it automatically; this requires installing extra components that can perform those tasks; you will also have to create other objects such as Issuers and Certificates
Let's not choose the easy way and go for the second method. The steps you have to take are outlined below:
- install cert-manager (see https://github.com/jetstack/cert-manager); this component takes care of requesting and renewing certificates; we will use Let's Encrypt with http verification
- create an appropriate Ingress resource; we will use nginx-ingress now to make the procedure work in any environment
- create an Issuer resource that uses Let's Encrypt
- create a Certificate resource that tells cert-manager what to do
You will also need access to a domain where you can create an A record. I use my domain (baeke.info) to create a record called influx.baeke.info that points to the external IP address of the Ingress Controller. The procedures below were tested on GKE.
Installing cert-manager
The easiest way to install cert-manager is via Helm. The installation instructions can be found at https://github.com/jetstack/cert-manager/blob/master/docs/user-guides/deploying.md. Follow them to the letter! At the time of this writing, v0.2.3 was the most recent version. I deployed cert-manager to a GKE cluster.
Note that if your cluster uses RBAC, which is the default in GKE 1.7+, you need to take care to grant Tiller, the server-side component of Helm the required access rights. Use the procedure at https://github.com/kubernetes/helm/blob/master/docs/rbac.md if RBAC applies to you. At the time of this writing, Azure AKS did not support RBAC yet.
After the installation of cert-manager, you will find a cert-manager deployment in kube-system. Use kubectl get pods --namespace=kube-system to find it:
NAME                        DESIRED   CURRENT   UP-TO-DATE   AVAILABLE   AGE
cert-manager-cert-manager   1         1         1            1           1d
Ingress
Next, we create the Ingress resource. As discussed above, we will use nginx-ingress as the Ingress Controller so make sure you install it with Helm:
helm install stable/nginx-ingress
Without the --name parameter, you will get a random release name. Mine was altered-poodle:
NAME                                                            READY     STATUS    RESTARTS   AGE
altered-poodle-nginx-ingress-controller-68789d9d66-vn5nt        1/1       Running   0          4h
altered-poodle-nginx-ingress-default-backend-7cf575f4f5-ddmgp   1/1       Running   0          4h
The YAML for the Ingress resource can be written as follows (modify it for your domain):
apiVersion: extensions/v1beta1
kind: Ingress
metadata:
 name: influx-baeke-info
 annotations:
      kubernetes.io/ingress.class: nginx
spec:
 rules:
  - host: influx.baeke.info
    http:
     paths:
     - backend:
         serviceName: influx-rest
         servicePort: 80
 tls:
   - hosts:
     - influx.baeke.info
     secretName: influx-baeke-info-tls
Note that we set the Ingress class to nginx here instead of gke. The ingress definition (in the spec) makes sure that requests for host influx.baeke.info get directed to our influx-rest service. The influx-rest service is of type ClusterIP!
When you connect to http://influx.baeke.info, you will get redirected to the https URL:
curl http://influx.baeke.info

<html>
<head><title>308 Permanent Redirect</title></head>
<body bgcolor="white">
<center><h1>308 Permanent Redirect</h1></center>
<hr><center>nginx/1.13.8</center>
</body>
</html>
Tip: if the secret does not exist when you create the Ingress resource, use the flag --validate=false with kubectl apply.
Issuer
cert-manager can work with multiple issuers.As issuer is basically a source of X.509 certificates. In our case, we will use Let's Encrypt as our issuer. With the ACME protocol, which stands for Automated Certificate Management Environment, the interactions between the Let's Encrypt certificate authority and components that require certificates can be be automated. In order for cert-manager to know that it should request certificates from Let's Encrypt, an issues has to be created.
To create an issuer for the Let's Encrypt staging environment, create the following YAML file:
apiVersion: certmanager.k8s.io/v1alpha1
kind: Issuer
metadata:
  name: letsencrypt-staging
  namespace: default
spec:
  acme:
    # The ACME server URL
    server: https://acme-staging.api.letsencrypt.org/directory
    # Email address used for ACME registration
    email: <your-email>
    # Name of a secret used to store the ACME account private key
    privateKeySecretRef:
      name: letsencrypt-staging
    # Enable the HTTP-01 challenge provider
    http01: {}
Note the server property, set to https://acme-staging.api.letsencrypt.org/directory. Certificates requested via staging will not be properly recognized by your browser. When you are testing however, it is recommended to use staging.
To also create an issuer for the Let's Encrypt production environment, use the following YAML file:
apiVersion: certmanager.k8s.io/v1alpha1
kind: Issuer
metadata:
  name: letsencrypt-prod
  namespace: default
spec:
  acme:
    # The ACME server URL
    server: https://acme-v01.api.letsencrypt.org/directory
    # Email address used for ACME registration
    email: <your-email>
    # Name of a secret used to store the ACME account private key
    privateKeySecretRef:
      name: letsencrypt-prod
    # Enable the HTTP-01 challenge provider
    http01: {}
Of course, do not forget to create these resources with kubectl apply -f filename.
Certificates issued via the above issuer will be properly recognized by most browers.
When you request a certificate for a domain, you will have to provide proof you are the owner of that domain. Let's Encrypt will challenge you, over HTTP or DNS, for proof. The above issuers have been configured to use the http challenger. This means that Let's Encrypt will connect to your server and request a specific file from it. Because we are dealing with an automated process here, cert-manager will make sure Let's Encrypt can successfully challenge you by automatically providing access to the http resource.
Creating the certificate
You can probably guess it already? Indeed, we need to create a certificate resource. Use the YAML file below (modify it for your domain):
apiVersion: certmanager.k8s.io/v1alpha1
kind: Certificate
metadata:
  name: influx-baeke-info
  namespace: default
spec:
  secretName: influx-baeke-info-tls
  issuerRef:
    name: letsencrypt-prod
  commonName: influx.baeke.info
  dnsNames:
  - influx.baeke.info
  acme:
    config:
    - http01:
        ingress: influx-baeke-info
      domains:
      - influx.baeke.info
You need to make sure that the secretName is the same one as in the Ingress resource. We use the Let's Encrypt production environment, by referring to the Issuer we created earlier (see issuerRef above). In http01, we set ingress to the name of our ingress resource. cert-manager will modify it to make the http challenge succeed.
If everything is setup correctly, you can create the certificate with kubectl apply -f your-cert.yaml. Next, use kubectl describe certificate your-cert-name. If the automated process succeeds, you should get a new secret called influx-baeke-info-tls (based on my example YAML above). Get its contents with:
kubectl get secret influx-baeke-info-tls -o yaml
The result will be (tls.crt and tls.key contents abbreviated):
apiVersion: v1
data:
  tls.crt: LS0tL...
  tls.key: LS0tL...
kind: Secret
metadata:
  creationTimestamp: 2018-02-09T11:13:36Z
  name: influx-baeke-info-tls
  namespace: default
  resourceVersion: "1446100"
  selfLink: /api/v1/namespaces/default/secrets/influx-baeke-info-tls
  uid: 45f9f1bf-0d8a-11e8-85af-42010a8401a8
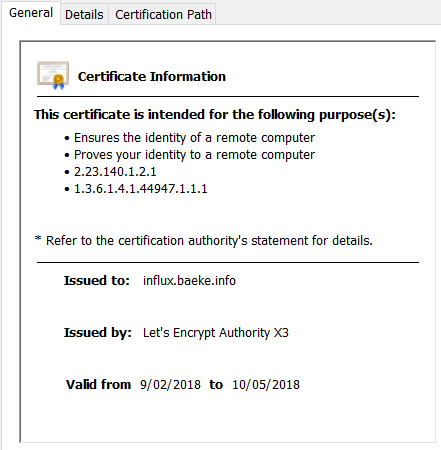
The Ingress Controller, via the ingress resource that uses the above secret, can now properly establish a TLS connection:

If you delete the secret, it will automatically be recreated. The result from kubectl describe certificate influx-baeke-info will be:
Name:           influx-baeke-info
Namespace:      default
Labels:         <none>
Events:
  FirstSeen     LastSeen        Count   From                    SubObjectPath   Type            Reason                Message
  ---------     --------        -----   ----                    -------------   --------        ------                -------
  4h            15s             2       cert-manager-controller                 Warning         ErrorCheckCertificate Error checking existing TLS certificate: secret "influx-baeke-info-tls" not found
  4h            15s             2       cert-manager-controller                 Normal          PrepareCertificate    Preparing certificate with issuer
  4h            15s             2       cert-manager-controller                 Normal          IssueCertificate      Issuing certificate...
  4h            14s             2       cert-manager-controller                 Normal          CeritifcateIssued     Certificated issued successfully
  4h            14s             4       cert-manager-controller                 Normal          RenewalScheduled      Certificate scheduled for renewal in 1438 hours
Note that the certificate is scheduled for renewal in 1438 hours. Indeed, the Let's Encrypt certificates have a short lifetime:
Modifying the Mobile App
You can now modify services.js and use https in api_url:
var api_url = 'https://influx.baeke.info/measurements/last/'
If you used Ionic Creator before, you can modify that code as well and you will be able to test the app right from within Creator!
With https configured properly, we can proceed with authentication for the REST API.